$ mn create-app my-app --features security-jwt
Table of Contents
Micronaut Security
Official Security Solution for Micronaut
Version: 1.1.2.BUILD-SNAPSHOT
1 Introduction
Micronaut Security is a fully featured and customizable security solution for your applications.
Getting Started
|
Using the CLI
If you are creating your project using the Micronaut CLI, supply either the |
To use the Micronaut’s security capabilities you must have the security dependency on your classpath. For example in build.gradle:
build.gradle
annotationProcessor "io.micronaut:micronaut-security"
compile "io.micronaut:micronaut-security"
Enable security capabilities with:
| Property | Type | Description |
|---|---|---|
|
boolean |
If Security is enabled. Default value false |
|
java.util.List |
Map that defines the interception patterns. |
|
java.util.List |
Allowed IP patterns. Default value (["0.0.0.0"]) |
Once you enable security, Micronaut returns HTTP Status Unauthorized (401) for any endpoint invocation.

2 Authentication Providers
To authenticate users you must provide implementations of AuthenticationProvider.
The following code snippet illustrates a naive implementation:
@Singleton
public class AuthenticationProviderUserPassword implements AuthenticationProvider {

    @Override
    public Publisher<AuthenticationResponse> authenticate(AuthenticationRequest authenticationRequest) {
        if (authenticationRequest.getIdentity().equals("user") && authenticationRequest.getSecret().equals("password")) {
            return Flowable.just(new UserDetails("user", new ArrayList<>()));
        }
        return Flowable.just(new AuthenticationFailed());
    }
}
The built-in Login Controller uses every available authentication provider. Authentication strategies, such as basic auth, where the credentials are present in the request use the available authentication providers too.
Micronaut ships with DelegatingAuthenticationProvider which can be typically used in environments such as the one described in the following diagram.

DelegatingAuthenticationProvider is not enabled unless you provide implementations for UserFetcher,
PasswordEncoder and AuthoritiesFetcher
| Read the LDAP and Database authentication providers to learn more. |
3 Security Rules
The decision to allow access to a particular endpoint to anonymous or authenticated users is determined by a collection of Security Rules. Micronaut ships with several built-in security rules. If they don’t fulfil your needs, you can implement your own SecurityRule.
3.1 IP Pattern Rule
When you turn on security, traffic coming from any ip address is allowed by default.
You can however reject traffic not coming from a white list of IP Patterns as illustrated below:
micronaut:
  security:
    enabled: true
    ip-patterns:
      - 127.0.0.1
      - 192.168.1.*
In the previous code, the IpPatternsRule rejects traffic not coming
either 127.0.0.1 or 192.168.1.* range.
3.2 Secured Annotation
As illustrated below, you can use Secured annotation to configure access at Controller or Controller’s Action level.
@Controller("/example")
@Secured(SecurityRule.IS_AUTHENTICATED) (1)
public class ExampleController {

    @Produces(MediaType.TEXT_PLAIN)
    @Get("/admin")
    @Secured({"ROLE_ADMIN", "ROLE_X"}) (2)
    public String withroles() {
        return "You have ROLE_ADMIN or ROLE_X roles";
    }

    @Produces(MediaType.TEXT_PLAIN)
    @Get("/anonymous")
    @Secured(SecurityRule.IS_ANONYMOUS)  (3)
    public String anonymous() {
        return "You are anonymous";
    }

    @Produces(MediaType.TEXT_PLAIN)
    @Get("/authenticated") (1)
    public String authenticated(Authentication authentication) {
        return authentication.getName() + " is authenticated";
    }
}| 1 | Authenticated users are able to access authenticated Controller’s action. |
| 2 | Users granted role ROLE_ADMIN or ROLE_X roles can access withroles Controller’s action. |
| 3 | Anonymous users (authenticated and not authenticated users) can access anonymous Controller’s action. |
Alternatively, you could use JSR_250 annotations (javax.annotation.security.PermitAll, javax.annotation.security.RolesAllowed, javax.annotation.security.DenyAll):
@Controller("/example")
public class ExampleController {

    @Produces(MediaType.TEXT_PLAIN)
    @Get("/admin")
    @RolesAllowed({"ROLE_ADMIN", "ROLE_X"}) (1)
    public String withroles() {
        return "You have ROLE_ADMIN or ROLE_X roles";
    }

    @Produces(MediaType.TEXT_PLAIN)
    @Get("/anonymous")
    @PermitAll  (2)
    public String anonymous() {
        return "You are anonymous";
    }
}| 1 | Users granted role ROLE_ADMIN or ROLE_X roles can access withroles Controller’s action. |
| 2 | Anonymous users (authenticated and not authenticated users) can access anonymous Controller’s action. |
3.3 Intercept URL Map
Moreover, you can configure endpoint authentication and authorization access with an Intercept URL Map:
micronaut:
  security:
    enabled: true
    intercept-url-map:
      -
        pattern: /images/*
        http-method: GET
        access:
          - isAnonymous() (1)
      -
        pattern: /books
        access:
          - isAuthenticated() (2)
      -
        pattern: /books/grails
        http-method: GET
        access:
          - ROLE_GRAILS (3)
- ROLE_GROOVY| 1 | Enable access to authenticated and not authenticated users |
| 2 | Enable access for everyone authenticated |
| 3 | Enable access for users who are granted any of the specified roles. |
As you see in the previous code listing, any endpoint is identified by a combination of pattern and an optional HTTP Method
3.4 Built-In Endpoints Security
When you turn on security, Built-in endpoints are secured depending on their sensitive value.
endpoints:
  beans:
    enabled: true
    sensitive: true (1)
  info:
    enabled: true
sensitive: false (2)| 1 | /beans endpoint is secured |
| 2 | /info endpoint is open for unauthenticated access. |
4 Authentication Strategies
4.1 Basic Auth
Out-of-the-box, Micronaut supports RFC7617 which defines the "Basic" Hypertext Transfer Protocol (HTTP) authentication scheme, which transmits credentials as user-id/password pairs, encoded using Base64.
Once you enable Micronaut security, Basic Auth is enabled by default.
micronaut:
  security:
    enabled: true
The following sequence illustrates the authentication flow:

Below is a sample of a cURL command using basic auth:
cURL command using Basic Auth
curl "http://localhost:8080/info" \
     -u 'user:password'
After credentials are read from the HTTP Header, they are feed into an Authenticator which attempts to validate them.
The code snippet below illustrates how to send credentials using the basicAuth method from MutableHttpRequest method:
Accessing a protected resource using an Authorization request header
HttpRequest request = HttpRequest.GET("/home").basicAuth('sherlock', 'password')The following configuration properties are available to customize basic authentication behaviour:
| Property | Type | Description |
|---|---|---|
|
boolean |
Enables BasicAuthTokenReader. Default value true. |
|
java.lang.String |
Http Header name. Default value {@value io.micronaut.http.HttpHeaders#AUTHORIZATION}. |
|
java.lang.String |
Http Header value prefix. Default value {@value io.micronaut.http.HttpHeaderValues#AUTHORIZATION_PREFIX_BASIC}. |
| Read the Basic Authentication Micronaut Guide to learn more. |
4.2 Session Authentication
Micronaut supports Session based authentication.
|
Using the CLI
If you are creating your project using the Micronaut CLI, supply either the $ mn create-app my-app --features security-session |
To use the Micronaut’s session based authentication capabilities you must have the security-session dependency on your classpath. For example in build.gradle:
build.gradle
annotationProcessor "io.micronaut:micronaut-security"
compile "io.micronaut:micronaut-security-session"
The following sequence illustrates the authentication flow:

The following configuration properties are available to customize session based authentication behaviour:
| Property | Type | Description |
|---|---|---|
|
java.lang.String |
Sets the login success target URL. Default value ("/"). |
|
java.lang.String |
Sets the login failure target URL. Default value ("/"). |
|
java.lang.String |
Sets the logout target URL. Default value ("/"). |
|
java.lang.String |
Sets the unauthorized target URL. |
|
java.lang.String |
Sets the forbidden target URL. |
|
boolean |
Sets whether the session config is enabled. Default value (false). |
|
boolean |
Decides whether the deprecated {@link SessionSecurityFilterOrderProvider} is loaded, instead of the new RedirectRejectionHandler. Defaults to (true). |
Example of Session-Based Authentication configuration
micronaut:
  security:
    enabled: true
    endpoints:
      login:
        enabled: true
      logout:
        enabled: true
    session:
      enabled: true
login-failure-target-url: /login/authFailed| Read the Session-Based Authentication Micronaut Guide to learn more. |
4.3 JSON Web Token
The following configuration properties are available to customize token based authentication:
| Property | Type | Description |
|---|---|---|
|
boolean |
Sets whether the configuration is enabled. Default value true. |
|
java.lang.String |
Name of the roles property. Default value "roles". |
Micronaut ships with security capabilities based on Json Web Token (JWT). JWT is an IETF standard which defines a secure way to encapsulate arbitrary data that can be sent over unsecure URL’s.
|
Using the CLI
If you are creating your project using the Micronaut CLI, supply the $ mn create-app my-app --features security-jwt |
To use the Micronaut’s JWT based authentication capabilities you must have the security-jwt dependency on your classpath. For example in build.gradle:
build.gradle
annotationProcessor "io.micronaut:micronaut-security"
compile "io.micronaut:micronaut-security-jwt"
The following configuration properties are available to customize JWT based authentication behaviour:
| Property | Type | Description |
|---|---|---|
|
boolean |
Sets whether JWT security is enabled. Default value (false). |
What does a JWT look like?
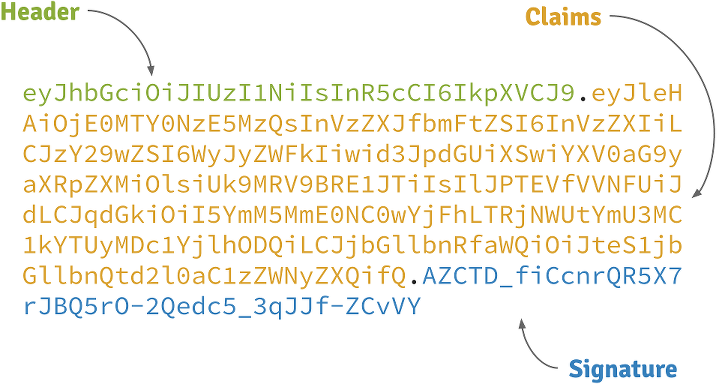
Header
A base64-encoded JSON like:
JWT header
{
    "alg": "HS256",
    "typ": "JWT"
}
Claims
A base64-encoded JSON like:
JWT claims
{
    "exp": 1422990129,
    "sub": "jimi",
    "roles": [
        "ROLE_ADMIN",
        "ROLE_USER"
    ],
    "iat": 1422986529
}
Signature
Depends on the algorithm specified on the header, it can be a digital signature of the base64-encoded header and claims, or an encryption of them.
4.3.1 Reading JWT Token
4.3.1.1 Bearer Token Reader
Micronaut supports the RFC 6750 Bearer Token specification for transmitting JWT tokens. The following sequence illustrates the RFC 6750 authentication flow:

The following configuration properties are available to customize how the Bearer Token will be read:
| Property | Type | Description |
|---|---|---|
|
boolean |
Set whether to enable bearer token authentication. Default value true. |
|
java.lang.String |
Sets the header name to use. Default value {@value io.micronaut.http.HttpHeaders#AUTHORIZATION}. |
|
java.lang.String |
Sets the prefix to use for the auth token. Default value {@value io.micronaut.http.HttpHeaderValues#AUTHORIZATION_PREFIX_BEARER}. |
Sending tokens in the request
The code snippet below illustrates how to send a JWT token in the Authorization request header, using the bearerAuth method from MutableHttpRequest method:
Accessing a protected resource using an Authorization request header
String accessToken = rsp.body().accessToken
List<Book> books = gatewayClient.toBlocking().retrieve(HttpRequest.GET("/api/gateway")
        .bearerAuth(accessToken), Argument.listOf(Book))
Example of HTTP GET request using Authorization request header
GET /protectedResource HTTP/1.1
Host: micronaut.example`
Authorization: Bearer eyJhbGciOiJIUzI1NiJ9.eyJleHAiOjE0MjI5OTU5MjIsInN1YiI6ImppbWkiLCJyb2xlcyI6WyJST0xFX0FETUlOIiwiUk9MRV9VU0VSIl0sImlhdCI6MTQyMjk5MjMyMn0.rA7A2Gwt14LaYMpxNRtrCdO24RGrfHtZXY9fIjV8x8o| Check out the Micronaut JWT Authentication guide for a tutorial on Micronaut’s JWT support. |
4.3.1.2 Cookie Token Reader
You can send/read a JWT token from a Cookie too.
The following sequence illustrates the authentication flow:

Reading tokens from Cookies is disabled by default. Note that using JWT tokens from cookies requires JWT Authentication to be enabled.
| Property | Type | Description |
|---|---|---|
|
java.lang.String |
Sets the domain name of this Cookie. |
|
java.lang.String |
Sets the path of the cookie. Default value ("/". |
|
java.lang.Boolean |
Whether the Cookie can only be accessed via HTTP. Default value (true. |
|
java.lang.Boolean |
Sets whether the cookie is secured. Default value (true. |
|
java.time.Duration |
Sets the maximum age of the cookie. |
|
boolean |
Sets whether JWT cookie based security is enabled. Default value (false). |
|
java.lang.String |
Sets the logout target URL. Default value ("/"). |
|
java.lang.String |
Cookie Name. Default value ("JWT"). |
|
java.lang.String |
Sets the login success target URL. Default value ("/"). |
|
java.lang.String |
Sets the login failure target URL. Default value ("/"). |
| Read the Micronaut JWT Authentication with Cookies to learn more. |
4.3.2 JWT Token Generation
Micronaut relies on Nimbus JOSE + JWT library to provide JWT token signature and encryption.
The following configuration options are available:
| Property | Type | Description |
|---|---|---|
|
java.lang.Integer |
Refresh token expiration. By default refresh tokens, do not expire. |
|
java.lang.Integer |
Access token expiration. Default value (3600). |
4.3.2.1 JWT Signature
Micronaut security capabilities use signed JWT’s as specified by the JSON Web Signature specification.
To enable a JWT signature in token generation, you need to have in your app a bean of type RSASignatureGeneratorConfiguration,
ECSignatureGeneratorConfiguration,
SecretSignatureConfiguration qualified with name generator.
To verify signed JWT tokens, you need to have in your app a bean of type RSASignatureConfiguration, RSASignatureGeneratorConfiguration, ECSignatureGeneratorConfiguration, ECSignatureConfiguration, or SecretSignatureConfiguration.
You can setup a SecretSignatureConfiguration named generator easily via configuration properties:
micronaut:
  security:
    enabled: true
    token:
      jwt:
        enabled: true
        signatures:
          secret:
            generator:
              secret: pleaseChangeThisSecretForANewOne (1)
jws-algorithm: HS256 (2)| 1 | Change this for your own secret and keep it safe. |
| 2 | Json Web Token Signature name. In this example, HMAC using SHA-256 hash algorithm. |
You can supply the secret with Base64 encoding.
micronaut:
  security:
    enabled: true
    token:
      jwt:
        enabled: true
        signatures:
          secret:
            generator:
              secret: 'cGxlYXNlQ2hhbmdlVGhpc1NlY3JldEZvckFOZXdPbmU=' (1)
              base64: true (2)
jws-algorithm: HS256| 1 | Secret Base64 encoded |
| 2 | Signal that the secret is Base64 encoded |
4.3.2.2 Encrypted JWTs
Signed claims prevents an attacker to tamper its contents to introduce malicious data or try a privilege escalation by adding more roles. However, the claims can be decoded just by using Base 64.
If the claims contains sensitive information, you can use a JSON Web Encryption algorithm to prevent them to be decoded.
To enable a JWT encryption in token generation, you need to have in your app a bean of type RSAEncryptionConfiguration,
ECEncryptionConfiguration,
SecretEncryptionConfiguration qualified with name generator.
Example of JWT Signed with Secret and Encrypted with RSA
Setup a SecretSignatureConfiguration through configuration properties
micronaut:
  security:
    enabled: true
    token:
      jwt:
        enabled: true
        signatures:
          secret:
            generator:
              secret: pleaseChangeThisSecretForANewOne (1)
              jws-algorithm: HS256 (2)
pem:
path: /home/user/rsa-2048bit-key-pair.pem (2)| 1 | Name the Signature configuration generator to make it participate in JWT token generation. |
| 2 | Location of PEM file |
Generate a 2048-bit RSA private + public key pair:
openssl genrsa -out rsa-2048bit-key-pair.pem 2048@Named("generator") (1)
@Singleton
class RSAOAEPEncryptionConfiguration implements RSAEncryptionConfiguration {
private RSAPrivateKey rsaPrivateKey
private RSAPublicKey rsaPublicKey
JWEAlgorithm jweAlgorithm = JWEAlgorithm.RSA_OAEP_256
EncryptionMethod encryptionMethod = EncryptionMethod.A128GCM
RSAOAEPEncryptionConfiguration(@Value('${pem.path}') String pemPath) {
Optional<KeyPair> keyPair = KeyPairProvider.keyPair(pemPath)
if (keyPair.isPresent()) {
this.rsaPublicKey = (RSAPublicKey) keyPair.get().getPublic()
this.rsaPrivateKey = (RSAPrivateKey) keyPair.get().getPrivate()
}
}
@Override
RSAPublicKey getPublicKey() {
return rsaPublicKey
}
@Override
RSAPrivateKey getPrivateKey() {
return rsaPrivateKey
}
@Override
JWEAlgorithm getJweAlgorithm() {
return jweAlgorithm
}
@Override
EncryptionMethod getEncryptionMethod() {
return encryptionMethod
}
}| 1 | Name Bean generator to designate this bean as participant in the JWT Token Generation. |
To parse the PEM key, use a collaborator as described in OpenSSL key generation.
@Slf4j
class KeyPairProvider {
    /**
     *
     * @param pemPath Full path to PEM file.
     * @return returns KeyPair if successfully for PEM files.
     */
    static Optional<KeyPair> keyPair(String pemPath) {
        // Load BouncyCastle as JCA provider
        Security.addProvider(new BouncyCastleProvider())

        // Parse the EC key pair
        PEMParser pemParser
        try {
            pemParser = new PEMParser(new InputStreamReader(Files.newInputStream(Paths.get(pemPath))))
            PEMKeyPair pemKeyPair = (PEMKeyPair) pemParser.readObject()

            // Convert to Java (JCA) format
            JcaPEMKeyConverter converter = new JcaPEMKeyConverter()
            KeyPair keyPair = converter.getKeyPair(pemKeyPair)
            pemParser.close()

            return Optional.of(keyPair)

        } catch (FileNotFoundException e) {
            log.warn("file not found: {}", pemPath)

        } catch (PEMException e) {
            log.warn("PEMException {}", e.getMessage())

        } catch (IOException e) {
            log.warn("IOException {}", e.getMessage())
        }
        return Optional.empty()
    }
}
4.3.3 JWT Token Validation
Micronaut’s JWT validation support multiple Signature and Encryption configurations.
Any beans of type RSASignatureConfiguration, ECSignatureConfiguration, SecretSignatureConfiguration participate as signature configurations in the JWT validation.
Any beans of type RSAEncryptionConfiguration, ECEncryptionConfiguration, SecretEncryptionConfiguration participate as encryption configurations in the JWT validation.
4.3.3.1 Validation with remote JWKS
A JSON Web Key (JWK) is a JSON object that represents a cryptographic key. You can use a remote JWK Set, A JSON object that represents a set of JWKs, to validate JWT signatures.
You can configure a remote JWKS as a signature validator:
micronaut:
  security:
    enabled: true
    token:
      jwt:
        enabled: true
        signatures:
          jwks:
            awscognito:
              url: 'https://cognito-idp.eu-west-1.amazonaws.com/eu-west-XXXX/.well-known/jwks.json'
The previous snippet creates a JwksSignature bean with a awscognito name qualifier.
If you want to expose your own JWK Set, read the Keys Controller section.
4.3.4 Claims Generation
If the built-in JWTClaimsSetGenerator, does not fulfil your needs you can provide your own replacement of ClaimsGenerator.
For example, if you want to add the email address of the user to the JWT Claims you could create a class which extends UserDetails:
public class EmailUserDetails extends UserDetails {

    private String email;

    public EmailUserDetails(String username, Collection<String> roles) {
        super(username, roles);
    }


    public EmailUserDetails(String username, Collection<String> roles, String email) {
        super(username, roles);
        this.email = email;
    }

    public String getEmail() {
        return email;
    }

    public void setEmail(String email) {
        this.email = email;
    }
}
Configure your AuthenticationProvider to respond such a class:
@Singleton
public class CustomAuthenticationProvider implements AuthenticationProvider {

    @Override
    public Publisher<AuthenticationResponse> authenticate(AuthenticationRequest authenticationRequest) {
        return Flowable.just(new EmailUserDetails("sherlock", Collections.emptyList(), "sherlock@micronaut.example"));
    }
}
And then replace JWTClaimsSetGenerator with a bean that overrides the method populateWithUserDetails:
@Singleton
@Replaces(bean = JWTClaimsSetGenerator.class)
public class CustomJWTClaimsSetGenerator extends JWTClaimsSetGenerator {

    public CustomJWTClaimsSetGenerator(TokenConfiguration tokenConfiguration,
                                       @Nullable JwtIdGenerator jwtIdGenerator,
                                       @Nullable ClaimsAudienceProvider claimsAudienceProvider,
                                       @Nullable ApplicationConfiguration applicationConfiguration) {
        super(tokenConfiguration, jwtIdGenerator, claimsAudienceProvider, applicationConfiguration);
    }

    @Override
    protected void populateWithUserDetails(JWTClaimsSet.Builder builder, UserDetails userDetails) {
        super.populateWithUserDetails(builder, userDetails);
        if (userDetails instanceof EmailUserDetails) {
            builder.claim("email", ((EmailUserDetails)userDetails).getEmail());
        }
    }
}
4.3.5 Token Render
When you use JWT authentication and the built-in LoginController, the JWT tokens are returned to the client as part of an OAuth 2.0 RFC6749 access token response.
An example of such a response is:
HTTP/1.1 200 OK
Content-Type: application/json;charset=UTF-8
Cache-Control: no-store
Pragma: no-cache
{
    "access_token":"eyJhbGciOiJIUzI1NiJ9...",
    "token_type":"Bearer",
    "expires_in":3600,
    "refresh_token":"tGzv3JOkF0XG5Qx2TlKWIA...",
    "username": "euler",
    "roles": [
        "ROLE_USER"
    ],
}
If you wish to customize the previous JSON payload, you may want to provide a bean replacement for BearerTokenRenderer. If that is not enough, check the AccessRefreshTokenLoginHandler to accommodate it to your needs.
4.4 LDAP Authentication
Micronaut supports authentication with LDAP out of the box. To get started, add the security-ldap dependency to your application.
build.gradle
compile "io.micronaut.configuration:micronaut-security-ldap"| Read the LDAP and Database authentication providers to see an example. |
4.4.1 Configuration
The LDAP authentication in Micronaut supports configuration of one or more LDAP servers to authenticate with. Each server has it’s own settings and can be enabled or disabled.
| Property | Type | Description |
|---|---|---|
|
boolean |
Sets whether this configuration is enabled. Default true. |
| Property | Type | Description |
|---|---|---|
|
java.lang.String |
Sets the server URL. |
|
java.lang.String |
Sets the manager DN. |
|
java.lang.String |
Sets the manager password. |
|
java.lang.String |
Sets the context factory class. Default "com.sun.jndi.ldap.LdapCtxFactory" |
| Property | Type | Description |
|---|---|---|
|
boolean |
Sets if the subtree should be searched. Default true |
|
java.lang.String |
Sets the base DN to search. |
|
java.lang.String |
Sets the search filter. Default "(uid={0})" |
|
java.lang.String[] |
Sets the attributes to return. Default all |
| Property | Type | Description |
|---|---|---|
|
boolean |
Sets if group search is enabled. Default false |
|
boolean |
Sets if the subtree should be searched. Default true |
|
java.lang.String |
Sets the base DN to search from. |
|
java.lang.String |
Sets the group search filter. Default "uniquemember={0}" |
|
java.lang.String |
Sets the group attribute name. Default "cn" |
4.4.2 Extending Default Behavior
This section will outline some common requirements that will require custom code to implement and describe what to do in those cases.
Authentication Data
The authentication object returned from a successful authentication request is by default an instance of UserDetails, which only contains the username and any roles associated with the user. To store additional data in the authentication, extend UserDetails with your own implementation that has fields for the additional data you wish to store.
To use this new implementation, you must override the DefaultContextAuthenticationMapper and provide your own implementation.
MyContextAuthenticationMapper.java
@Singleton
@Replaces(DefaultContextAuthenticationMapper.class) (1)
public class MyContextAuthenticationMapper implements ContextAuthenticationMapper {

    @Override
    public AuthenticationResponse map(ConvertibleValues<Object> attributes, String username, Set<String> groups) {
        // return an extended UserDetails or an AuthenticationFailed object
    }
}| 1 | The usage of @Replaces will allow your bean to replace the default implementation in the context |
Groups
By default the groups found in LDAP, if enabled, will be returned as is without any processing. No additional groups from any other sources will be added to the list. It is a common requirement to retrieve additional groups from other sources, or to normalize the names of the groups in a specific format.
To extend this behavior, it is necessary to create your own implementation of LdapGroupProcessor. Likely it will be desired to extend the default implementation because it has the logic for querying the groups from LDAP and executes the other methods to process the groups and query for additional groups.
MyLdapGroupProcessor.java
@Singleton
@Replaces(DefaultLdapGroupProcessor.class) (1)
public class MyLdapGroupProcessor extends DefaultLdapGroupProcessor {

    Set<String> getAdditionalGroups(LdapSearchResult result) { (2)
        //Use the result to query another source for additional groups (database, etc)
    }

    Optional<String> processGroup(String group) { (3)
        //convert "Admin" to "ROLE_ADMIN" for example
        //return an empty optional to exclude the group
    }
}| 1 | The usage of @Replaces will allow your bean to replace the default implementation in the context |
| 2 | The getAdditionalGroups method allows you to add groups from other sources |
| 3 | The processGroup method allows you to transform the name of the group, or exclude it |
Search Logic
To customize how LDAP searches are done, replace the default implementation with your own. See LdapSearchService.
MyLdapSearchService.java
@Singleton
@Replaces(DefaultLdapSearchService.class)
public class MyLdapSearchService implements LdapSearchService {

}
Context Building
To customize how the LDAP context is built, replace the default implementation with your own. See ContextBuilder.
MyContextBuilder.java
@Singleton
@Replaces(DefaultContextBuilder.class)
public class MyContextBuilder implements ContextBuilder {

}
5 Rejection Handling
Micronaut allows the customization of the response that is sent when a request is not authorized to access a resource, or is not authenticated and the resource requires authentication.
To control this response, it is necessary to register a RejectionHandler and ensure your bean replaces the default implementation.
If both beans (UnauthorizedRejectionUriProvider, ForbiddenRejectionUriProvider) exists, then RedirectRejectionHandler,
a generic redirect handler, is registered as a RejectionHandler.
You can create your own RejectionHandler. You will need to replace the current RejectionHandler.
For those using JWT based security, replace HttpStatusCodeRejectionHandler.
For example:
@Singleton
@Replaces(HttpStatusCodeRejectionHandler.class)
public class MyRejectionHandler extends HttpStatusCodeRejectionHandler {

    @Override
    public Publisher<MutableHttpResponse<?>> reject(HttpRequest<?> request, boolean forbidden) {
        //Let the HttpStatusCodeRejectionHandler create the initial request
        //then add a header
        return Flowable.fromPublisher(super.reject(request, forbidden))
                .map(response -> response.header("X-Reason", "Example Header"));
    }
}
For those using session based security, replace SessionSecurityfilterRejectionHandler.
If you are using session based security to use the RedirectRejectionHandler you will need to disable SessionSecurityfilterRejectionHandler with micronaut.security.session.legacy-redirect-handler: false.
|
6 Token Propagation
Imagine you have a Gateway microservice which consumes three other microservices:

If the incoming request localhost:8080/api/books contains a valid JWT token, you may want to propagate
that token to other requests in your network.
You can configure token propagation to achieve that.
micronaut:
    application:
        name: gateway
    security:
        enabled: true
        token:
            jwt:
                enabled: true
                signatures:
                    secret:
                        generator:
                            secret: "pleaseChangeThisSecretForANewOne"
                            jws-algorithm: HS256
            writer:
                header:
                    enabled: true
                    headerName: "Authorization"
                    prefix: "Bearer "
            propagation:
                enabled: true
                service-id-regex: "http://localhost:(8083|8081|8082)"
The previous configuration, configures a HttpHeaderTokenWriter and a and a propagation filter, TokenPropagationHttpClientFilter, which will propagate the security token seamlessly.
If you use Service Discovery features, you can use the service id in your service id regular expression:
micronaut.security.token.propagation.service-id-regex="catalogue|recommendations|inventory"| Read the Token Propagation tutorial to learn more. |
7 Built-In Security Controllers
7.1 Login Controller
You can enable LoginController with configuration property:
| Property | Type | Description |
|---|---|---|
|
boolean |
Enables LoginController. Default value false |
|
java.lang.String |
Path to the LoginController. Default value "/login" |
The response of the Login Endpoint is handled by a bean instance of LoginHandler.
Login Endpoint invocation example
Login Endpoint invocation example
curl -X "POST" "http://localhost:8080/login" \
     -H 'Content-Type: application/json; charset=utf-8' \
     -d $'{
  "username": "euler",
  "password": "password"
}'
7.2 Logout Controller
You can enable LogoutController with configuration property:
| Property | Type | Description |
|---|---|---|
|
boolean |
Enables LogoutController. Default value false. |
|
java.lang.String |
Path to the LogoutController. Default value "/logout". |
|
boolean |
Enables HTTP GET invocations of LogoutController. Default value (false). |
Each bean of type LogoutHandler gets invoked.
If you are using JWT authentication, you may not need to invoke the /logout endpoint. Since logging out normally means simply deleting access, refresh JWT tokens at the client side.
|
Logout Endpoint invocation example
Login Endpoint invocation example
curl -X "POST" "http://localhost:8080/logout"7.3 Refresh Controller
| This controller can only be enabled if you are using JWT authentication. |
By default, issued access tokens expire after a period of time, and they are paired with refresh tokens. To ease the refresh, you can enable OauthController, with configuration property:
| Property | Type | Description |
|---|---|---|
|
boolean |
Sets whether the OauthController is enabled. Default value (false). |
|
java.lang.String |
Sets the path to map the OauthController to. Default value ("/oauth/access_token"). |
The controller exposes an endpoint as defined by section 6 of the OAuth 2.0 spec - Refreshing an Access Token.
By default, issued Refresh tokens never expire, and can be used to obtain a new access token by sending a POST request to the /oauth/access_token endpoint:
Sample HTTP request to obtain an access token
POST /myApp/oauth/access_token HTTP/1.1
Host: micronaut.example
Content-Type: application/x-www-form-urlencoded

grant_type=refresh_token&refresh_token=eyJhbGciOiJSU0EtT0FFUCIsImVuYyI6IkEyNTZHQ00ifQ....
As you can see, is a form request with 2 parameters:
grant_type: must be refresh_token always.
refresh_token: the refresh token obtained previously.
| By default refresh tokens never expire, they must be securely stored in your client application. See section 10.4 of the OAuth 2.0 spec for more information. |
7.4 Keys Controller
| This controller can only be enabled if you are using JWT authentication. |
A JSON Web Key (JWK) is a JSON object that represents a cryptographic key. The members of the object represent properties of the key, including its value.
Meanwhile, a JWK Set is a JSON object that represents a set of JWKs. The JSON object MUST have a "keys" member, which is an array of JWKs.
You can enable the KeysController to expose an endpoint which returns a JWK Set. You can configure it with:
| Property | Type | Description |
|---|---|---|
|
boolean |
Enables KeysController. Default value false. |
|
java.lang.String |
Path to the KeysController. Default value "/keys". |
Moreover, you will need to provide beans to type JwkProvider.
8 Retrieve the authenticated user
Often you may want to retrieve the authenticated user.
You can bind java.security.Principal as a method’s parameter in a controller.
import io.micronaut.context.annotation.Requires;
import io.micronaut.core.util.CollectionUtils;
import io.micronaut.http.annotation.Controller;
import io.micronaut.http.annotation.Get;
import io.micronaut.security.annotation.Secured;
import javax.annotation.Nullable;
import java.security.Principal;

@Controller("/user")
public class UserController {

    @Secured("isAnonymous()")
    @Get("/myinfo")
    public Map myinfo(@Nullable Principal principal) {
        if (principal == null) {
            return Collections.singletonMap("isLoggedIn", false);
        }
        return CollectionUtils.mapOf("isLoggedIn", true, "username", principal.getName());
    }
}
If you need a greater level of detail, you can bind Authentication as a method’s parameter in a controller.
import io.micronaut.context.annotation.Requires;
import io.micronaut.core.util.CollectionUtils;
import io.micronaut.http.annotation.Controller;
import io.micronaut.http.annotation.Get;
import io.micronaut.security.annotation.Secured;
import io.micronaut.security.authentication.Authentication;
import javax.annotation.Nullable


@Controller("/user")
public class UserController {

    @Secured("isAnonymous()")
    @Get("/myinfo")
    public Map myinfo(@Nullable Authentication authentication) {
        if (authentication == null) {
            return Collections.singletonMap("isLoggedIn", false);
        }
        return CollectionUtils.mapOf("isLoggedIn", true,
                "username", authentication.getName(),
                "roles", authentication.getAttributes().get("roles")
        );
    }
}
8.1 User outside of a controller
If you need to access the currently authenticated user outside of a controller, you can inject SecurityService bean, which provides a set of convenient methods related to authentication and authorization.
9 Security Events
Micronaut security classes generate several ApplicationEvents which you can subscribe to.
Event Name |
Description |
Triggered when an unsuccessful login takes place. |
|
Triggered when a successful login takes place. |
|
Triggered when the user logs out. |
|
Triggered when a token is validated. |
|
Triggered when a JWT access token is generated. |
|
Triggered when a JWT refresh token is generated. |
To learn how to listen for events, see the Context Events section of the documentation.