$ mn create-app my-app --features picocli
Table of Contents
Micronaut Picocli Configuration
Provides integration between Micronaut and Picocli
Version: 1.2.0
1 Introduction
Picocli is a command line parser that supports usage help with ANSI colors, autocomplete and nested subcommands. It has an annotations API to create command line applications with almost no code, and a programmatic API for dynamic uses like creating Domain Specific Languages.
From the project Readme page:
How it works: annotate your class and picocli initializes it from the command line arguments, converting the input to strongly typed data. Supports git-like subcommands (and nested sub-subcommands), any option prefix style, POSIX-style grouped short options, password options, custom type converters and more. Parser tracing facilitates troubleshooting.
It distinguishes between named options and positional parameters and allows both to be strongly typed. Multi-valued fields can specify an exact number of parameters or a range (e.g.,
0..*,1..2). Supports Map options like-Dkey1=val1 -Dkey2=val2, where both key and value can be strongly typed.It generates polished and easily tailored usage help and version help, using ANSI colors where possible. Picocli-based command line applications can have TAB autocompletion, interactively showing users what options and subcommands are available. Picocli can generate completion scripts for bash and zsh, and offers an API to easily create a JLine
Completerfor your application.
Micronaut features dedicated support for defining picocli Command instances. Micronaut applications built with picocli can be deployed with or without the presence of an HTTP server.
Combining picocli with Micronaut makes it easy to provide a rich, well-documented command line interface for your Microservices.
2 Setting up Picocli
|
Using the CLI
If you are creating your project using the Micronaut CLI, supply the |
To add support for Picocli to an existing project, you should first add the picocli dependency and the Micronaut picocli configuration to your build configuration.
compile 'info.picocli:picocli'<dependency>
<groupId>info.picocli</groupId>
<artifactId>picocli</artifactId>
</dependency>
compile 'io.micronaut.configuration:micronaut-picocli:1.2.0'<dependency>
<groupId>io.micronaut.configuration</groupId>
<artifactId>micronaut-picocli</artifactId>
<version>1.2.0</version>
</dependency>Configuring picocli
Picocli does not require configuration. See other sections of the manual for configuring the services and resources to inject.
3 Generating a Picocli Project
To create a project with picocli support using the Micronaut CLI, use the create-cli-app command.
This will add the dependencies for the picocli feature, and set the profile of the generated project to cli, so the create-command command is available to generate additional commands.
The main class of the project is set to the *Command class (based on the project name - e.g., hello-world will generate HelloWorldCommand):
$ mn create-cli-app my-cli-app
The generated command looks like this:
my.cli.app.MyCliAppCommand.java generated by
create-cli-apppackage my.cli.app;
import io.micronaut.configuration.picocli.PicocliRunner;
import io.micronaut.context.ApplicationContext;
import picocli.CommandLine;
import picocli.CommandLine.Command;
import picocli.CommandLine.Option;
import picocli.CommandLine.Parameters;
@Command(name = "my-cli-app", description = "...",
mixinStandardHelpOptions = true) (1)
public class MyCliAppCommand implements Runnable { (2)
@Option(names = {"-v", "--verbose"}, description = "...") (3)
boolean verbose;
public static void main(String[] args) throws Exception {
PicocliRunner.run(MyCliAppCommand.class, args); (4)
}
public void run() { (5)
// business logic here
if (verbose) {
System.out.println("Hi!");
}
}
}| 1 | The picocli @Command annotation designates this class as a command. The mixinStandardHelpOptions attribute adds --help and --version options to it. |
| 2 | By implementing Runnable or Callable your application can be executed in a single line (<4>) and picocli takes care of handling invalid input and requests for usage help (<cmd> --help) or version information (<cmd> --version). |
| 3 | An example option. Options can have any name and be of any type. The generated code contains this example boolean flag option that lets the user request more verbose output. |
| 4 | PicocliRunner lets picocli-based applications leverage the Micronaut DI container. PicocliRunner.run first creates an instance of this command with all services and resources injected, then parses the command line, while taking care of handling invalid input and requests for usage help or version information, and finally invokes the run method. |
| 5 | Put the business logic of the application in the run or call method. |
Running the Application
Now you can build the project and start the application. The build will create a ${project-name}-all.jar with all dependencies in build/libs.
Running this jar from Java will run the generated MyCliAppCommand.
$ java -jar build/libs/my-cli-app-0.1-all.jar -v
Picocli Feature
Alternatively, to create a project with picocli support using the Micronaut CLI, supply the picocli feature to the features flag.
$ mn create-app my-picocli-app --features picocli
This will create a project with the service profile that has the minimum necessary configuration for picocli.
Note that no command is generated and the main class of the project is set to the default Application class.
Cli Profile
It is also possible to create a project with the create-app command and the --profile=cli flag.
This will create a Micronaut app with picocli support, without an HTTP server (although you can add one if you desire).
The cli profile provides a command for generating picocli commands and subcommands.
$ mn create-app example --profile cli
Note that the main class of the project is set to the default Application class.
If you want a picocli command to be the main class of this application, you need to first generate a command with create-command:
$ cd example
$ ../mn
mn> create-command example.my-command
| Rendered template Command.java to destination src/main/java/example/MyCommand.java
| Rendered template CommandTest.java to destination src/test/java/example/MyCommandTest.java
Then open the gradle.build file, and change the mainClassName line to the fully qualified class name of the command:
mainClassName = "example.MyCommand"
The create-cli-app command is more convenient, since it generates a project that includes a command from the beginning and sets the main class to this command.
|
4 Picocli Quick Start
Creating a Picocli Command with @Command
This section will show a quick example that provides a command line interface to a HTTP client that communicates with the GitHub API.
When creating this example project with the Micronaut CLI, use the create-cli-app command, and add the --features=http-client flag:
$ mn create-cli-app example.git-star --features http-client
This will add the io.micronaut:micronaut-http-client dependency to the build. You can also manually add to your build:
compile 'io.micronaut:micronaut-http-client'<dependency>
<groupId>io.micronaut</groupId>
<artifactId>micronaut-http-client</artifactId>
</dependency>An Example HTTP Client
To create a picocli Command you create a class with fields annotated with @Option or @Parameters to capture the values of the command line options or positional parameters, respectively.
For example the following is a picocli @Command that wraps around the GitHub API:
Example picocli command with injected HTTP client
package example;

import io.micronaut.configuration.picocli.PicocliRunner;
import io.micronaut.context.ApplicationContext;
import io.micronaut.http.client.annotation.*;
import io.micronaut.http.client.*;
import io.reactivex.*;

import static io.micronaut.http.HttpRequest.*;

import picocli.CommandLine;
import picocli.CommandLine.Command;
import picocli.CommandLine.Option;
import picocli.CommandLine.Parameters;

import java.util.*;
import javax.inject.Inject;

@Command(name = "git-star", header = {
        "@|green       _ _      _             |@", (1)
        "@|green  __ _(_) |_ __| |_ __ _ _ _  |@",
        "@|green / _` | |  _(_-<  _/ _` | '_| |@",
        "@|green \\__, |_|\\__/__/\\__\\__,_|_|   |@",
        "@|green |___/                        |@"},
        description = "Shows GitHub stars for a project",
        mixinStandardHelpOptions = true, version = "git-star 0.1") (2)
public class GitStarCommand implements Runnable {

    @Client("https://api.github.com")
    @Inject RxHttpClient client; (3)

    @Option(names = {"-v", "--verbose"}, description = "Shows some project details")
    boolean verbose;

    @Parameters(description = {"One or more GitHub slugs (comma separated) to show stargazers for.",
                "  Default: ${DEFAULT-VALUE}"}, split = ",", paramLabel = "<owner/repo>") (4)
    List<String> githubSlugs = Arrays.asList("micronaut-projects/micronaut-core", "remkop/picocli");

    public static void main(String[] args) throws Exception {
        PicocliRunner.run(GitStarCommand.class, args);
    }

    public void run() { (5)
        for (String slug : githubSlugs) {
            Map m = client.retrieve(
                    GET("/repos/" + slug).header("User-Agent", "remkop-picocli"),
                    Map.class).blockingFirst();
            System.out.printf("%s has %s stars%n", slug, m.get("watchers"));

            if (verbose) {
                String msg = "Description: %s%nLicense: %s%nForks: %s%nOpen issues: %s%n%n";
                System.out.printf(msg, m.get("description"),
                                ((Map) m.get("license")).get("name"),
                                m.get("forks"), m.get("open_issues"));
            }
        }
    }
}| 1 | Headers, footers and descriptions can be multi-line. You can embed ANSI styled text anywhere with the @|STYLE1[,STYLE2]… text|@ markup notation. |
| 2 | Add version information to display when the user requests this with --version. This can also be supplied dynamically, e.g. from the manifest file or a build-generated version properties file. |
| 3 | Inject a HTTP client. In this case, hard-coded to the GitHub API endpoint. |
| 4 | A positional parameter that lets the user select one or more GitHub projects |
| 5 | The business logic: display information for each project the user requested. |
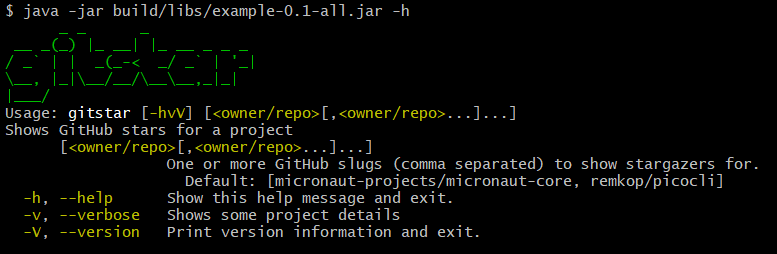
The usage help message generated for this command looks like this:
Subcommands
If your service has a lot of functionality, a common pattern is to have subcommands to control different areas of the service.
To allow Micronaut to inject services and resources correctly into the subcommands,
make sure to obtain subcommand instances from the ApplicationContext, instead of instantiating them directly.
The easiest way to do this is to declare the subcommands on the top-level command, like this:
A top-level command with subcommands
@Command(name = "topcmd", subcommands = {SubCmd1.class, SubCmd2.class}) (1)
class TopCommand implements Callable<Object> { (2)

    public static void main(String[] args) throws Exception {
        PicocliRunner.call(TopCommand.class, args); (3)
    }
    //...
}| 1 | The top-level command has two subcommands, SubCmd1 and SubCmd2. |
| 2 | Let all commands in the hierarchy implement Runnable or Callable. |
| 3 | Start the application with PicocliRunner. This creates an ApplicationContext that instantiates the commands and performs the dependency injection. |