implementation("io.micronaut.oraclecloud:micronaut-oraclecloud-bmc-vault")Table of Contents
Micronaut Oracle Cloud
Provides integration between Micronaut and Oracle Cloud
Version: 5.5.2
1 Introduction
This module provides integration between Micronaut and the Oracle Cloud Infrastructure (OCI) SDK by allowing you to easily inject SDK clients into your Micronaut services and controllers.
In addition to supporting the SDK’s blocking clients, the module provides reactive clients that use RxJava to provide async alternatives to the blocking clients in the SDK (an improvement upon the SDK’s 'out-of-the-box' async clients).
2 Release History
For this project, you can find a list of releases (with release notes) here:
3 Breaking Changes
This section will document breaking changes that may happen during milestone or release candidate releases, as well as major releases eg (1.x.x → 2.x.x).
Micronaut Oracle Cloud 2.2.0 breaking changes
In version 2.33.0, Oracle removed some dependencies from their Oracle Cloud SDK. If you relied on those dependencies being available but did not declare them in your build file explicitly, they may now be missing. The solution is to add those dependencies to your own build file.
In general, we do not recommend depending on transitive dependencies of the Oracle Cloud SDK, as future versions may remove further dependencies.
The affected dependencies for this release are commons-codec, commons-io, and commons-logging.
4 Quick Start
To get started quickly, setup the Oracle Cloud CLI making sure you have run oci setup config to configure local access to Oracle Cloud.
Then add dependencies on the Micronaut Oracle Cloud modules corresponding to OCI SDK clients you wish to use, for example, Vault:
<dependency>
    <groupId>io.micronaut.oraclecloud</groupId>
    <artifactId>micronaut-oraclecloud-bmc-vault</artifactId>
</dependency>
Use Micronaut Injection to get an instance of the client in your application, e.g.:
@Inject
Vault vault
All OCI SDK clients are supported.
5 Authentication
The following authentication providers are supported in this module:
ConfigFileAuthenticationDetailsProvider
ConfigFileAuthenticationDetailsProvider uses a config file located at $HOME/.oci/config.
Specify a profile or config file path within the config file via your application configuration file:
| Property | Type | Description |
|---|---|---|
|
java.lang.String |
The profile to use. |
|
java.lang.String |
A custom path for the OCI configuration file. |
|
java.lang.Boolean |
Whether to enable or disable using the OCI configuration file. |
|
java.lang.Boolean |
Whether to enable the configuration of a {@link com.oracle.bmc.auth.SessionTokenAuthenticationDetailsProvider}. |
In the Oracle Java SDK, the environment variable OCI_CONFIG_FILE doesn’t take precedence over the ~/.oci/config if the file exists.
Assign the OCI_CONFIG_FILE to oci.config.path. To change the order: oci.config.path: ${OCI_CONFIG_FILE}
|
SimpleAuthenticationDetailsProvider
SimpleAuthenticationDetailsProvider lets you provide config details via standard Micronaut configuration files.
oci.fingerprint=<value>
oci.passphrase=<value>
oci.private-key=<value>
oci.private-key-file=<value>
oci.region=<value>
oci.tenant-id=<value>
oci.user-id=<value>
oci:
fingerprint: <value>
passphrase: <value>
private-key: <value>
private-key-file: <value>
region: <value>
tenant-id: <value>
user-id: <value>[oci]
fingerprint="<value>"
passphrase="<value>"
private-key="<value>"
private-key-file="<value>"
region="<value>"
tenant-id="<value>"
user-id="<value>"oci {
fingerprint = "<value>"
passphrase = "<value>"
privateKey = "<value>"
privateKeyFile = "<value>"
region = "<value>"
tenantId = "<value>"
userId = "<value>"
}{
oci {
fingerprint = "<value>"
passphrase = "<value>"
private-key = "<value>"
private-key-file = "<value>"
region = "<value>"
tenant-id = "<value>"
user-id = "<value>"
}
}{
"oci": {
"fingerprint": "<value>",
"passphrase": "<value>",
"private-key": "<value>",
"private-key-file": "<value>",
"region": "<value>",
"tenant-id": "<value>",
"user-id": "<value>"
}
}-
fingerprint: the private key fingerprint] -
passphrase: the private key passphrase] -
private-key: the contents of your private key. Optionally, pass a path with private-key-file (see below).] -
private-key-file: the path to the private key file (used in place of private-key above)] -
region: e.g. us-phoenix-1 -
tenant-id: the tenancy OCID -
user-id: the user OCID
InstancePrincipalsAuthenticationDetailsProvider
If your application is running in Oracle Cloud, you can authorize InstancePrincipalsAuthenticationDetailsProvider to make SDK calls and use Instance Principal authentication.
See the documentation to enable this using dynamic groups and policies, and then enable it for the Oracle Cloud environment via the application-oraclecloud configuration file with:
oci.config.instance-principal.enabled=trueoci:
config:
instance-principal:
enabled: true[oci]
[oci.config]
[oci.config.instance-principal]
enabled=trueoci {
config {
instancePrincipal {
enabled = true
}
}
}{
oci {
config {
instance-principal {
enabled = true
}
}
}
}{
"oci": {
"config": {
"instance-principal": {
"enabled": true
}
}
}
}ResourcePrincipalAuthenticationDetailsProvider
ResourcePrincipalAuthenticationDetailsProvider is similar to instance principals, but used for Oracle Functions (serverless). See the documentation for instructions on how to configure the necessary dynamic group rules and policies to use Resource Principal auth with your serverless functions. Once the proper configuration is complete, your Micronaut-driven serverless functions will be able to use the OCI SDKs.
OkeWorkloadIdentityAuthenticationDetailsProvider
If your application is running in Oracle Cloud OKE (Container Engine for Kubernetes), you can authorize /com/oracle/bmc/auth/okeworkloadidentity/OkeWorkloadIdentityAuthenticationDetailsProvider to make SDK calls and use OKE Workload Identity authentication.
See the documentation to enable this using dynamic groups and policies, and then enable it for the K8s environment via the application-k8s configuration file with:
oci.config.oke-workload-identity.enabled=trueoci:
config:
oke-workload-identity:
enabled: true[oci]
[oci.config]
[oci.config.oke-workload-identity]
enabled=trueoci {
config {
okeWorkloadIdentity {
enabled = true
}
}
}{
oci {
config {
oke-workload-identity {
enabled = true
}
}
}
}{
"oci": {
"config": {
"oke-workload-identity": {
"enabled": true
}
}
}
}Required dependency:
implementation("io.micronaut.oraclecloud:micronaut-oraclecloud-oke-workload-identity")<dependency>
<groupId>io.micronaut.oraclecloud</groupId>
<artifactId>micronaut-oraclecloud-oke-workload-identity</artifactId>
</dependency>| See the guide for Authenticate Micronaut Application Users with OpenID Connect and Oracle IDCS to learn more. |
SessionTokenAuthenticationDetailsProvider
You can enable a SessionTokenAuthenticationDetailsProvider by setting:
oci.config.session-token=trueoci:
config:
session-token: true[oci]
[oci.config]
session-token=trueoci {
config {
sessionToken = true
}
}{
oci {
config {
session-token = true
}
}
}{
"oci": {
"config": {
"session-token": true
}
}
}With the rest of the oci.config configuration properties, you can use a non-default configuration file or use a different profile.
6 Available Modules
The following modules are provided.
micronaut-oraclecloud-common
implementation("io.micronaut.oraclecloud:micronaut-oraclecloud-common")<dependency>
<groupId>io.micronaut.oraclecloud</groupId>
<artifactId>micronaut-oraclecloud-common</artifactId>
</dependency>Provides common functionality and configures the following beans:
-
BasicAuthenticationDetailsProvider - Authentication details auto-detected from local
$HOME/.oci/configor environment -
ClientConfiguration - Common configuration for all clients
-
TenancyIdProvider - Interface to resolve the current tenancy
micronaut-oraclecloud-httpclient-netty
implementation("io.micronaut.oraclecloud:micronaut-oraclecloud-httpclient-netty")<dependency>
<groupId>io.micronaut.oraclecloud</groupId>
<artifactId>micronaut-oraclecloud-httpclient-netty</artifactId>
</dependency>Provides an implementation of the OCI SDK client based on Netty and Micronaut Serialization.
micronaut-oraclecloud-bmc-[OCI SDK Client] modules must be used instead of the OCI Java SDK modules, as they are compatible with this client.
|
micronaut-oraclecloud-bmc-[OCI SDK Client]
OCI SDK client dependencies compatible with the micronaut-oraclecloud-httpclient-netty.
The modules also support injection of the OCI SDK client interfaces.
Injection of Reactor or RxJava 2 clients is supported with the addition of one of the following dependencies:
implementation("io.micronaut.reactor:micronaut-reactor")<dependency>
<groupId>io.micronaut.reactor</groupId>
<artifactId>micronaut-reactor</artifactId>
</dependency>implementation("io.micronaut.rxjava2:micronaut-rxjava2")<dependency>
<groupId>io.micronaut.rxjava2</groupId>
<artifactId>micronaut-rxjava2</artifactId>
</dependency>micronaut-oraclecloud-sdk
implementation("io.micronaut.oraclecloud:micronaut-oraclecloud-sdk")<dependency>
<groupId>io.micronaut.oraclecloud</groupId>
<artifactId>micronaut-oraclecloud-sdk</artifactId>
</dependency>Provides support for injecting any of the available SDK client interfaces.
| The module is only required when you want to use the OCI SDK clients with a Jersey implementation, as the Netty client implementations support Micronaut injection by default. For example, to use Vault with the OCI Jersey client, you would define a dependency on this module as well as: |
implementation("com.oracle.oci.sdk:oci-java-sdk-vault")<dependency>
<groupId>com.oracle.oci.sdk</groupId>
<artifactId>oci-java-sdk-vault</artifactId>
</dependency>implementation("com.oracle.oci.sdk:oci-java-sdk-common-httpclient-jersey")<dependency>
<groupId>com.oracle.oci.sdk</groupId>
<artifactId>oci-java-sdk-common-httpclient-jersey</artifactId>
</dependency>micronaut-oraclecloud-sdk-rxjava2
implementation("io.micronaut.oraclecloud:micronaut-oraclecloud-sdk-rxjava2")<dependency>
<groupId>io.micronaut.oraclecloud</groupId>
<artifactId>micronaut-oraclecloud-sdk-rxjava2</artifactId>
</dependency>Provides support for injecting RxJava 2 client implementations.
| The module is only required when you want to use the OCI SDK clients with a Jersey implementation, as the Netty client implementations support Micronaut injection by default. For example, to use Vault with the OCI Jersey client, you would define a dependency on this module as well as: |
implementation("com.oracle.oci.sdk:oci-java-sdk-vault")<dependency>
<groupId>com.oracle.oci.sdk</groupId>
<artifactId>oci-java-sdk-vault</artifactId>
</dependency>implementation("com.oracle.oci.sdk:oci-java-sdk-common-httpclient-jersey")<dependency>
<groupId>com.oracle.oci.sdk</groupId>
<artifactId>oci-java-sdk-common-httpclient-jersey</artifactId>
</dependency>micronaut-oraclecloud-sdk-reactor
implementation("io.micronaut.oraclecloud:micronaut-oraclecloud-sdk-reactor")<dependency>
<groupId>io.micronaut.oraclecloud</groupId>
<artifactId>micronaut-oraclecloud-sdk-reactor</artifactId>
</dependency>Provides support for injecting Reactor client implementations.
| The module is only required when you want to use the OCI SDK clients with a Jersey implementation, as the Netty client implementations support Micronaut injection by default. For example, to use Vault with the OCI Jersey client, you would define a dependency on this module as well as: |
implementation("com.oracle.oci.sdk:oci-java-sdk-vault")<dependency>
<groupId>com.oracle.oci.sdk</groupId>
<artifactId>oci-java-sdk-vault</artifactId>
</dependency>implementation("com.oracle.oci.sdk:oci-java-sdk-common-httpclient-jersey")<dependency>
<groupId>com.oracle.oci.sdk</groupId>
<artifactId>oci-java-sdk-common-httpclient-jersey</artifactId>
</dependency>micronaut-oraclecloud-function
implementation("io.micronaut.oraclecloud:micronaut-oraclecloud-function")<dependency>
<groupId>io.micronaut.oraclecloud</groupId>
<artifactId>micronaut-oraclecloud-function</artifactId>
</dependency>Provides the OciFunction superclass that you can subclass to write Oracle Cloud Functions in Micronaut that can use Micronaut dependency injection.
micronaut-oraclecloud-function-http
implementation("io.micronaut.oraclecloud:micronaut-oraclecloud-function-http")<dependency>
<groupId>io.micronaut.oraclecloud</groupId>
<artifactId>micronaut-oraclecloud-function-http</artifactId>
</dependency>Provides the HttpFunction class that can be used as a handler to write HTTP API Gateway function handlers that delegate to Micronaut controllers.
micronaut-oraclecloud-atp
implementation("io.micronaut.oraclecloud:micronaut-oraclecloud-atp")<dependency>
<groupId>io.micronaut.oraclecloud</groupId>
<artifactId>micronaut-oraclecloud-atp</artifactId>
</dependency>Provides support for configuring the data source connection for the UCP and HikariCP connection pools by specifying Oracle Cloud Autonomous Database configuration.
| The module generates the OracleWallet on startup. |
micronaut-oraclecloud-micrometer
implementation("io.micronaut.oraclecloud:micronaut-oraclecloud-micrometer")<dependency>
<groupId>io.micronaut.oraclecloud</groupId>
<artifactId>micronaut-oraclecloud-micrometer</artifactId>
</dependency>Provides support for sending Micrometer metrics to the Oracle Cloud Monitoring service.
micronaut-oraclecloud-vault
implementation("io.micronaut.oraclecloud:micronaut-oraclecloud-vault")<dependency>
<groupId>io.micronaut.oraclecloud</groupId>
<artifactId>micronaut-oraclecloud-vault</artifactId>
</dependency>Provides support for Distributed Configuration with Oracle Cloud Vault service.
7 OCI SDK Netty HTTP Client
This module provides a Netty client implementation for the Java OCI SDK. The client uses Micronaut Serialization.
Add a dependency to the micronaut-oraclecloud-httpclient-netty module:
implementation("io.micronaut.oraclecloud:micronaut-oraclecloud-httpclient-netty")<dependency>
<groupId>io.micronaut.oraclecloud</groupId>
<artifactId>micronaut-oraclecloud-httpclient-netty</artifactId>
</dependency>For serialization to work correctly, use one of the Micronaut OCI SDK modules instead of the OCI SDK modules. For example, for Object Store, define the dependency:
implementation("io.micronaut.oraclecloud:micronaut-oraclecloud-bmc-objectstorage")<dependency>
<groupId>io.micronaut.oraclecloud</groupId>
<artifactId>micronaut-oraclecloud-bmc-objectstorage</artifactId>
</dependency>Importing SDK’s not compiled with Micronaut
If an OCI SDK client exists that is built with OCI SDK v3 or above but not compiled with Micronaut and therefore missing the required Micronaut Serialization types, you can import the client using the @SdkImport annotation.
First, add an annotation processor dependency:
annotationProcessor("io.micronaut.oraclecloud:oraclecloud-serde-processor")<annotationProcessorPaths>
<path>
<groupId>io.micronaut.oraclecloud</groupId>
<artifactId>oraclecloud-serde-processor</artifactId>
</path>
</annotationProcessorPaths>Then declare @SdkImport on any class, specifying the type of the client you wish to import. For example:
Declaring
@SdkImport@SdkImport(DisasterRecoveryClient.class)Migrate
Replace the com.oracle.oci.sdk:oci-java-sdk-common-httpclient-jersey with the micronaut-oraclecloud-httpclient-netty client and the com.oracle.oci.sdk:oci-java-sdk-bom with micronaut-oraclecloud-bom.
Then replace other OCI SDK modules with Micronaut modules. To simplify the process, you can use the following regular expression:
For Maven, replace
<dependency>(\s*)<groupId>com.oracle.oci.sdk</groupId>(\s*)<artifactId>oci-java-sdk-([^<]+)</artifactId>(((?!</dependency>)[\s\S])+)</dependency>with
<dependency>$1<groupId>io.micronaut.oraclecloud</groupId>$2<artifactId>micronaut-oraclecloud-bmc-$3</artifactId>$4</dependency>For Gradle, replace
com.oracle.oci.sdk:oci-java-sdk-([^:"')]+)with
io.micronaut.oraclecloud:micronaut-oraclecloud-bmc-$1If you plan to use the modules in a Micronaut application, add one of the micronaut-oraclecloud-sdk, micronaut-oraclecloud-sdk-rxjava2 or micronaut-oraclecloud-sdk-reactor modules.
Configuration
The Jersey HTTP client can be configured through a ClientConfigurator and StandardClientProperties.
Only some of these properties are supported for the Netty client.
Which properties are supported also depends on whether the Netty client is used in a managed context, i.e., whether the SDK client is injected from an application context.
The following properties are supported:
-
StandardClientProperties.BUFFER_REQUESTalways supported -
StandardClientProperties.READ_TIMEOUTsupported only when the client is not managed -
StandardClientProperties.CONNECT_TIMEOUTsupported only when the client is not managed -
StandardClientProperties.ASYNC_POOL_SIZEsupported only when the client is not managed
Other properties — particularly those related to proxies and TLS configuration — are not supported directly.
Instead, these settings should be configured using the standard Micronaut HTTP client configuration properties, with a special service name prefix.
For example, to configure the managed Netty client, you can use properties like oci.client.read-timeout.
This allows you to configure TLS, proxy settings, timeouts, connection pool sizes, and other HTTP client options.
Similarly, you can configure other Micronaut-provided clients by specifying the appropriate service ID. For example:
-
oci.clients.objectstorage.read-timeoutfor the Object Storage client -
oci.clients.identity.read-timeoutfor the Identity client
You can find a client’s service ID by checking the factory class that creates it or directly by client name. For example:
-
IdentityClientFactory produces IdentityClient → identity.
-
ObjectStorageClientFactory produces ObjectStorageClient → objectstorage.
Choose either micronaut.http.services.oci or oci.client to configure your OCI client; supplying both will cause a NonUniqueBeanException.
|
Logging
To enable logging of all requests, set the micronaut.http.services.oci.log-level or oci.client.log-level property to INFO.
Log messages will appear at INFO level.
| This logging includes sensitive data such as authentication tokens, and should only be enabled for debugging purposes. |
Proxy configuration via system properties (unmanaged Netty client)
| This feature is experimental and subject to change. |
When the Netty HTTP client is created in an unmanaged context (i.e. not obtained from a Micronaut ApplicationContext), this module will map the following system properties to the Micronaut HTTP client’s proxy configuration:
-
io.micronaut.oci.proxyURI form:http://user:pass@host:port,https://host:443orsocks5://host:1080 -
io.micronaut.oci.proxy.hostHost name of the proxy -
io.micronaut.oci.proxy.portPort number of the proxy -
io.micronaut.oci.proxy.usernameProxy username (optional) -
io.micronaut.oci.proxy.passwordProxy password (optional) -
io.micronaut.oci.proxy.typeOne ofhttp,socks,socks5(defaults tohttpunless the scheme ofio.micronaut.oci.proxyissocks*) -
io.micronaut.oci.proxy.nonProxyHostsComma-separated host patterns that must bypass the proxy (supportswildcard), for example:.internal,localhost,127.0.0.1
Property precedence:
- If io.micronaut.oci.proxy is set, it is parsed and takes precedence.
- Otherwise, discrete properties (host, port, username, password, type) are used if present.
Examples:
Configure via single URI
java -Dio.micronaut.oci.proxy=http://user:pass@proxy.example:8080 -jar app.jarConfigure via discrete properties
java \
 -Dio.micronaut.oci.proxy.host=proxy.acme.local \
 -Dio.micronaut.oci.proxy.port=3128 \
 -Dio.micronaut.oci.proxy.username=alice \
 -Dio.micronaut.oci.proxy.password=secret \
 -Dio.micronaut.oci.proxy.type=http \
 -Dio.micronaut.oci.proxy.nonProxyHosts="*.internal,localhost,127.0.0.1" \
 -jar app.jar
For managed clients (obtained from Micronaut DI), configure proxy using standard Micronaut HTTP client configuration (for example micronaut.http.services. or oci.client.), not system properties.
|
Managed Netty client configuration (oci.netty.*)
| This feature is experimental and subject to change. |
The managed Netty client reads oci.netty.* settings:
-
oci.netty.legacy-netty-client(boolean, defaultfalse) — Use the legacy Netty client implementation. This is experimental and intended for migration scenarios. -
oci.netty.use-managed-provider-globally(boolean, defaultfalse) — Enable usage of the managed Netty HTTP provider globally for SDK clients, centralizing configuration via Micronaut.
Example (application.yml):
oci:
  netty:
    legacy-netty-client: false
    use-managed-provider-globally: true
8 Reactive Support
In addition to the blocking clients, this module provides clients that use RxJava or Reactor to allow reactive programming with Micronaut for each SDK.
For RxJava 2, add the following module along with a micronaut-oraclecloud-sdk-[OCI SDK client] module:
implementation("io.micronaut.rxjava2:micronaut-rxjava2")<dependency>
<groupId>io.micronaut.rxjava2</groupId>
<artifactId>micronaut-rxjava2</artifactId>
</dependency>For Reactor, add the following module along with micronaut-oraclecloud-sdk-[OCI SDK client] module:
implementation("io.micronaut.reactor:micronaut-reactor")<dependency>
<groupId>io.micronaut.reactor</groupId>
<artifactId>micronaut-reactor</artifactId>
</dependency>For example, instead of ObjectStorageClient, you can inject ObjectStorageRxClient for RxJava 2 or ObjectStorageReactorClient for Reactor to use the Object Storage API:
import com.oracle.bmc.objectstorage.model.BucketSummary;
import com.oracle.bmc.objectstorage.model.CreateBucketDetails;
import com.oracle.bmc.objectstorage.requests.CreateBucketRequest;
import com.oracle.bmc.objectstorage.requests.DeleteBucketRequest;
import com.oracle.bmc.objectstorage.requests.GetNamespaceRequest;
import com.oracle.bmc.objectstorage.requests.ListBucketsRequest;
import com.oracle.bmc.objectstorage.responses.CreateBucketResponse;
import io.micronaut.core.annotation.Nullable;
import io.micronaut.http.annotation.Controller;
import io.micronaut.http.annotation.Delete;
import io.micronaut.http.annotation.Get;
import io.micronaut.http.annotation.PathVariable;
import io.micronaut.http.annotation.Post;
import io.micronaut.oraclecloud.clients.reactor.objectstorage.ObjectStorageReactorClient;
import io.micronaut.oraclecloud.core.TenancyIdProvider;
import reactor.core.publisher.Mono;

import java.util.List;
import java.util.stream.Collectors;

@Controller("/os")
public class BucketController implements BucketOperations {

    private final ObjectStorageReactorClient objectStorage;
    private final TenancyIdProvider tenancyIdProvider;
    private final String defaultCompartmentId = System.getenv("COMPARTMENT_OCID");

    public BucketController(ObjectStorageReactorClient objectStorage,
                            TenancyIdProvider tenancyIdProvider) { // (1)
        this.objectStorage = objectStorage;
        this.tenancyIdProvider = tenancyIdProvider;
    }
}
import com.oracle.bmc.objectstorage.model.CreateBucketDetails
import com.oracle.bmc.objectstorage.requests.CreateBucketRequest
import com.oracle.bmc.objectstorage.requests.DeleteBucketRequest
import com.oracle.bmc.objectstorage.requests.GetNamespaceRequest
import com.oracle.bmc.objectstorage.requests.ListBucketsRequest
import com.oracle.bmc.objectstorage.responses.CreateBucketResponse
import groovy.transform.CompileStatic
import io.micronaut.core.annotation.Nullable
import io.micronaut.http.annotation.Controller
import io.micronaut.http.annotation.Delete
import io.micronaut.http.annotation.Get
import io.micronaut.http.annotation.PathVariable
import io.micronaut.http.annotation.Post
import io.micronaut.oraclecloud.clients.reactor.objectstorage.ObjectStorageReactorClient
import io.micronaut.oraclecloud.core.TenancyIdProvider
import reactor.core.publisher.Mono
@CompileStatic
@Controller('/os')
class BucketController implements BucketOperations {
private final ObjectStorageReactorClient objectStorage
private final TenancyIdProvider tenancyIdProvider
BucketController(ObjectStorageReactorClient objectStorage,
TenancyIdProvider tenancyIdProvider) { // (1)
this.objectStorage = objectStorage
this.tenancyIdProvider = tenancyIdProvider
}
}import io.micronaut.oraclecloud.clients.reactor.objectstorage.ObjectStorageReactorClient
import io.micronaut.oraclecloud.core.TenancyIdProvider
import io.micronaut.http.annotation.Get
import io.micronaut.http.annotation.PathVariable
import com.oracle.bmc.objectstorage.requests.ListBucketsRequest
import com.oracle.bmc.objectstorage.responses.ListBucketsResponse
import com.oracle.bmc.objectstorage.requests.CreateBucketRequest
import com.oracle.bmc.objectstorage.model.CreateBucketDetails
import com.oracle.bmc.objectstorage.responses.CreateBucketResponse
import com.oracle.bmc.objectstorage.requests.DeleteBucketRequest
import com.oracle.bmc.objectstorage.requests.GetNamespaceRequest
import com.oracle.bmc.objectstorage.responses.DeleteBucketResponse
import com.oracle.bmc.objectstorage.responses.GetNamespaceResponse
import io.micronaut.core.annotation.Nullable
import io.micronaut.http.annotation.Controller
import io.micronaut.http.annotation.Delete
import io.micronaut.http.annotation.Post
import reactor.core.publisher.Mono
@Controller("/os")
class BucketController(private val objectStorage: ObjectStorageReactorClient,
private val tenancyIdProvider: TenancyIdProvider) // (1)
: BucketOperations {
}| 1 | The ObjectStorageRxClient is injected into the constructor. |
Once you have a reference to the relevant reactive client, it is easier to compose non-blocking operations. The following example creates a bucket:
@Override
@Post(value = "/buckets/{name}")
public Mono<String> createBucket(String name) {

    String compartmentId = defaultCompartmentId != null ? defaultCompartmentId : tenancyIdProvider.getTenancyId();

    GetNamespaceRequest getNamespaceRequest = GetNamespaceRequest.builder()
            .compartmentId(compartmentId).build();
    return objectStorage.getNamespace(getNamespaceRequest) // (1)
            .flatMap(namespaceResponse -> {
                CreateBucketRequest createBucketRequest = CreateBucketRequest.builder()
                        .namespaceName(namespaceResponse.getValue())
                        .createBucketDetails(CreateBucketDetails.builder()
                                .compartmentId(compartmentId)
                                .name(name)
                                .build())
                        .build();

                return objectStorage.createBucket(createBucketRequest) // (2)
                        .map(CreateBucketResponse::getLocation); // (3)
            });
}
@Override
@Post(value = '/buckets/{name}')
Mono<String> createBucket(String name) {
String tenancyId = tenancyIdProvider.tenancyId
GetNamespaceRequest getNamespaceRequest = GetNamespaceRequest.builder()
.compartmentId(tenancyId).build()
return objectStorage.getNamespace(getNamespaceRequest) // (1)
.flatMap(namespaceResponse -> {
CreateBucketRequest createBucketRequest = CreateBucketRequest.builder()
.namespaceName(namespaceResponse.value)
.createBucketDetails(CreateBucketDetails.builder()
.compartmentId(tenancyId)
.name(name)
.build())
.build()
return objectStorage.createBucket(createBucketRequest) // (2)
.map(CreateBucketResponse::getLocation) // (3)
}) as Mono<String>
}@Post(value = "/buckets/{name}")
override fun createBucket(name: String): Mono<String> {
val tenancyId = tenancyIdProvider.tenancyId
val getNamespaceRequest = GetNamespaceRequest.builder()
.compartmentId(tenancyId).build()
return objectStorage.getNamespace(getNamespaceRequest) // (1)
.flatMap { namespaceResponse: GetNamespaceResponse ->
val createBucketRequest = CreateBucketRequest.builder()
.namespaceName(namespaceResponse.value)
.createBucketDetails(CreateBucketDetails.builder()
.compartmentId(tenancyId)
.name(name)
.build())
.build()
objectStorage.createBucket(createBucketRequest) // (2)
.map { obj: CreateBucketResponse -> obj.location } // (3)
}
}| 1 | First, a request to obtain the namespace is sent |
| 2 | Then with the response the flatMap operator is used to send another request to create a bucket |
| 3 | Finally, the location of the bucket is returned in the response |
9 Oracle Functions (Serverless)
Oracle Functions are based on Project.fn. You can write simple functions targeting the Oracle Function environment by extending the OciFunction superclass.
Micronaut’s Oracle Function support can use GraalVM native-image running within a Docker container.
This will result in extremely responsive serverless functions using very few Cloud resources.
|
This superclass enables dependency injection for the function. Note that the function class must conform to the following rules:
-
it must have a public, no-arguments constructor
-
it must have a public method that executes the function
-
it must be annotated with
@Singleton
Micronaut support for Oracle Functions can be combined with the OCI SDK support to give your serverless functions access to the OCI SDKs as needed.
| You must have resource principal authentication properly configured in order for this example to work. |
Creating a Function with a Gradle build
You can create a new Oracle Function using Gradle as the build tool with the following:
$ mn create-function-app myfunction --features oracle-functionThis will create a Micronaut project with a Gradle build that configures the Micronaut Gradle plugin.
The only necessary changes are to modify build.gradle and alter the dockerBuild and dockerBuildNative sections to specify the Oracle Cloud Registry to publish the docker images to for the function:
dockerBuild {
    images = ["[REGION].ocir.io/[TENANCY_ID]/[REPOSITORY]/$project.name:$project.version"]
}

dockerBuildNative {
    images = ["[REGION].ocir.io/[TENANCY_ID]/[REPOSITORY]/$project.name:$project.version"]
}
Change the REGION to your region, the TENANCY_ID to your tenancy and the REPOSITORY to your Docker repository.
Creating a Function with a Maven build
You can create a new Oracle Function using Maven as the build tool with the following:
$ mn create-function-app myfunction --build=maven --features oracle-functionThis will create a Micronaut project with a Maven build that configures the Micronaut Maven plugin.
The only necessary changes are to modify pom.xml and add these properties in the <properties> section to specify the Oracle Cloud Registry to publish the docker images to for the function
<jib.docker.image>[REGION].ocir.io/[TENANCY_ID]/[REPOSITORY]/${project.artifactId}</jib.docker.image>

<jib.docker.tag>${project.version}</jib.docker.tag>
Change the REGION to your region, the TENANCY_ID to your tenancy and the REPOSITORY to your Docker repository.
Also add a property to specify the full class name and package of the function class, e.g.
<exec.mainClass>com.mycompany.MyFunction</exec.mainClass>Build
The following provides a serverless function example that uses the Object Storage API to list the available buckets:
import com.oracle.bmc.objectstorage.ObjectStorageClient;
import com.oracle.bmc.objectstorage.model.BucketSummary;
import com.oracle.bmc.objectstorage.requests.GetNamespaceRequest;
import com.oracle.bmc.objectstorage.requests.ListBucketsRequest;
import io.micronaut.core.annotation.ReflectiveAccess;
import io.micronaut.oraclecloud.core.TenancyIdProvider;
import io.micronaut.oraclecloud.function.OciFunction;

import jakarta.inject.Inject;
import jakarta.inject.Singleton;
import java.util.List;
import java.util.stream.Collectors;

@Singleton
public class ListBucketsFunction extends OciFunction { // (1)

    @Inject
    ObjectStorageClient objectStorageClient; // (2)

    @Inject
    TenancyIdProvider tenantIdProvider;
}
import com.oracle.bmc.objectstorage.ObjectStorageClient
import com.oracle.bmc.objectstorage.requests.GetNamespaceRequest
import com.oracle.bmc.objectstorage.requests.ListBucketsRequest
import groovy.transform.CompileStatic
import io.micronaut.core.annotation.ReflectiveAccess
import io.micronaut.oraclecloud.core.TenancyIdProvider
import io.micronaut.oraclecloud.function.OciFunction
import jakarta.inject.Inject
import jakarta.inject.Singleton
@CompileStatic
@Singleton
class ListBucketsFunction extends OciFunction { // (1)
@Inject
ObjectStorageClient objectStorageClient // (2)
@Inject
TenancyIdProvider tenantIdProvider
}import com.oracle.bmc.objectstorage.ObjectStorageClient
import com.oracle.bmc.objectstorage.requests.GetNamespaceRequest
import com.oracle.bmc.objectstorage.requests.ListBucketsRequest
import io.micronaut.core.annotation.ReflectiveAccess
import io.micronaut.oraclecloud.core.TenancyIdProvider
import io.micronaut.oraclecloud.function.OciFunction
import jakarta.inject.Inject
import jakarta.inject.Singleton
@Singleton
class ListBucketsFunction : OciFunction() { // (1)
@Inject
lateinit var objectStorageClient : ObjectStorageClient // (2)
@Inject
lateinit var tenantIdProvider: TenancyIdProvider
}| 1 | A public class with a no argument constructor annotated with @Singleton and extending from OciFunction |
| 2 | You can use the @Inject annotation to inject SDK components |
Once you have defined the function, define a public method to be the function handler, e.g.:
@ReflectiveAccess
public List<String> handleRequest() {

    GetNamespaceRequest getNamespaceRequest = GetNamespaceRequest.builder()
            .compartmentId(tenantIdProvider.getTenancyId()).build();
    String namespace = objectStorageClient.getNamespace(getNamespaceRequest).getValue();

    ListBucketsRequest listBucketsRequest = ListBucketsRequest.builder()
            .namespaceName(namespace)
            .compartmentId(tenantIdProvider.getTenancyId())
            .build();

    return objectStorageClient.listBuckets(listBucketsRequest)
            .getItems().stream().map(BucketSummary::getName)
            .collect(Collectors.toList());
}
@ReflectiveAccess
List<String> handleRequest() {
GetNamespaceRequest getNamespaceRequest = GetNamespaceRequest.builder()
.compartmentId(tenantIdProvider.tenancyId).build()
String namespace = objectStorageClient.getNamespace(getNamespaceRequest).value
ListBucketsRequest listBucketsRequest = ListBucketsRequest.builder()
.namespaceName(namespace)
.compartmentId(tenantIdProvider.tenancyId)
.build()
return objectStorageClient.listBuckets(listBucketsRequest).items*.name
}@ReflectiveAccess
fun handleRequest(): List<String> {
val getNamespaceRequest = GetNamespaceRequest.builder()
.compartmentId(tenantIdProvider.tenancyId).build()
val namespace = objectStorageClient.getNamespace(getNamespaceRequest).value
val listBucketsRequest = ListBucketsRequest.builder()
.namespaceName(namespace)
.compartmentId(tenantIdProvider.tenancyId)
.build()
return objectStorageClient.listBuckets(listBucketsRequest)
.items.map { it.name }The above example uses the Object Storage API to list the available buckets.
Docker Build
To build the Oracle Function with Gradle, run the ./gradlew dockerBuild command, or build a GraalVM native executable by running ./gradlew dockerBuildNative.
To build the Oracle Function with Maven, run the ./mvnw package -Dpackaging=docker command, or build a GraalVM native executable by running ./mvnw package -Dpackaging=docker-native.
Deploy
To deploy the Oracle Function as a Java function with Gradle, run ./gradlew dockerPush to push the function to Oracle Container Registry, or deploy the GraalVM native executable by running ./gradlew dockerPushNative.
To deploy the Oracle Function as a Java function with Maven, run ./mvnw deploy -Dpackaging=docker to push the function to Oracle Container Registry, or deploy the GraalVM native executable by running ./mvnw deploy -Dpackaging=docker-native.
Note that these commands only publish the function to Oracle Container Registry.
To make the function invokable, use the Oracle Cloud UI to create the function, or use the fn command line application to create the function from the container image:
Creating a Function from a Container Image
$ fn create function myapp myfunction [REGION].ocir.io/[TENANCY]/[REPOSITORY/[FUNCTION_NAME]:[FUNCTION_VERSION]

## For example:
$ fn create function myapp myfunction us-ashburn-1.ocir.io/mytenancy/myrepository/myfunction:1.0.0
For Java functions that do not use Native Image you will need to pass --memory 512 --timeout 120 as Java functions use more memory that native functions.
|
If you publish a new image using ./gradlew dockerPush or ./gradlew dockerPushNative (or with Maven using ./mvnw deploy -Dpackaging=docker or ./mvnw deploy -Dpackaging=docker-native) for an existing function you can also update it with fn update:
Updating an existing Function from a Container Image
$ fn update function myapp myfunction [REGION].ocir.io/[TENANCY]/[REPOSITORY/[FUNCTION_NAME]:[FUNCTION_VERSION]| See the guide for Deploy a Micronaut Function (Serverless) Application to Oracle Cloud to learn more. |
10 Oracle Functions HTTP (Serverless)
The micronaut-oraclecloud-function-http module lets you write HTTP API Gateway function handlers that delegate to Micronaut controllers.
You can create HTTP functions with a Gradle build using the command line or via Micronaut Launch:
Creating a new Function with the CLI
$ mn create-app myfunction --features oracle-functionYou can create HTTP functions with a Maven build using the command line or via Micronaut Launch:
Creating a new Function with the CLI
$ mn create-app myfunction --build=maven --features oracle-functionYou can then create your controller just as you would a regular Micronaut controller.
import com.oracle.bmc.objectstorage.ObjectStorage;
import com.oracle.bmc.objectstorage.model.BucketSummary;
import com.oracle.bmc.objectstorage.model.CreateBucketDetails;
import com.oracle.bmc.objectstorage.model.ListObjects;
import com.oracle.bmc.objectstorage.model.ObjectSummary;
import com.oracle.bmc.objectstorage.requests.CreateBucketRequest;
import com.oracle.bmc.objectstorage.requests.DeleteBucketRequest;
import com.oracle.bmc.objectstorage.requests.GetNamespaceRequest;
import com.oracle.bmc.objectstorage.requests.ListBucketsRequest;
import com.oracle.bmc.objectstorage.requests.ListObjectsRequest;
import io.micronaut.core.annotation.Nullable;
import io.micronaut.core.util.CollectionUtils;
import io.micronaut.http.MediaType;
import io.micronaut.http.annotation.Controller;
import io.micronaut.http.annotation.Delete;
import io.micronaut.http.annotation.Get;
import io.micronaut.http.annotation.PathVariable;
import io.micronaut.http.annotation.Post;
import io.micronaut.http.annotation.QueryValue;
import io.micronaut.oraclecloud.core.TenancyIdProvider;

import java.util.List;
import java.util.Map;
import java.util.Optional;
import java.util.stream.Collectors;

@Controller("/os")
public class BucketController {

    private final ObjectStorage objectStorage;
    private final TenancyIdProvider tenancyIdProvider;

    public BucketController(ObjectStorage objectStorage,
                            TenancyIdProvider tenancyIdProvider) { // (1)
        this.objectStorage = objectStorage;
        this.tenancyIdProvider = tenancyIdProvider;
    }
}
import com.oracle.bmc.objectstorage.ObjectStorage
import com.oracle.bmc.objectstorage.model.CreateBucketDetails
import com.oracle.bmc.objectstorage.model.ListObjects
import com.oracle.bmc.objectstorage.requests.CreateBucketRequest
import com.oracle.bmc.objectstorage.requests.DeleteBucketRequest
import com.oracle.bmc.objectstorage.requests.GetNamespaceRequest
import com.oracle.bmc.objectstorage.requests.ListBucketsRequest
import com.oracle.bmc.objectstorage.requests.ListObjectsRequest
import groovy.transform.CompileStatic
import io.micronaut.core.annotation.Nullable
import io.micronaut.http.MediaType
import io.micronaut.http.annotation.Controller
import io.micronaut.http.annotation.Delete
import io.micronaut.http.annotation.Get
import io.micronaut.http.annotation.PathVariable
import io.micronaut.http.annotation.Post
import io.micronaut.http.annotation.QueryValue
import io.micronaut.oraclecloud.core.TenancyIdProvider
@CompileStatic
@Controller('/os')
class BucketController {
private final ObjectStorage objectStorage
private final TenancyIdProvider tenancyIdProvider
BucketController(ObjectStorage objectStorage,
TenancyIdProvider tenancyIdProvider) { // (1)
this.objectStorage = objectStorage
this.tenancyIdProvider = tenancyIdProvider
}
}import com.oracle.bmc.objectstorage.ObjectStorage
import com.oracle.bmc.objectstorage.model.CreateBucketDetails
import com.oracle.bmc.objectstorage.requests.CreateBucketRequest
import com.oracle.bmc.objectstorage.requests.DeleteBucketRequest
import com.oracle.bmc.objectstorage.requests.GetNamespaceRequest
import com.oracle.bmc.objectstorage.requests.ListBucketsRequest
import com.oracle.bmc.objectstorage.requests.ListObjectsRequest
import io.micronaut.core.annotation.Nullable
import io.micronaut.http.MediaType
import io.micronaut.http.annotation.Controller
import io.micronaut.http.annotation.Delete
import io.micronaut.http.annotation.Get
import io.micronaut.http.annotation.PathVariable
import io.micronaut.http.annotation.Post
import io.micronaut.http.annotation.QueryValue
import io.micronaut.oraclecloud.core.TenancyIdProvider
import java.util.Optional
@Controller("/os")
class BucketController(private val objectStorage: ObjectStorage,
private val tenancyIdProvider: TenancyIdProvider) { // (1)
}| 1 | This example uses the micronaut-oraclecloud-sdk module to perform Object Storage operations, so the ObjectStorage client and TenancyIdProvider are injected. |
Next, add a controller method to list all the buckets in a compartment:
@Get("/buckets{/compartmentId}")
public List<String> listBuckets(@PathVariable @Nullable String compartmentId) {

    String compartmentOcid = compartmentId != null ? compartmentId : tenancyIdProvider.getTenancyId();

    GetNamespaceRequest getNamespaceRequest = GetNamespaceRequest.builder()
            .compartmentId(compartmentOcid).build();
    String namespace = objectStorage.getNamespace(getNamespaceRequest).getValue();

    ListBucketsRequest listBucketsRequest = ListBucketsRequest.builder()
            .namespaceName(namespace)
            .compartmentId(compartmentOcid)
            .build();

    return objectStorage.listBuckets(listBucketsRequest)
            .getItems()
            .stream()
            .map(BucketSummary::getName)
            .collect(Collectors.toList());
}
@Get('/buckets{/compartmentId}')
List<String> listBuckets(@PathVariable @Nullable String compartmentId) {
String compartmentOcid = compartmentId ?: tenancyIdProvider.tenancyId
GetNamespaceRequest getNamespaceRequest = GetNamespaceRequest.builder()
.compartmentId(compartmentOcid).build()
String namespace = objectStorage.getNamespace(getNamespaceRequest).value
ListBucketsRequest listBucketsRequest = ListBucketsRequest.builder()
.namespaceName(namespace)
.compartmentId(compartmentOcid)
.build()
return objectStorage.listBuckets(listBucketsRequest).items*.name
}@Get("/buckets{/compartmentId}")
fun listBuckets(@PathVariable @Nullable compartmentId: String?): List<String> {
val compartmentOcid = compartmentId ?: tenancyIdProvider.tenancyId!!
val getNamespaceRequest = GetNamespaceRequest.builder()
.compartmentId(compartmentOcid).build()
val namespace = objectStorage.getNamespace(getNamespaceRequest).value
val listBucketsRequest = ListBucketsRequest.builder()
.namespaceName(namespace)
.compartmentId(compartmentOcid)
.build()
return objectStorage.listBuckets(listBucketsRequest).items
.map { it.name }
}Docker Build
To build the Oracle Function with Gradle, run the ./gradlew dockerBuild command or to build the native version run ./gradlew dockerBuildNative.
To build the Oracle Function with Maven, run the ./mvnw package -Dpackaging=docker command or to build the native version run ./mvnw package -Dpackaging=docker-native.
Deploy
To deploy your function, follow the same instructions provided for regular Oracle Functions.
API Gateway
Once you have deployed your function, create an API Gateway to route requests to your serverless deployment. The Micronaut router will call the proper controller function based on the incoming HTTP Request Method and the path.
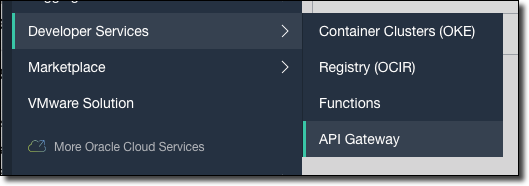
First, create an API Gateway by selecting 'Developer Services', then 'API Gateway' from the Oracle Cloud console dashboard.
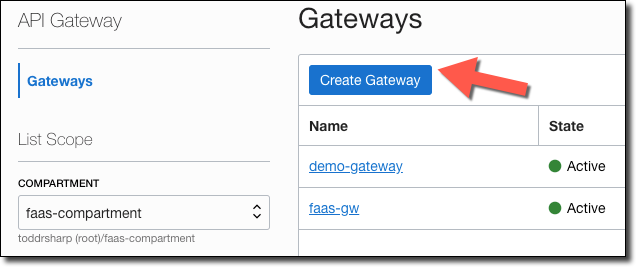
Click 'Create Gateway'.
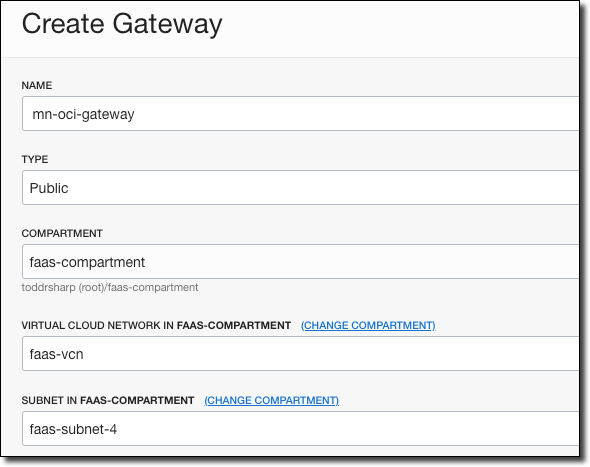
Enter a name for the gateway, choose the compartment it is stored in, and the network and subnet.
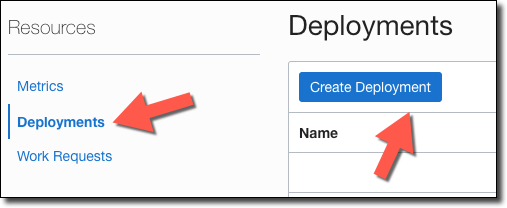
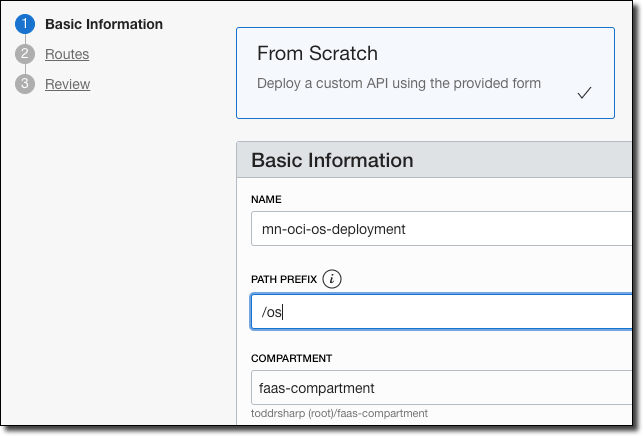
When the gateway is Active, click Deployments, then Create Deployment.
Provide a name for the deployment and enter a "Path Prefix".
If necessary, configure any Authentication, CORS, or Rate Limiting and click Next.
The path prefix must match the path you used in your controller (e.g. @Controller("/os")).
|
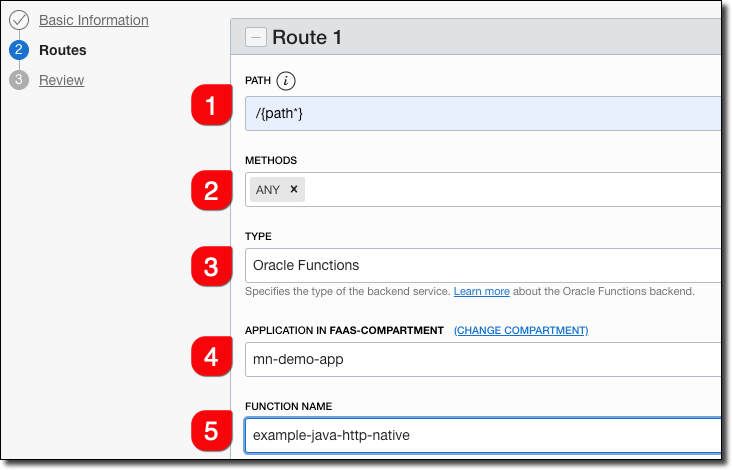
Enter route information.
-
Enter
/{path*}as the Path. This will capture all incoming requests, and the Micronaut router will match the incoming path and request method with the proper controller method. -
Choose
ANYfor methods. Optionally, choose the necessary methods individually. -
Choose 'Oracle Functions' as the type.
-
Choose the appropriate Oracle Functions application.
-
Choose the function name that you used. This can be found in your function’s
func.yamlfile.
Click 'Next', then review the deployment details and click 'Create'.
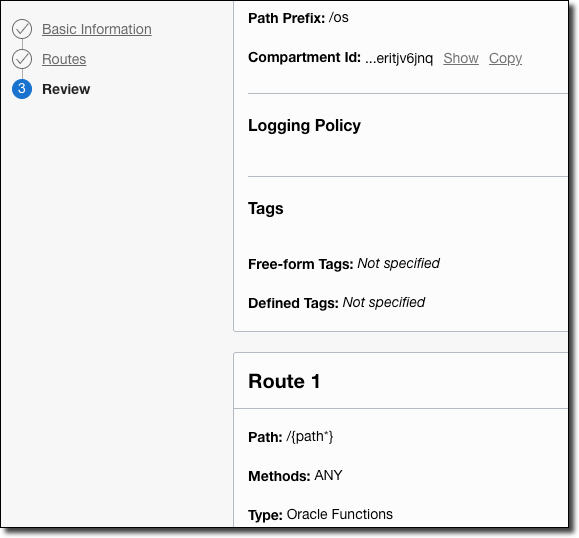
Your new deployment will be listed in 'Creating' state.
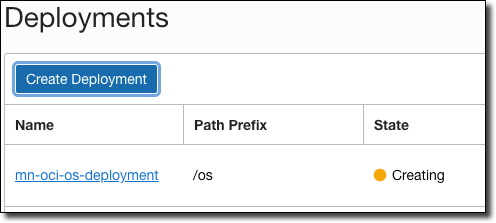
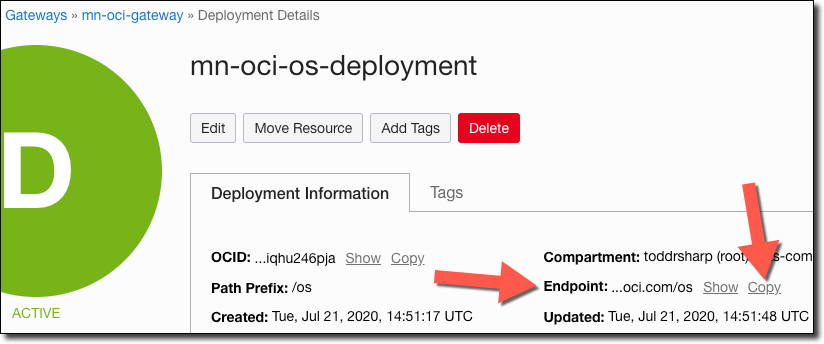
When your new deployment becomes 'Active', click the deployment to view the deployment details. Copy the 'Endpoint' - this is the base URL that you’ll use for your function invocations.
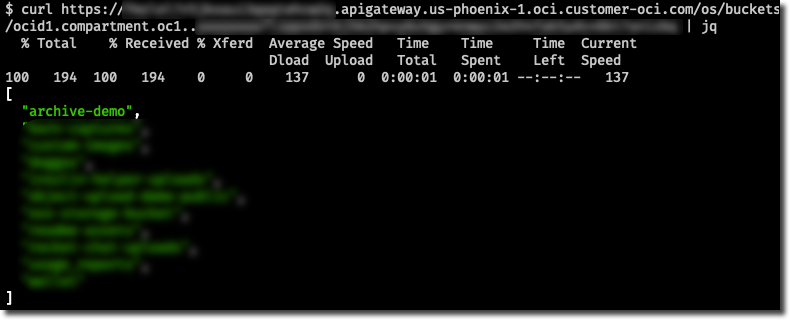
Test your functions by appending the proper controller path and one of your controller endpoints.
| See the guide for Deploy a Micronaut HTTP API Gateway Function (Serverless) Application to Oracle Cloud to learn more. |
11 Oracle Autonomous Database
Oracle Cloud Autonomous Database connection information and credentials are stored in an Oracle Wallet.
Micronaut can automatically generate and download the Wallet and configure the data source.
First, you need the correct version of the Oracle Database driver and required modules. To ensure you are using the correct version, apply the 21.1.0.0 or above Oracle Database BOM with Gradle:
implementation platform("com.oracle.database.jdbc:ojdbc-bom:21.1.0.0")Or with Maven:
  <dependencyManagement>
    <dependencies>
      <dependency>
        <groupId>com.oracle.database.jdbc</groupId>
        <artifactId>ojdbc-bom</artifactId>
        <version>21.1.0.0</version>
        <type>pom</type>
        <scope>import</scope>
      </dependency>
    </dependencies>
  </dependencyManagement>
Second, add a dependency on the micronaut-oraclecloud-atp module:
runtimeOnly("io.micronaut.oraclecloud:micronaut-oraclecloud-atp")<dependency>
<groupId>io.micronaut.oraclecloud</groupId>
<artifactId>micronaut-oraclecloud-atp</artifactId>
<scope>runtime</scope>
</dependency>Then configure the authentication provider.
Then, add a dependency to one of the Micronaut connection pool implementations.
| Automated configuration is currently supported only for the HikariCP and UCP connection pool. |
runtimeOnly("io.micronaut.sql:micronaut-jdbc-ucp")<dependency>
<groupId>io.micronaut.sql</groupId>
<artifactId>micronaut-jdbc-ucp</artifactId>
<scope>runtime</scope>
</dependency>Or:
runtimeOnly("io.micronaut.sql:micronaut-jdbc-hikari")<dependency>
<groupId>io.micronaut.sql</groupId>
<artifactId>micronaut-jdbc-hikari</artifactId>
<scope>runtime</scope>
</dependency>
Note that micronaut-oraclecloud-atp module is compatible with Java 17+.
|
To use automated data source configuration from the Wallet, provide a configuration similar to the following:
datasources.default.ocid=ocid1.autonomousdatabase.oc1.....
datasources.default.walletPassword=micronaut.1
datasources.default.username=foo
datasources.default.password=bar
datasources:
default:
ocid: ocid1.autonomousdatabase.oc1.....
walletPassword: micronaut.1
username: foo
password: bar[datasources]
[datasources.default]
ocid="ocid1.autonomousdatabase.oc1....."
walletPassword="micronaut.1"
username="foo"
password="bar"datasources {
'default' {
ocid = "ocid1.autonomousdatabase.oc1....."
walletPassword = "micronaut.1"
username = "foo"
password = "bar"
}
}{
datasources {
default {
ocid = "ocid1.autonomousdatabase.oc1....."
walletPassword = "micronaut.1"
username = "foo"
password = "bar"
}
}
}{
"datasources": {
"default": {
"ocid": "ocid1.autonomousdatabase.oc1.....",
"walletPassword": "micronaut.1",
"username": "foo",
"password": "bar"
}
}
}-
ocidspecifies the Autonomous Database id -
wallet-passwordencrypts the keys inside the wallet. It must be at least eight characters long, include at least one letter, and either one numeric character or one special character) -
specify the database
usernameandpassword
The username and password are not automatically generated and must be created in advance.
|
The module uses <db_name>_high as the default service alias.
This can be overridden with the serviceAlias property.
The wallet is of type SINGLE.
Use the walletType property to configure different types.
See other valid options at https://docs.oracle.com/en-us/iaas/api/#/en/database/20160918/datatypes/GenerateAutonomousDatabaseWalletDetails.
| See the guide for Access an Oracle Autonomous Database to learn more. |
12 Micrometer Support For Oracle Monitoring
The OCI Monitoring service enables you to actively and passively monitor your cloud resources using the Metrics and Alarms features.
The micronaut-oraclecloud-micrometer module integrates Micronaut’s Micrometer support with the OCI Monitoring service.
To begin, add the standard dependencies for the Micronaut Micrometer module per the documentation.
Next, add a dependency on the micronaut-oraclecloud-micrometer module:
runtimeOnly("io.micronaut.oraclecloud:micronaut-oraclecloud-micrometer")<dependency>
<groupId>io.micronaut.oraclecloud</groupId>
<artifactId>micronaut-oraclecloud-micrometer</artifactId>
<scope>runtime</scope>
</dependency>Also add a dependency for the OCI SDK Monitoring module:
implementation("com.oracle.oci.sdk:oci-java-sdk-monitoring")<dependency>
<groupId>com.oracle.oci.sdk</groupId>
<artifactId>oci-java-sdk-monitoring</artifactId>
</dependency>Then configure the authentication provider.
You can configure this Micrometer reporter using micronaut.metrics.export.oraclecloud.
The most commonly changed configuration properties are listed below:
Name |
Description |
enabled |
Whether to enable the reporter, e.g., set to |
application-name |
Application name used as a common dimension. Default: |
namespace |
Metrics namespace. Required. |
resource-group |
Metrics resource group. |
compartment-id |
Oracle Cloud compartment OCID. Default: the Oracle SDK tenantId. |
step |
How frequently to report metrics. Default: |
batch-size |
How many metrics to send per batch. Default: |
descriptions |
Whether to send meter descriptions to InfluxDB. Disable to minimize the amount of data sent on each scrape. Default: |
Example Oracle Cloud Config
micronaut.metrics.enabled=true
micronaut.metrics.export.oraclecloud.enabled=true
micronaut.metrics.export.oraclecloud.namespace=test
micronaut.metrics.export.oraclecloud.resourceGroup=foo
micronaut:
metrics:
enabled: true
export:
oraclecloud:
enabled: true
namespace: test
resourceGroup: foo[micronaut]
[micronaut.metrics]
enabled=true
[micronaut.metrics.export]
[micronaut.metrics.export.oraclecloud]
enabled=true
namespace="test"
resourceGroup="foo"micronaut {
metrics {
enabled = true
export {
oraclecloud {
enabled = true
namespace = "test"
resourceGroup = "foo"
}
}
}
}{
micronaut {
  metrics {
    enabled = true
    export {
      oraclecloud {
        enabled = true
        namespace = "test"
        resourceGroup = "foo"
      }
    }
  }
}
}{
"micronaut": {
"metrics": {
"enabled": true,
"export": {
"oraclecloud": {
"enabled": true,
"namespace": "test",
"resourceGroup": "foo"
}
}
}
}
}| See the guide for Collect Metrics with the Micronaut Framework and Monitor them on Oracle Cloud to learn more. |
OCI SDK client metrics
If you are using OCI SDK clients instrumented by Micronaut, by default metrics will be collected for each request.
Name |
Type |
Description |
micronaut.metrics.oci.sdk.client.enabled |
boolean |
Whether to enable the OCI SDK client metrics. Default: |
13 OCI Application Performance Monitoring as a Tracing Endpoint
You can use OCI Application Performance Monitoring (APM) to add Tracing in your Micronaut Applications.
OCI APM is a suite of services that give you insight into your applications and servers running in OCI via a small agent that runs on the machine and aggregates and reports metric data. It’s a nice service to monitor and diagnose performance issues. It also includes a Trace Explorer that is compatible with Zipkin (and Jaeger) which you can use in Micronaut applications (even without taking full advantage of APM via the Java Agent).
Add Dependencies
Micronaut Management
implementation("io.micronaut:micronaut-management")<dependency>
<groupId>io.micronaut</groupId>
<artifactId>micronaut-management</artifactId>
</dependency>Micronaut Tracing
implementation("io.micronaut:micronaut-tracing")<dependency>
<groupId>io.micronaut</groupId>
<artifactId>micronaut-tracing</artifactId>
</dependency>Brave Instrumentation
runtimeOnly("io.zipkin.brave:brave-instrumentation-http")<dependency>
<groupId>io.zipkin.brave</groupId>
<artifactId>brave-instrumentation-http</artifactId>
<scope>runtime</scope>
</dependency>Zipkin Reporter
runtimeOnly("io.zipkin.reporter2:zipkin-reporter")<dependency>
<groupId>io.zipkin.reporter2</groupId>
<artifactId>zipkin-reporter</artifactId>
<scope>runtime</scope>
</dependency>Open Tracing
implementation("io.opentracing.brave:brave-opentracing")<dependency>
<groupId>io.opentracing.brave</groupId>
<artifactId>brave-opentracing</artifactId>
</dependency>Create APM Domain
Create an APM domain in the OCI console if you haven’t already.
We’ll share a single domain to group and trace all of our services.
That may seem a bit confusing given the name "domain", but think of it more like a "project group" or an "environment" (you may want to create separate domains for QA, Test, Prod, etc.)
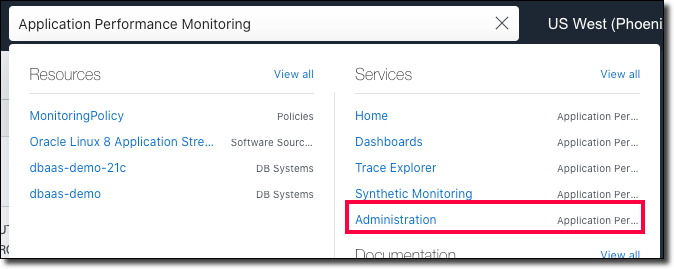
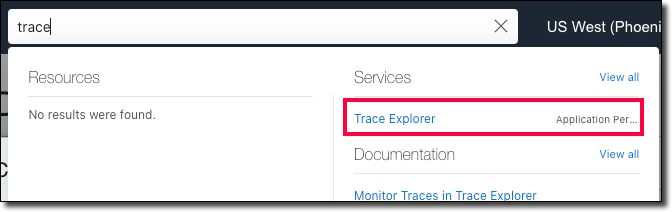
Search for Application Performance Monitoring and click Administration.
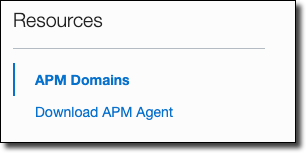
In the left sidebar, click APM Domains.
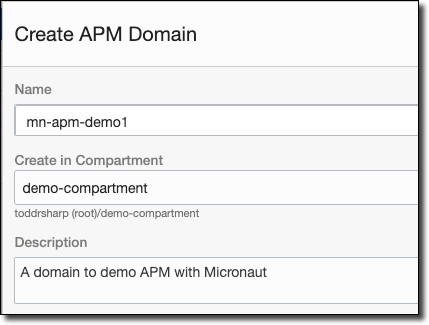
Click Create APM Domain.
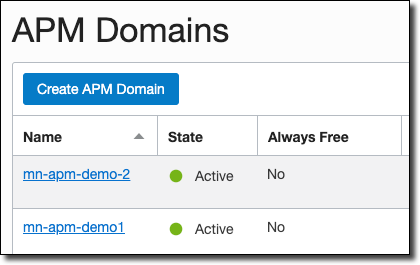
Name it, choose a compartment, and enter a description.
Once the domain is created, view the domain details. Here you’ll need to grab a few values, so copy the data upload endpoint (#1), private key (#2), and public key (#3).
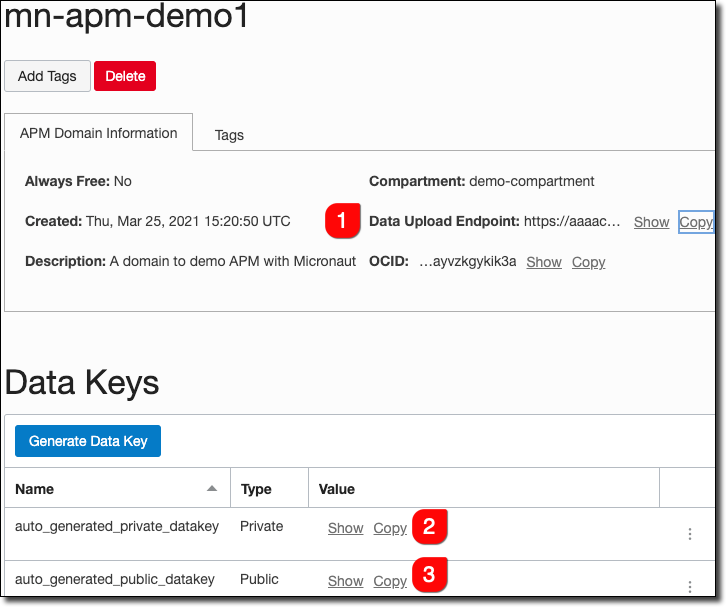
Now we have what we need to construct a URL to use in application configuration files.
The Collector URL format requires us to construct a URL by using the data upload endpoint as our base URL and generate the path based on some choices including values from our private or public key.
The format is documented here.
Once we’ve constructed the URL path, add it to your application-oraclecloud configuration file.
Example Oracle Cloud Config
micronaut.application.name=demo2
tracing.zipkin.enabled=true
tracing.zipkin.sampler.probability=1
tracing.zipkin.http.url=https://[redacted].apm-agt.us-phoenix-1.oci.oraclecloud.com
tracing.zipkin.http.path=/20200101/observations/public-span?dataFormat=zipkin&dataFormatVersion=2&dataKey=[public key]
tracing.zipkin.supportsJoin=false
micronaut:
application:
name: demo2
tracing:
zipkin:
enabled: true
sampler:
probability: 1
http:
url: https://[redacted].apm-agt.us-phoenix-1.oci.oraclecloud.com
path: /20200101/observations/public-span?dataFormat=zipkin&dataFormatVersion=2&dataKey=[public key]
supportsJoin: false[micronaut]
[micronaut.application]
name="demo2"
[tracing]
[tracing.zipkin]
enabled=true
supportsJoin=false
[tracing.zipkin.sampler]
probability=1
[tracing.zipkin.http]
url="https://[redacted].apm-agt.us-phoenix-1.oci.oraclecloud.com"
path="/20200101/observations/public-span?dataFormat=zipkin&dataFormatVersion=2&dataKey=[public key]"micronaut {
application {
name = "demo2"
}
}
tracing {
zipkin {
enabled = true
sampler {
probability = 1
}
http {
url = "https://[redacted].apm-agt.us-phoenix-1.oci.oraclecloud.com"
path = "/20200101/observations/public-span?dataFormat=zipkin&dataFormatVersion=2&dataKey=[public key]"
}
supportsJoin = false
}
}{
micronaut {
  application {
    name = "demo2"
  }
}
tracing {
  zipkin {
    enabled = true
    sampler {
      probability = 1
    }
    http {
      url = "https://[redacted].apm-agt.us-phoenix-1.oci.oraclecloud.com"
      path = "/20200101/observations/public-span?dataFormat=zipkin&dataFormatVersion=2&dataKey=[public key]"
    }
    supportsJoin = false
  }
}
}{
"micronaut": {
"application": {
"name": "demo2"
}
},
"tracing": {
"zipkin": {
"enabled": true,
"sampler": {
"probability": 1
},
"http": {
"url": "https://[redacted].apm-agt.us-phoenix-1.oci.oraclecloud.com",
"path": "/20200101/observations/public-span?dataFormat=zipkin&dataFormatVersion=2&dataKey=[public key]"
},
"supportsJoin": false
}
}
}To avoid hard-coding these values in config files, you can set them as environment variables, e.g.:
Set ENV vars
export TRACING_ZIPKIN_HTTP_URL="https://[redacted].apm-agt.us-phoenix-1.oci.oraclecloud.com"
export TRACING_ZIPKIN_HTTP_PATH="/20200101/observations/public-span?dataFormat=zipkin&dataFormatVersion=2&dataKey=[public key]"
Your application will now send trace information to APM.
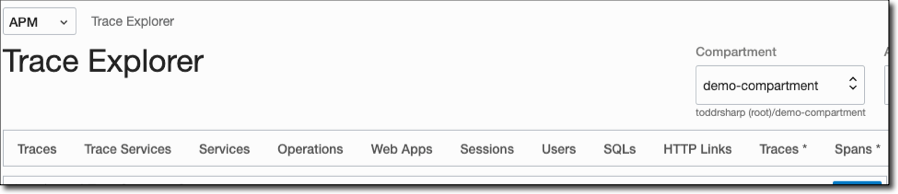
View Trace Data in APM
Go to the APM Trace Explorer in the OCI console.
Choose your APM domain in the top right and the time period that you’d like to view/search.
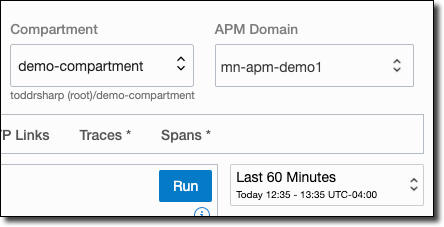
Choose one of the available pre-configured queries across the top.
View traces and spans:
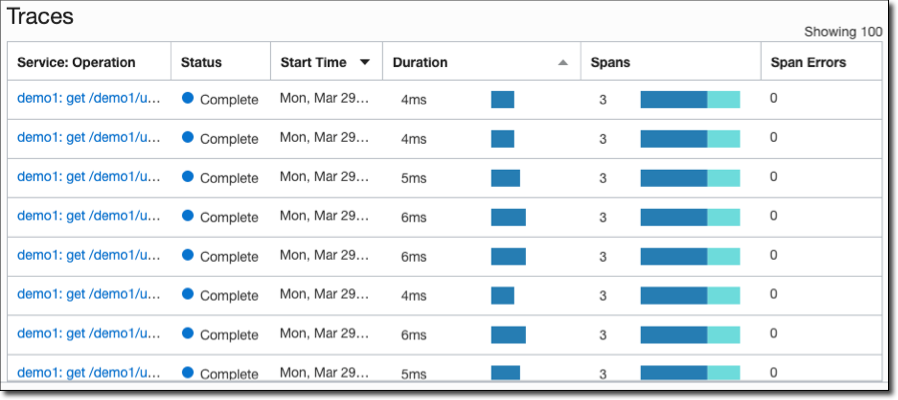
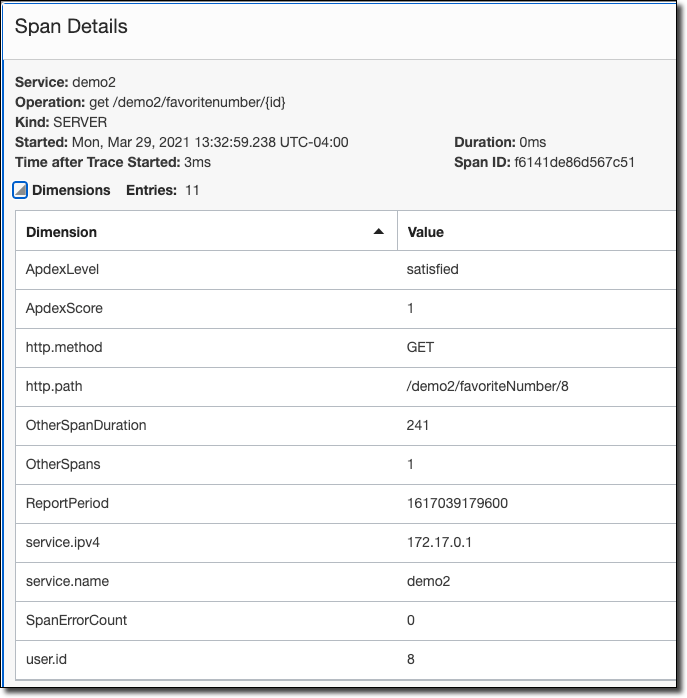
Click a trace to view detailed info.
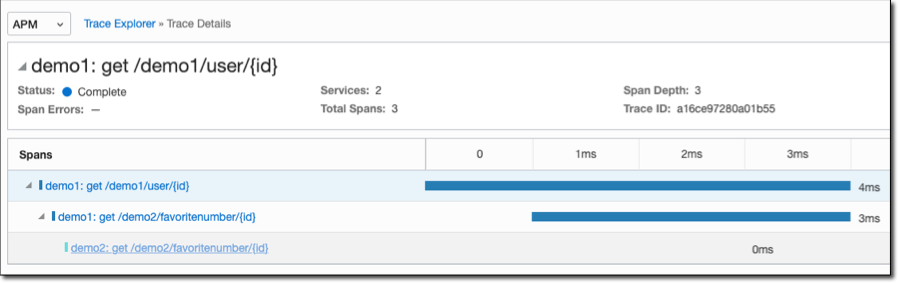
Click a span inside a trace to view detailed info and tagged values.
For more info, see Adding Tracing to Your Distributed Cloud Native Microservices.
Read more about the Trace Explorer in the documentation.
| See the guide for OpenTelemetry Tracing with Oracle Cloud and the Micronaut Framework to learn more. |
14 OCI Logging service
To use the Oracle Logging Service, add the following dependency to your project:
implementation("io.micronaut.oraclecloud:micronaut-oraclecloud-logging")<dependency>
<groupId>io.micronaut.oraclecloud</groupId>
<artifactId>micronaut-oraclecloud-logging</artifactId>
</dependency>Create Oracle Cloud Custom Log
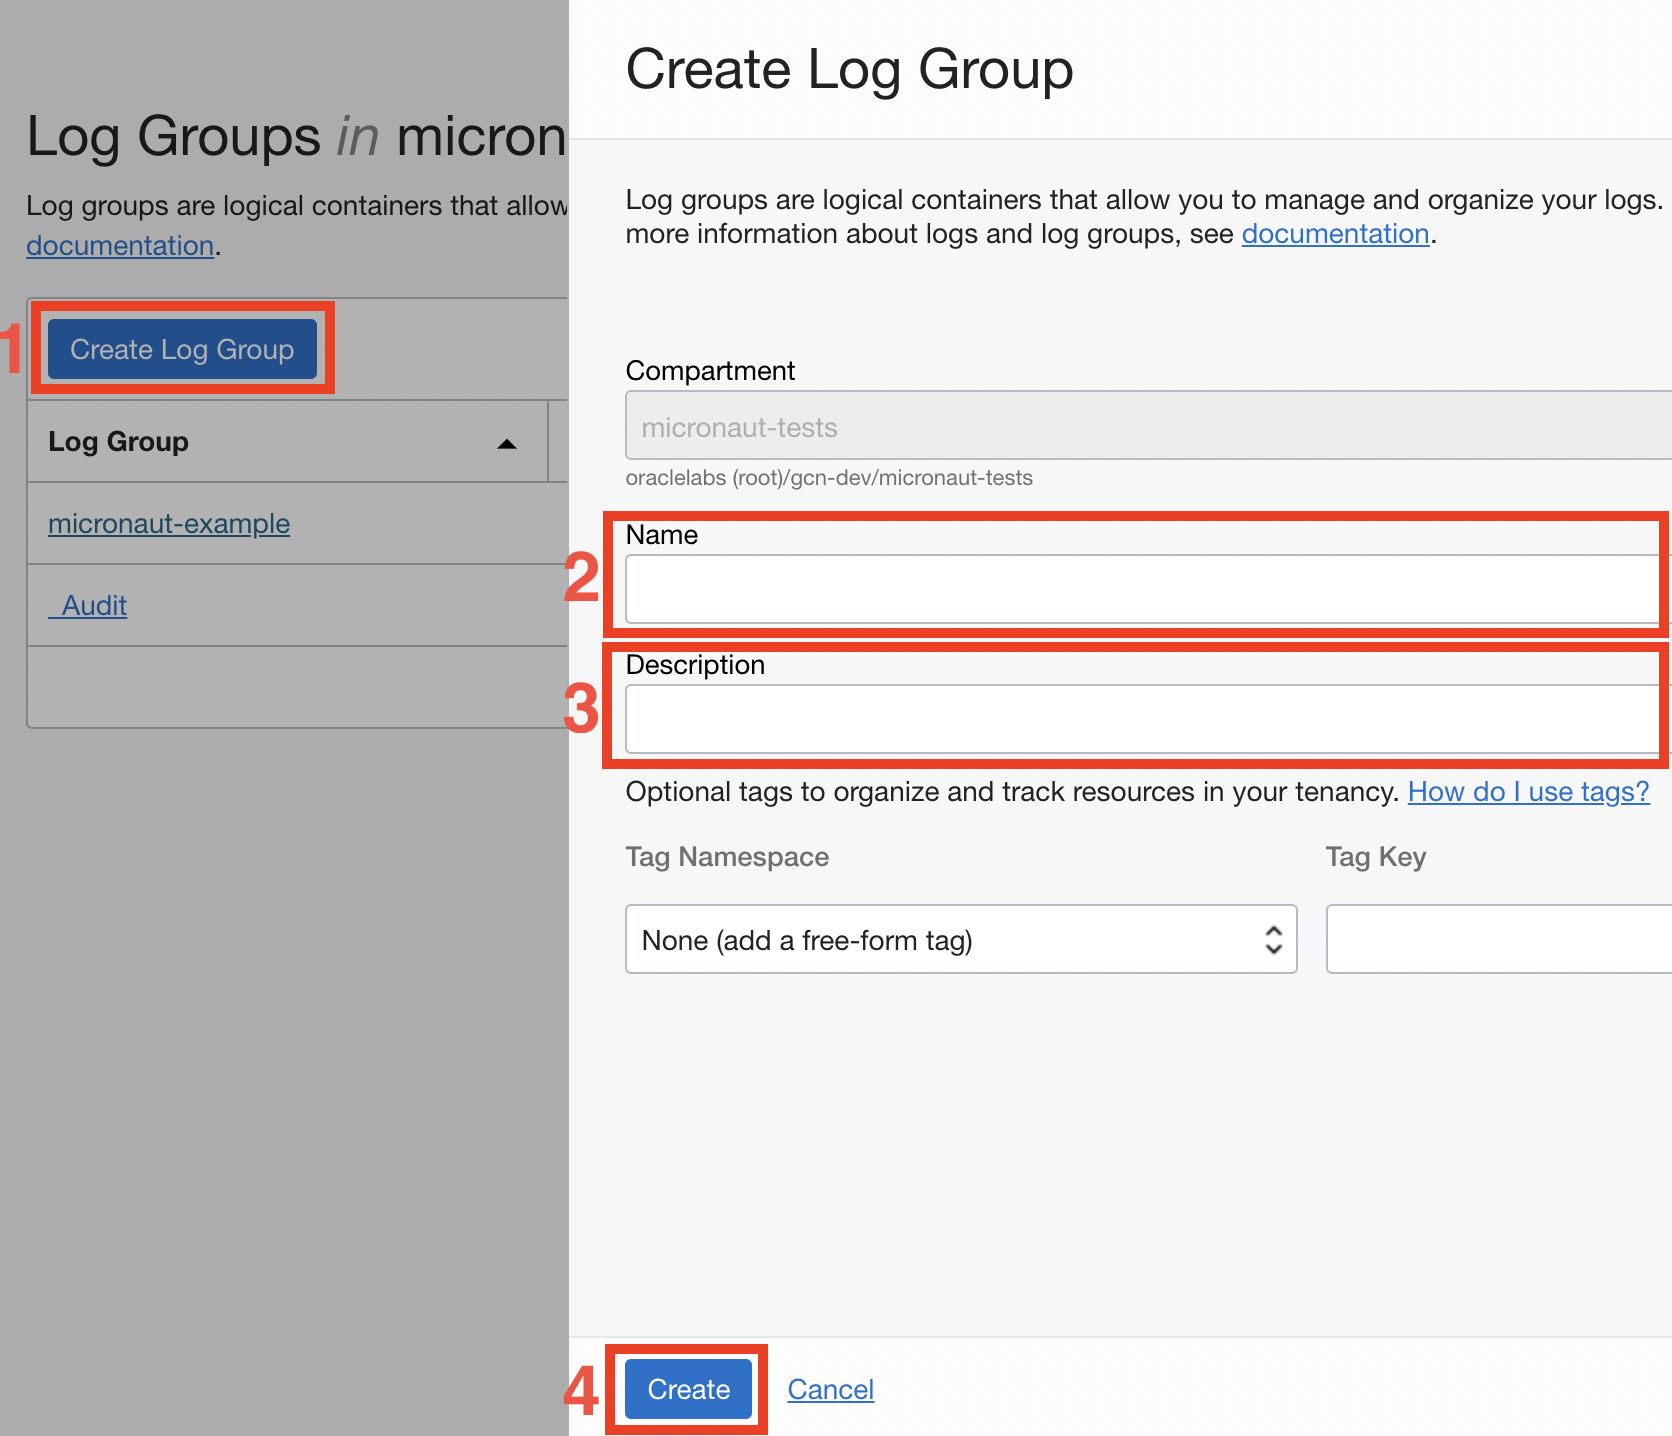
If you don’t already have a Log group, create one.
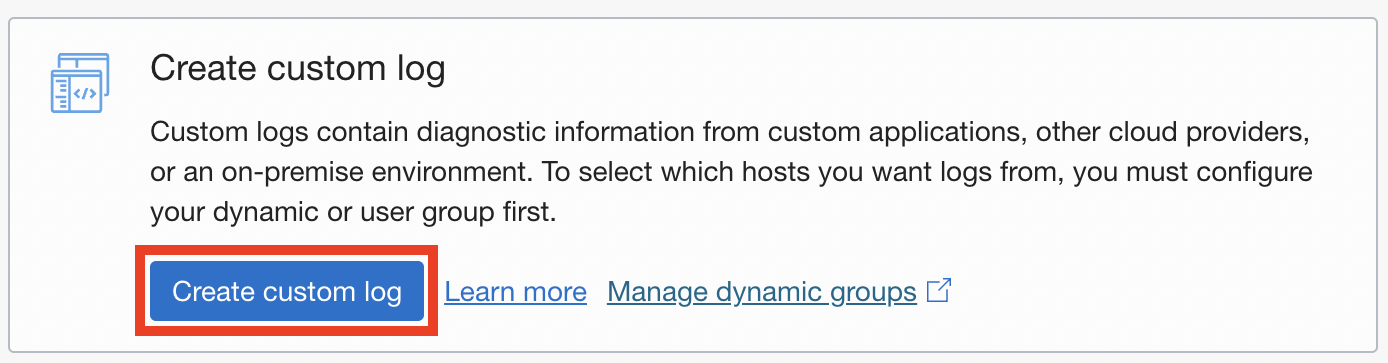
To create a custom log, first visit the Oracle Log Portal.
Click "Create Custom log".
Specify the name for the log and go to the next step.

Choose "Add Configuration later" and finish the wizard.

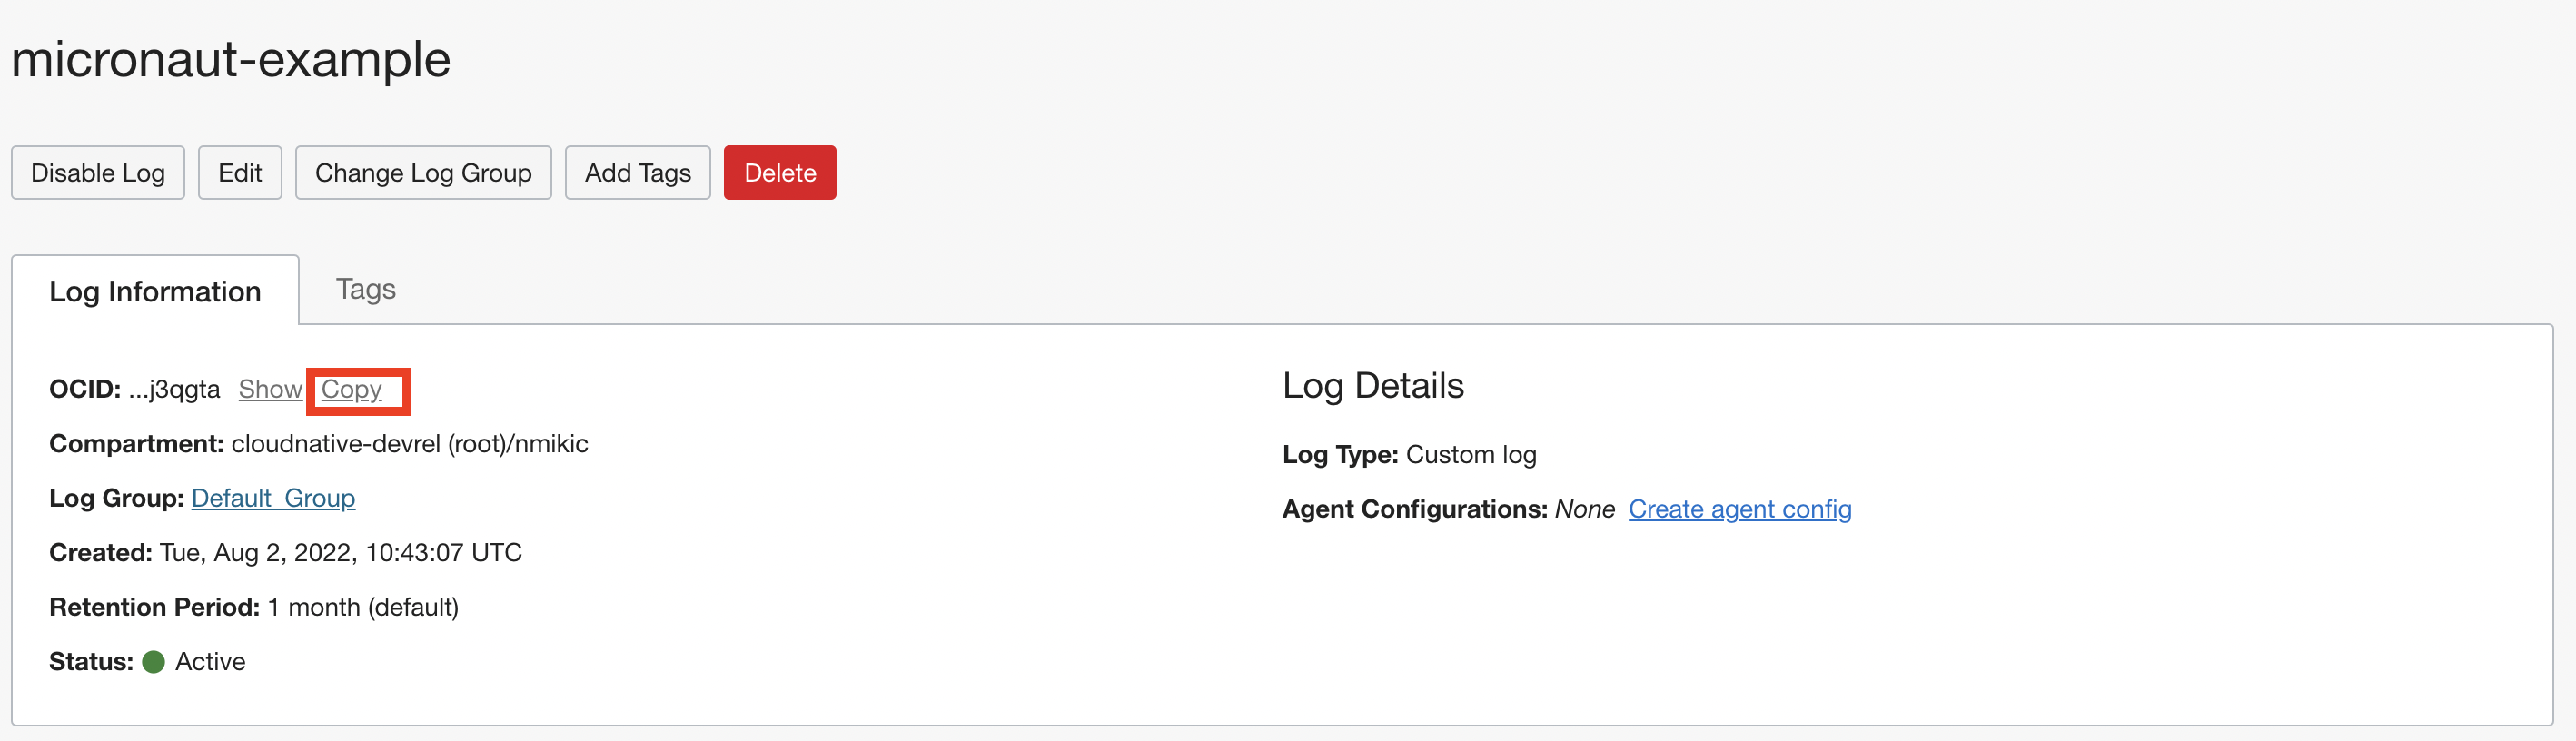
Copy the OCID, you will need it later.
Logback configuration
Edit src/main/resources/logback.xml to look like this:
src/main/resources/logback.xml
<configuration>

    <appender name="ORACLE" class="io.micronaut.oraclecloud.logging.OracleCloudAppender">
        <logId>ocid1.log.oc1.iad...</logId>
        <!-- <blackListLoggerName>example.app.Application</blackListLoggerName> -->
        <encoder class="ch.qos.logback.core.encoder.LayoutWrappingEncoder">
            <layout class="ch.qos.logback.contrib.json.classic.JsonLayout">
                <jsonFormatter class="io.micronaut.oraclecloud.logging.OracleCloudJsonFormatter" />
            </layout>
        </encoder>
    </appender>

    <root level="INFO">
        <appender-ref ref="ORACLE" />
    </root>
</configuration>
Specify the OCID of your log in the logId element.
You can customize your JsonLayout with additional parameters as described in the Logback JsonLayout documentation.
OracleCloudAppender supports blacklisting one or more loggers by specifying the logger names.
This is useful when specifying level=DEBUG or level=TRACE for the root logger level.
| Property | Type | Required | Default value | Description |
|---|---|---|---|---|
|
|
true |
/ |
the OCID of the log |
|
|
false |
host-name.application-name |
the type of the log |
|
|
false |
application-name |
the subject of the log |
|
|
false |
host-name |
the source of the log |
|
|
false |
100 |
Time in ms between log publishing batches |
|
|
false |
128 |
The maximum number of log entries that will be sent per batch |
|
|
false |
128 |
The size of the publishing log queue |
|
|
false |
empty |
Comma-delimited list of logger names that won’t be published |
The logId is also configurable through the application and application-oraclecloud configuration files with the oci.logging.logId key, and it will be considered as the prime source of it.
|
OpenTelemetry and logging
If you use OpenTelemetry for tracing, you can include traceId and spanId fields in your logs.
First, add this dependency in your build file:
runtimeOnly("io.opentelemetry.instrumentation:opentelemetry-logback-mdc-1.0:1.16.0-alpha")<dependency>
<groupId>io.opentelemetry.instrumentation</groupId>
<artifactId>opentelemetry-logback-mdc-1.0</artifactId>
<version>1.16.0-alpha</version>
<scope>runtime</scope>
</dependency>Inside src/main/resources/logback.xml, add a new io.opentelemetry.instrumentation.logback.v1_0.OpenTelemetryAppender.
src/main/resources/logback.xml
<configuration>

    <appender name="ORACLE" class="io.micronaut.oraclecloud.logging.OracleCloudAppender">
        <logId>ocid1.log.oc1.iad...</logId>
        <!-- <blackListLoggerName>example.app.Application</blackListLoggerName> -->
        <encoder class="ch.qos.logback.core.encoder.LayoutWrappingEncoder">
            <layout class="ch.qos.logback.contrib.json.classic.JsonLayout">
                <jsonFormatter class="io.micronaut.oraclecloud.logging.OracleCloudJsonFormatter" />
            </layout>
        </encoder>
    </appender>

    <appender name="OTEL" class="io.opentelemetry.instrumentation.logback.v1_0.OpenTelemetryAppender">
        <appender-ref ref="ORACLE" />
    </appender>

    <root level="INFO">
        <appender-ref ref="OTEL" />
    </root>
</configuration>
Emergency Appender
OracleCloudAppender queues log messages and pushes them in batches to your OCI logs, so it is possible network issues or other problems can result in log messages not being remoted correctly.
To address such scenarios, you can configure the emergency appender to preserve those messages.
Add a new appender in src/main/resources/logback.xml (in the example it is STDOUT).
Inside the OracleCloudAppender add an appender-ref element that references this appender:
src/main/resources/logback.xml
<configuration>
    <appender name="STDOUT" class="ch.qos.logback.core.ConsoleAppender">
        <withJansi>true</withJansi>
        <!-- encoders are assigned the type
             ch.qos.logback.classic.encoder.PatternLayoutEncoder by default -->
        <encoder>
            <pattern>%cyan(%d{HH:mm:ss.SSS}) %gray([%thread]) %highlight(%-5level) %magenta(%logger{36}) - %msg%n</pattern>
        </encoder>
    </appender>

    <appender name="ORACLE" class="io.micronaut.oraclecloud.logging.OracleCloudAppender">
        <appender-ref ref="STDOUT"/>
        <logId>ocid1.log.oc1.iad.amaaaaaabnqp5kqao2yjg6xymuql7w25otmcoylqgnqymwsh3gaxm2j3qgtza</logId>
        <blackListLoggerName>org.apache.http.impl.conn.PoolingHttpClientConnectionManager</blackListLoggerName>
        <encoder class="ch.qos.logback.core.encoder.LayoutWrappingEncoder">
            <layout class="ch.qos.logback.contrib.json.classic.JsonLayout">
                <jsonFormatter class="io.micronaut.oraclecloud.logging.OracleCloudJsonFormatter" />
            </layout>
        </encoder>
    </appender>

    <root level="INFO">
        <appender-ref ref="ORACLE" />
    </root>
</configuration>
Browsing the logs
You can browse your logs in the Oracle Log Portal. Navigate to your Log and view log entries in the "Explore Log" section.
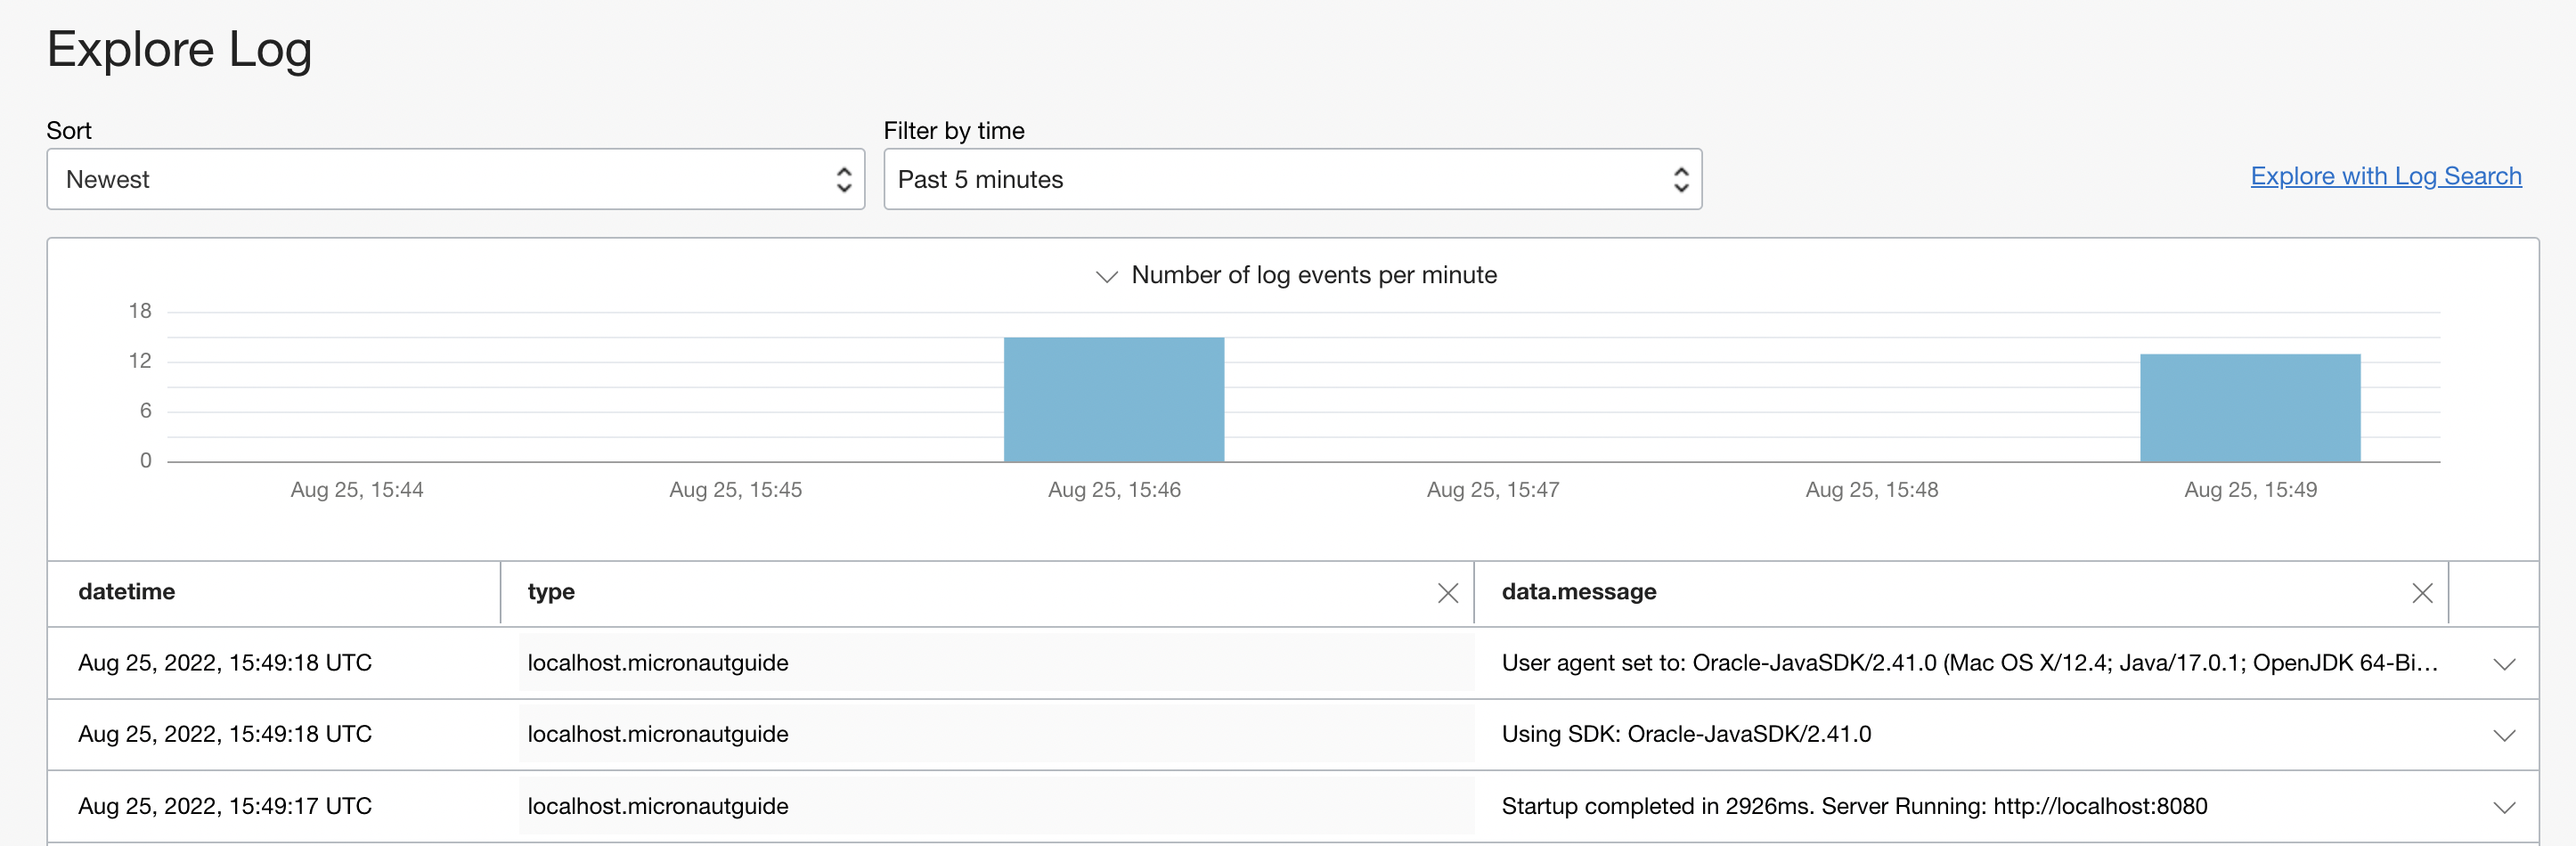
If you have any troubles with configuring the Oracle Appender, add <configuration debug="false"> in logback.xml.
15 Secure Distributed Configuration with Oracle Cloud Vault
To get started with Distributed Configuration with Oracle Cloud Vault, add the following dependency to your project:
implementation("io.micronaut.oraclecloud:micronaut-oraclecloud-vault")<dependency>
<groupId>io.micronaut.oraclecloud</groupId>
<artifactId>micronaut-oraclecloud-vault</artifactId>
</dependency>Then create a bootstrap configuration file in src/main/resources/ and ensure your Authentication configuration is present in this file to enable authenticating with one of the supported mechanisms (config, instance principal, resource principal, etc.)
Then, add the following to the bootstrap configuration file to specify Vault support:
micronaut.application.name=myapp
micronaut.config-client.enabled=true
oci.vault.config.enabled=true
oci.vault.vaults[0].ocid=ocid1.vault.oc1.phx...
oci.vault.vaults[0].compartment-ocid=ocid1.compartment.oc1...
micronaut:
application:
name: myapp
config-client:
enabled: true
oci:
vault:
config:
enabled: true
vaults:
- ocid: ocid1.vault.oc1.phx...
compartment-ocid: ocid1.compartment.oc1...[micronaut]
[micronaut.application]
name="myapp"
[micronaut.config-client]
enabled=true
[oci]
[oci.vault]
[oci.vault.config]
enabled=true
[[oci.vault.vaults]]
ocid="ocid1.vault.oc1.phx..."
compartment-ocid="ocid1.compartment.oc1..."micronaut {
application {
name = "myapp"
}
configClient {
enabled = true
}
}
oci {
vault {
config {
enabled = true
}
vaults = [{
ocid = "ocid1.vault.oc1.phx..."
compartmentOcid = "ocid1.compartment.oc1..."
}]
}
}{
micronaut {
application {
name = "myapp"
}
config-client {
enabled = true
}
}
oci {
vault {
config {
enabled = true
}
vaults = [{
ocid = "ocid1.vault.oc1.phx..."
compartment-ocid = "ocid1.compartment.oc1..."
}]
}
}
}{
"micronaut": {
"application": {
"name": "myapp"
},
"config-client": {
"enabled": true
}
},
"oci": {
"vault": {
"config": {
"enabled": true
},
"vaults": [{
"ocid": "ocid1.vault.oc1.phx...",
"compartment-ocid": "ocid1.compartment.oc1..."
}]
}
}
}One or more Vaults can be configured, and each must include ocid and compartment-ocid configuration values.
Note that the compartment-ocid is not the vault compartment, but the compartment from where the secrets will be fetched.
If you only want this configuration to be active in the Oracle Cloud environment but not locally, name the configuration file bootstrap-oraclecloud (with the appropriate extension, such as .properties).
|
You’re now ready to go! You can access the config variables in a few different ways.
If you create a secret with the name of SECRET_ONE in your Oracle Cloud Vault, then it will be available to use in your application like any standard configuration variable:
@Value("${SECRET_ONE}") String secretOne;You can also use @Property:
@Property(name = "SECRET_ONE") String secretOne;Values from Vault are always String, but you can use @ConfigurationProperties` on a bean to provide properly typed configuration variables.
So if you were to create secrets in your Oracle Cloud Vault like so:
| Name | Value |
|---|---|
MY_SECRETS_ONE |
Value One |
MY_SECRETS_TWO |
value two |
MY_SECRETS_THREE |
true |
MY_SECRETS_FOUR |
42 |
MY_SECRETS_FIVE |
3.16 |
You could add a config bean, like so:
@ConfigurationProperties("my-secrets")
public record Config(String one,
                     String two,
                     boolean three,
                     int four,
                     Double five) {
}
Another option is to inject your variables into your configuration files. Then allows you to store things like database passwords and API keys in your vault:
datasources.default.password=${DB_PASSWORD}datasources:
default:
password: ${DB_PASSWORD}[datasources]
[datasources.default]
password="${DB_PASSWORD}"datasources {
'default' {
password = "${DB_PASSWORD}"
}
}{
datasources {
default {
password = "${DB_PASSWORD}"
}
}
}{
"datasources": {
"default": {
"password": "${DB_PASSWORD}"
}
}
}| See the guide for Securely Store Micronaut Application Secrets in Oracle Cloud Vault to learn more. |
16 Oracle Cloud Storage Support
Micronaut provides a high-level, uniform object storage API that works across the major cloud providers: Micronaut Object Storage.
To get started, select the object-storage-oracle-cloud feature in Micronaut Launch, or add the following dependency:
implementation("io.micronaut.objectstorage:micronaut-object-storage-oracle-cloud")<dependency>
<groupId>io.micronaut.objectstorage</groupId>
<artifactId>micronaut-object-storage-oracle-cloud</artifactId>
</dependency>For more information, see the Micronaut Object Storage Oracle Cloud support documentation.
| See the guide for Use the Micronaut Object Storage API to Store Files in Oracle Cloud Infrastructure (OCI) Object Storage to learn more. |
17 OCI Certificate SSL Support
To start using Oracle Cloud Certificates service, first create a certificate on OCI, and add the following dependency to your project:
implementation("io.micronaut.oraclecloud:micronaut-oraclecloud-certificates")<dependency>
<groupId>io.micronaut.oraclecloud</groupId>
<artifactId>micronaut-oraclecloud-certificates</artifactId>
</dependency>Copy the OCID of your certificate:
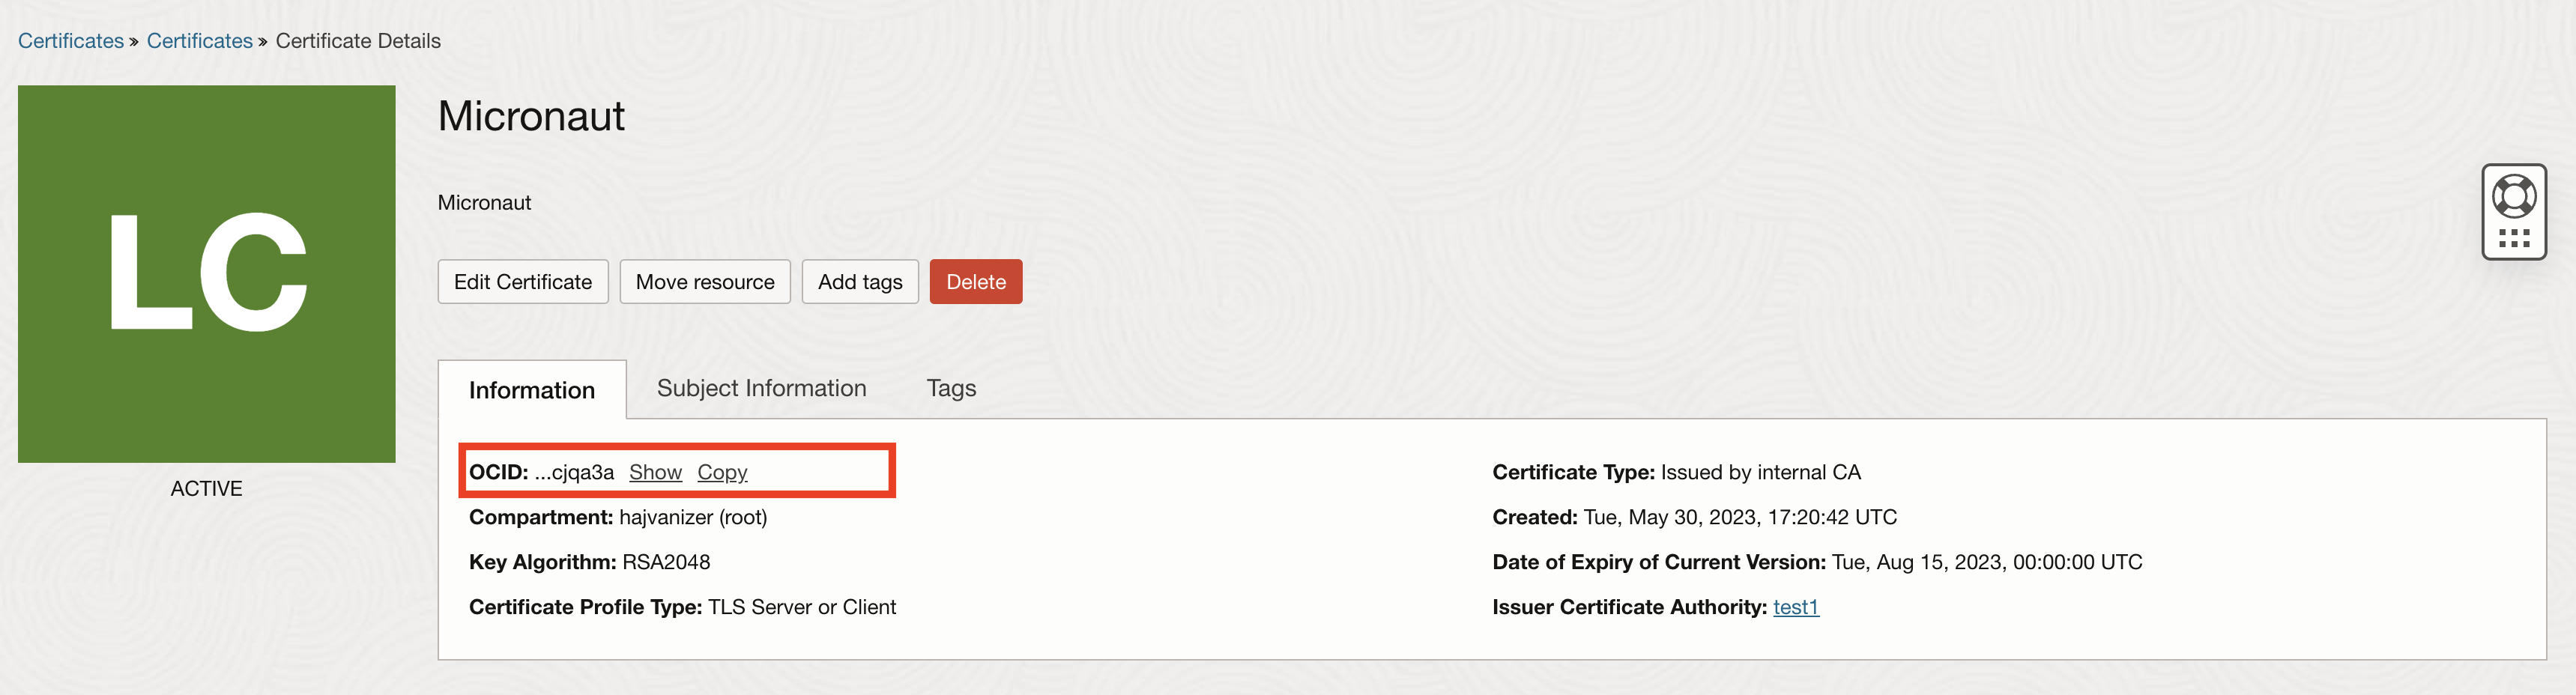
| Before you create a certificate, make sure that you have created the required policies. |
Add the following to the application configuration file to enable SSL and Oracle Cloud Certificate support:
micronaut.server.ssl.enabled=true
oci.certificates.default.enabled=true
oci.certificates.default.certificate-id=ocid1.certificate.oc1.....
micronaut:
server:
ssl:
enabled: true
oci:
certificates:
# Define one or more named certificate configurations (primary name is "default")
default:
enabled: true
certificate-id: ocid1.certificate.oc1.....
# version-number: 1
# certificate-version-name: my-version[micronaut]
[micronaut.server]
[micronaut.server.ssl]
enabled=true
[oci]
[oci.certificates]
[oci.certificates.default]
enabled=true
certificate-id="ocid1.certificate.oc1....."micronaut {
server {
ssl {
enabled = true
}
}
}
oci {
certificates {
'default' {
enabled = true
certificateId = "ocid1.certificate.oc1....."
}
}
}{
micronaut {
server {
ssl {
enabled = true
}
}
}
oci {
certificates {
default {
enabled = true
certificate-id = "ocid1.certificate.oc1....."
}
}
}
}{
"micronaut": {
"server": {
"ssl": {
"enabled": true
}
}
},
"oci": {
"certificates": {
"default": {
"enabled": true,
"certificate-id": "ocid1.certificate.oc1....."
}
}
}
}To use a specific named certificate for server SSL, set micronaut.server.ssl.key-name to the same name you configure under oci.certificates.<name>.* and provide the certificate-id.
For example, to use a certificate named server:
micronaut.server.ssl.enabled=true
micronaut.server.ssl.key-name=server
oci.certificates.server.certificate-id=ocid1.certificate.oc1.....
micronaut:
server:
ssl:
enabled: true
key-name: server
oci:
certificates:
server:
certificate-id: ocid1.certificate.oc1.....[micronaut]
[micronaut.server]
[micronaut.server.ssl]
enabled=true
key-name="server"
[oci]
[oci.certificates]
[oci.certificates.server]
certificate-id="ocid1.certificate.oc1....."micronaut {
server {
ssl {
enabled = true
keyName = "server"
}
}
}
oci {
certificates {
server {
certificateId = "ocid1.certificate.oc1....."
}
}
}{
micronaut {
server {
ssl {
enabled = true
key-name = "server"
}
}
}
oci {
certificates {
server {
certificate-id = "ocid1.certificate.oc1....."
}
}
}
}{
"micronaut": {
"server": {
"ssl": {
"enabled": true,
"key-name": "server"
}
}
},
"oci": {
"certificates": {
"server": {
"certificate-id": "ocid1.certificate.oc1....."
}
}
}
}| The previously supported top-level properties (oci.certificates.certificate-id, etc.) are deprecated. They remain functional for backward compatibility, but you should migrate to the named configuration format oci.certificates.<name>.*. If you continue using the legacy top-level keys, a deprecation warning is logged at startup. |
Legacy configuration (deprecated):
micronaut.server.ssl.enabled=true
oci.certificates.enabled=true
oci.certificates.certificate-id=ocid1.certificate.oc1.....
micronaut:
server:
ssl:
enabled : true
oci:
certificates:
enabled: true
certificate-id: ocid1.certificate.oc1.....[micronaut]
[micronaut.server]
[micronaut.server.ssl]
enabled=true
[oci]
[oci.certificates]
enabled=true
certificate-id="ocid1.certificate.oc1....."micronaut {
server {
ssl {
enabled = true
}
}
}
oci {
certificates {
enabled = true
certificateId = "ocid1.certificate.oc1....."
}
}{
micronaut {
server {
ssl {
enabled = true
}
}
}
oci {
certificates {
enabled = true
certificate-id = "ocid1.certificate.oc1....."
}
}
}{
"micronaut": {
"server": {
"ssl": {
"enabled": true
}
}
},
"oci": {
"certificates": {
"enabled": true,
"certificate-id": "ocid1.certificate.oc1....."
}
}
}
If you only want this configuration to be active in the Oracle Cloud environment but not locally, name the configuration file application-oraclecloud (with the appropriate extension, such as .properties).
|
In the next table, you can find useful parameters to further customize integration with Oracle Cloud Certificates:
| Property | Type | Required | Default value | Description |
|---|---|---|---|---|
|
|
false |
false |
Enable/Disable OCI Certificate feature |
|
|
true |
/ |
the OCID of the certificate |
|
|
false |
/ |
Version number of the certificate |
|
|
false |
/ |
Version name of the certificate |
|
|
false |
24h |
Refresh frequency for SSL Certificate |
|
|
false |
24h |
Initial refresh delay for refreshing SSL Certificate |
|
|
false |
3 |
How many attempts to retry if refreshing the certificate fails |
|
|
false |
1s |
How long to delay attempts between retries if refreshing a certificate fails |
| Property | Type | Required | Default value | Description |
|---|---|---|---|---|
|
|
false |
true |
Enable/Disable this named certificate entry. Defaults to true when defined. |
|
|
true |
/ |
The OCID of the certificate to load and refresh. |
|
|
false |
/ |
Specific version number to use. |
|
|
false |
/ |
Specific version name to use. |
Global refresh settings continue to be configured under oci.certificates.refresh.* and apply to all configured certificates.
|
18 OCI OKE Kubernetes Client
The micronaut-oraclecloud-oke-kubernetes-client module integrates Micronaut Kubernetes Client with the OKE and OCI Container Engine service.
When the module is enabled, the client will retrieve a kubeconfig from the OKE cluster and provide authentication for requests to the OKE API server. This module is not needed for Kubernetes nodes that do not connect to the Kubernetes API server. Instead, this is useful for sending requests to manage the OKE cluster.
If you want to use an OCI client inside an OKE node, use the micronaut-oraclecloud-oke-workload-identity module instead.
|
To begin, add a dependency on the micronaut-oraclecloud-oke-kubernetes-client module:
runtimeOnly("io.micronaut.oraclecloud:micronaut-oraclecloud-oke-kubernetes-client")<dependency>
<groupId>io.micronaut.oraclecloud</groupId>
<artifactId>micronaut-oraclecloud-oke-kubernetes-client</artifactId>
<scope>runtime</scope>
</dependency>Add a dependency on one of the Kubernetes OpenAPI clients (there are blocking and Reactor-based versions):
implementation("io.micronaut.kubernetes:micronaut-kubernetes-client-openapi")<dependency>
<groupId>io.micronaut.kubernetes</groupId>
<artifactId>micronaut-kubernetes-client-openapi</artifactId>
</dependency>Then configure the OKE kubernetes client cluster id:
Configuring cluster id
oci.oke.kubernetes.client.cluster-id=ocid..my-cluster-idoci:
oke:
kubernetes:
client:
cluster-id: 'ocid..my-cluster-id'[oci]
[oci.oke]
[oci.oke.kubernetes]
[oci.oke.kubernetes.client]
cluster-id="ocid..my-cluster-id"oci {
oke {
kubernetes {
client {
clusterId = "ocid..my-cluster-id"
}
}
}
}{
oci {
oke {
kubernetes {
client {
cluster-id = "ocid..my-cluster-id"
}
}
}
}
}{
"oci": {
"oke": {
"kubernetes": {
"client": {
"cluster-id": "ocid..my-cluster-id"
}
}
}
}
}See all available configuration properties in OkeKubernetesClientConfig.
19 Guides
See the following list of guides to learn more about working with Oracle Cloud in the Micronaut Framework:
20 Repository
You can find the source code of this project in this repository: