implementation("io.micronaut.oraclecloud:micronaut-oraclecloud-sdk")Micronaut Oracle Cloud
Provides integration between Micronaut and Oracle Cloud
Version:
1 Introduction
This module provides integration between Micronaut and the Oracle Cloud SDK by giving you the ability to easily inject SDK clients into your Micronaut services and controllers. In addition to supporting the SDK’s blocking clients, the module provides reactive clients that use RxJava to provide async alternatives to the blocking clients in the SDK (an improvement upon the SDK’s 'out-of-the-box' aysnc clients). This module also includes support for Oracle Cloud (serverless) Functions.
2 Quick Start
To get started quickly Setup the Oracle Cloud CLI making sure you have run oci setup config to configure local access to Oracle Cloud.
Then add a dependency on the micronaut-oraclecloud-sdk module:
<dependency>
    <groupId>io.micronaut.oraclecloud</groupId>
    <artifactId>micronaut-oraclecloud-sdk</artifactId>
</dependency>
Followed by a dependency on the OCI SDK client you wish to use, for example for Object Store:
implementation("com.oracle.oci.sdk:oraclecloud-java-sdk-objectstorage")<dependency>
<groupId>com.oracle.oci.sdk</groupId>
<artifactId>oraclecloud-java-sdk-objectstorage</artifactId>
</dependency>All OCI SDK clients are supported.
3 Authentication
The following authentication providers are supported in this module:
ConfigFileAuthenticationDetailsProvider
The ConfigFileAuthenticationDetailsProvider uses a config file located at $USER_HOME/.oci/config. Specify a profile within the config file via your application.yml:
oci:
  config:
    profile: DEFAULT
SimpleAuthenticationDetailsProvider
The SimpleAuthenticationDetailsProvider allows you to provide config details via standard Micronaut configuration files (application.yml).
oci:
  fingerprint: [String. The private key fingerprint]
  passphrase: [String. The private key passphrase]
  private-key: [String. The contents of your private key. Optionally, pass a path with private-key-file (see below).]
  private-key-file: [String. The path to the private key file (used in place of private-key above)]
  region: [String. Ex: us-phoenix-1]
  tenant-id: [String. The tenancy OCID]
  user-id: [String. The user OCID]
InstancePrincipalsAuthenticationDetailsProvider
If your application is running in the Oracle Cloud, you can authorize the InstancePrincipalsAuthenticationDetailsProvider to make SDK calls and utilize Instance Principal authentication. See the documentation to enable this via dynamic groups and policies, and then enable it for the Oracle Cloud environment via application-oraclecloud.yml with:
oci:
  config:
    instance-principal:
        enabled: true
ResourcePrincipalAuthenticationDetailsProvider
ResourcePrincipalAuthenticationDetailsProvider is similar to instance principals, but used for Oracle Functions (serverless). See the documentation for instructions on how to configure the necessary dynamic group rules and policies to use Resource Principal auth with your serverless functions. Once the proper configuration is complete, your Micronaut driven serverless functions will be able to use the OCI SDKs with no futher configuration needed.
4 Available Modules
The following modules are provided.
micronaut-oraclecloud-common
implementation("io.micronaut.oraclecloud:micronaut-oraclecloud-common")<dependency>
<groupId>io.micronaut.oraclecloud</groupId>
<artifactId>micronaut-oraclecloud-common</artifactId>
</dependency>Provides the common functionality and sets up the following beans:
-
BasicAuthenticationDetailsProvider - Authentication details auto-detected from local
$USER/.oci/configor environment -
ClientConfiguration - Common configuration for all clients
-
TenancyIdProvider - Interface to resolve current tenancy
micronaut-oraclecloud-sdk
implementation("io.micronaut.oraclecloud:micronaut-oraclecloud-sdk")<dependency>
<groupId>io.micronaut.oraclecloud</groupId>
<artifactId>micronaut-oraclecloud-sdk</artifactId>
</dependency>Provides support for injecting any of the available SDK client interfaces.
| This module does not have a dependency on any one module. You should add these to your project as needed. For example to use Object Storage you would define a dependency on this module as well as: |
implementation("com.oracle.oci.sdk:oci-java-sdk-objectstorage")<dependency>
<groupId>com.oracle.oci.sdk</groupId>
<artifactId>oci-java-sdk-objectstorage</artifactId>
</dependency>micronaut-oraclecloud-function
implementation("io.micronaut.oraclecloud:micronaut-oraclecloud-function")<dependency>
<groupId>io.micronaut.oraclecloud</groupId>
<artifactId>micronaut-oraclecloud-function</artifactId>
</dependency>Provides the OciFunction super class that you can subclass to enable the ability to write Oracle Cloud Functions in Micronaut that can utilize Micronaut dependency injection services.
micronaut-oraclecloud-function-http
implementation("io.micronaut.oraclecloud:micronaut-oraclecloud-function-http")<dependency>
<groupId>io.micronaut.oraclecloud</groupId>
<artifactId>micronaut-oraclecloud-function-http</artifactId>
</dependency>Provides the HttpFunction class that can be used as a handler to write HTTP API Gateway function handlers that delegate to regular Micronaut controllers.
5 RxJava 2 Support
In addition to the blocking clients, this module provides clients that use RxJava to allow reactive programming with Micronaut for each SDK.
| You need to add the relevant OCI SDK dependency to use these clients. |
For example, instead of ObjectStorageClient, you can inject ObjectStorageRxClient to use the Object Storage API:
import com.oracle.bmc.objectstorage.model.*;
import com.oracle.bmc.objectstorage.requests.*;
import com.oracle.bmc.objectstorage.responses.*;
import io.micronaut.http.annotation.*;
import io.micronaut.oraclecloud.clients.rxjava2.objectstorage.ObjectStorageRxClient;
import io.micronaut.oraclecloud.core.TenancyIdProvider;
import io.reactivex.Single;

import javax.annotation.Nullable;
import java.util.List;
import java.util.stream.Collectors;

@Controller("/os")
public class BucketController implements BucketOperations {
    private final ObjectStorageRxClient objectStorage;
    private final TenancyIdProvider tenancyIdProvider;

    public BucketController(
            ObjectStorageRxClient objectStorage,
            TenancyIdProvider tenancyIdProvider) { (1)
        this.objectStorage = objectStorage;
        this.tenancyIdProvider = tenancyIdProvider;
    }
}| 1 | The ObjectStorageRxClient is injected into the constructor. |
Once you have a reference to the relevant RxJava 2 client it is easier to compose non-blocking operations, the following example creates a bucket:
@Override
@Post(value = "/buckets/{name}")
public Single<String> createBucket(String name) {
    String tenancyId = tenancyIdProvider.getTenancyId();
    GetNamespaceRequest getNamespaceRequest = GetNamespaceRequest.builder()
            .compartmentId(tenancyId).build();
    return objectStorage.getNamespace(getNamespaceRequest) (1)
            .flatMap(namespaceResponse -> {
        CreateBucketRequest.Builder builder = CreateBucketRequest.builder()
                .namespaceName(namespaceResponse.getValue())
                .createBucketDetails(CreateBucketDetails.builder()
                        .compartmentId(tenancyId)
                        .name(name)
                        .build());

        return objectStorage.createBucket(builder.build()) (2)
                .map(CreateBucketResponse::getLocation); (3)
    });
}| 1 | First a request to obtain the namespace is sent |
| 2 | Then with the response the flatMap operator is used to send another request to create a bucket |
| 3 | Finally the location of the bucket is returned in the response |
6 Oracle Functions (Serverless)
Oracle Functions are based on Project.fn. You can write simple functions targeting the Oracle Function environment by extending from the OciFunction super class.
Micronaut’s Oracle Function support can utilize GraalVM native-image running within a Docker container. This will result in extremely responsive serverless functions utilizing very few Cloud resources.
|
This super class enables dependency injection for the function. Note that the the function definition must conform to the following rules:
-
The class must have a public no arguments constructor
-
A public method that executes the function must be defined
-
The class must be annotated with
@Singleton
Micronaut support for Oracle Functions can be combined with the OCI SDK support to give your serverless functions access to the OCI SDKs as needed.
| You must have resource principal authentication properly configured in order for this example to work. |
With Micronaut 2.1 and above you can create a new Oracle Function with the following command line command:
$ mn create-function-app myfunction --features oracle-functionThis will create a Gradle build that sets up the Micronaut Gradle plugin. The only changes you need to make are to modify the build.gradle and alter the dockerBuild and dockerBuildNative to point at the Oracle Cloud Registry you wish the publish the docker images for the function:
dockerBuild {
    images = ["[REGION].ocir.io/[TENANCY_ID]/[REPOSITORY]/$project.name:$project.version"]
}

dockerBuildNative {
    images = ["[REGION].ocir.io/[TENANCY_ID]/[REPOSITORY]/$project.name:$project.version"]
}
The REGION should be altered to your region, the TENANCY_ID to your tenancy and the REPOSITORY to the Docker repository you wish to publish to.
Build
The following provides a serverless function example that uses the Object Storage API to list the available buckets:
import com.oracle.bmc.objectstorage.ObjectStorageClient;
import com.oracle.bmc.objectstorage.model.BucketSummary;
import com.oracle.bmc.objectstorage.requests.GetNamespaceRequest;
import com.oracle.bmc.objectstorage.requests.ListBucketsRequest;
import io.micronaut.oraclecloud.core.TenancyIdProvider;
import io.micronaut.oraclecloud.function.OciFunction;

import javax.inject.*;
import java.util.List;
import java.util.stream.Collectors;

@Singleton
public class ListBucketsFunction extends OciFunction { (1)

    @Inject
    ObjectStorageClient objectStorageClient; (2)

    @Inject
    TenancyIdProvider tenantIdProvider;

}| 1 | A public class with a no argument constructor annotated with @Singleton and extending from OciFunction |
| 2 | You can use the @Inject annotation to inject SDK components |
Once you have defined the function you should define a public method that is the function handler. For example:
public List<String> handleRequest() {
    GetNamespaceRequest getNamespaceRequest = GetNamespaceRequest.builder()
            .compartmentId(tenantIdProvider.getTenancyId()).build();
    String namespace = objectStorageClient.getNamespace(getNamespaceRequest).getValue();
    final ListBucketsRequest.Builder builder = ListBucketsRequest.builder();
    builder.namespaceName(namespace);
    builder.compartmentId(tenantIdProvider.getTenancyId());
    return objectStorageClient.listBuckets(builder.build())
            .getItems().stream().map(BucketSummary::getName)
            .collect(Collectors.toList());
}
The above example uses the Object Storage API to list the available buckets.
Docker Build
To build the Oracle Function you can run the ./gradlew dockerBuild command or to build the native version run ./gradlew dockerBuildNative.
Deploy
To deploy the Oracle Function as a Java function run ./gradlew dockerPush which will push the function to Oracle Container Registry.
To deploy the function as a native image you can run ./gradlew dockerPushNative which will deploy the function as a GraalVM native image.
Note that these commands will actually only publish the function to Oracle Container Registry, to make the function invokable you should use the Oracle Cloud UI to create the function or use the fn command line application to create the function from the container image:
Creating a Function from a Container Image
$ fn create function myapp myfunction [REGION].ocir.io/[TENANCY]/[REPOSITORY/[FUNCTION_NAME]:[FUNCTION_VERSION]

## For example:
$ fn create function myapp myfunction us-ashburn-1.ocir.io/mytenancy/myrepository/myfunction:1.0.0
For Java functions that do not use Native Image you will need to pass --memory 512 --timeout 120 as Java functions occupy more memory that native functions.
|
If you publish a new image using ./gradlew dockerPush or ./gradlerw dockerPushNative for an existing function you can also update it with fn update:
Updating an existing Function from a Container Image
$ fn update function myapp myfunction [REGION].ocir.io/[TENANCY]/[REPOSITORY/[FUNCTION_NAME]:[FUNCTION_VERSION]7 Oracle Functions HTTP (Serverless)
The micronaut-oraclecloud-function-http module gives you the ability to write HTTP API Gateway function handlers that delegate to regular Micronaut controllers.
Since Micronaut 2.1 you can create HTTP functions using the command line or via Micronaut Launch:
Creating a new Function with the CLI
$ mn create-app myfunction --features oracle-functionYou can then create your controller just as you would a normal Micronaut controller.
import com.oracle.bmc.objectstorage.ObjectStorage;
import com.oracle.bmc.objectstorage.model.BucketSummary;
import com.oracle.bmc.objectstorage.model.CreateBucketDetails;
import com.oracle.bmc.objectstorage.model.ListObjects;
import com.oracle.bmc.objectstorage.model.ObjectSummary;
import com.oracle.bmc.objectstorage.requests.*;
import com.oracle.bmc.objectstorage.responses.GetNamespaceResponse;
import io.micronaut.core.util.CollectionUtils;
import io.micronaut.http.MediaType;
import io.micronaut.http.annotation.*;
import io.micronaut.oraclecloud.core.TenancyIdProvider;

import javax.annotation.Nullable;
import java.util.List;
import java.util.Map;
import java.util.Optional;
import java.util.stream.Collectors;

@Controller("/os")
public class BucketController {
    private final ObjectStorage objectStorage;
    private final TenancyIdProvider tenancyIdProvider;

    public BucketController(
            ObjectStorage objectStorage,
            TenancyIdProvider tenancyIdProvider) { (1)
        this.objectStorage = objectStorage;
        this.tenancyIdProvider = tenancyIdProvider;
    }
}| 1 | This example uses the micronaut-oraclecloud-sdk module to perform Object Storage operations, so the ObjectStorage client and TenancyIdProvider are injected. |
Next, add a controller method to list all of the buckets in a compartment:
@Get("/buckets{/compartmentId}")
public List<String> listBuckets(@PathVariable @Nullable String compartmentId) {
    String compartmentOcid = compartmentId != null ? compartmentId : tenancyIdProvider.getTenancyId();
    GetNamespaceRequest getNamespaceRequest = GetNamespaceRequest.builder()
            .compartmentId(compartmentOcid).build();
    final GetNamespaceResponse namespaceResponse = objectStorage.getNamespace(getNamespaceRequest);
    final ListBucketsRequest.Builder builder = ListBucketsRequest.builder();
    builder.namespaceName(namespaceResponse.getValue());
    builder.compartmentId(compartmentOcid);
    return objectStorage.listBuckets(builder.build())
                    .getItems()
                    .stream()
                    .map(BucketSummary::getName)
                    .collect(Collectors.toList());
}
Docker Build
To build the Oracle Function you can run the ./gradlew dockerBuild command or to build the native version run ./gradlew dockerBuildNative.
Deploy
To deploy your function follow the same instructions provided for regular Oracle Functions.
API Gateway
Once you have deployed your function you’ll need to create an API Gateway to route requests to your serverless deployment. The Micronaut router will call the proper controller function based on the incoming HTTP Request Method and the path.
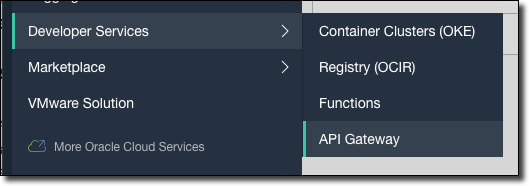
First, create an API Gateway by selecting 'Developer Services', then 'API Gateway' from the Oracle Cloud console dashboard.
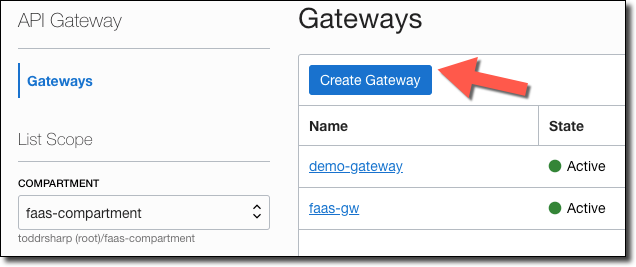
Click on 'Create Gateway'.
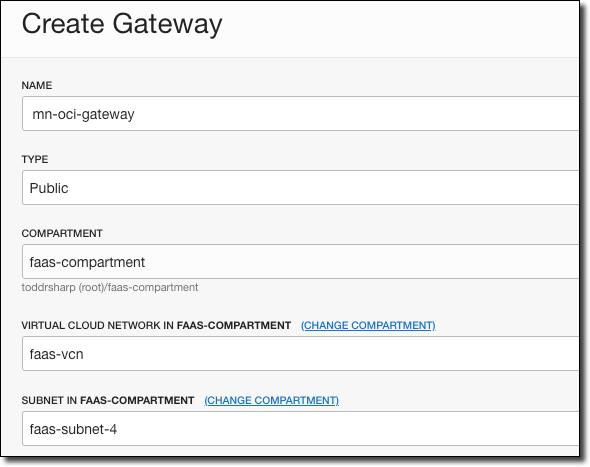
Enter a name for the gateway, choose the compartment it is stored in and the network and subnet.
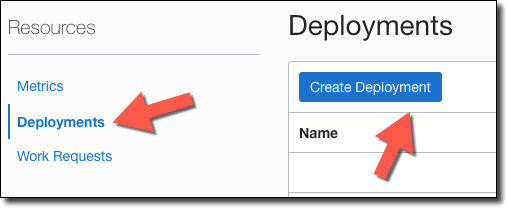
When the gateway is ‘Active’, click ‘Deployments’, then ‘Create Deployment’.
Provide a name for the deployment and enter a “Path Prefix”. If necessary, configure any Authentication, CORS or Rate Limiting and click ’Next’.
The path prefix must match the path you used in your controller (IE: @Controller("/os")).
|

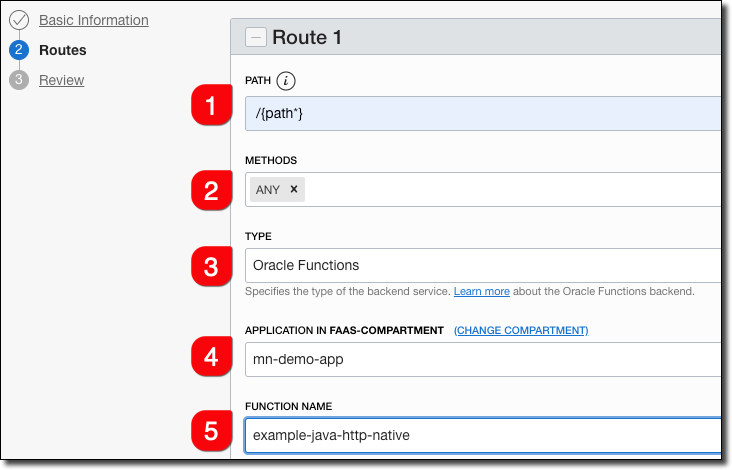
Enter route information.
-
Enter
/{path*}as the Path. This will capture all incoming requests and the Micronaut router will match the incoming path and request method with the proper controller method. -
Choose
ANYfor methods. Optionally, choose the necessary methods individually. -
Choose 'Oracle Functions' as the type.
-
Choose the appropriate Oracle Functions application.
-
Choose the function name that you used. This can be found in your function’s
func.yamlfile.
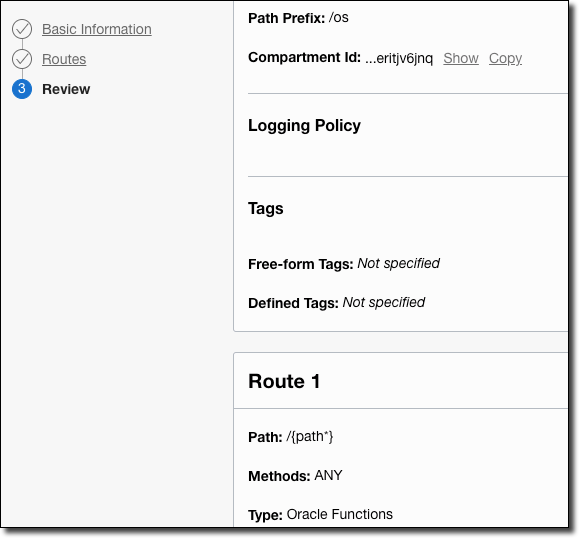
Click 'Next', then review the deployment details and click 'Create'.
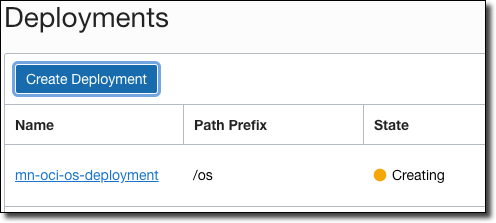
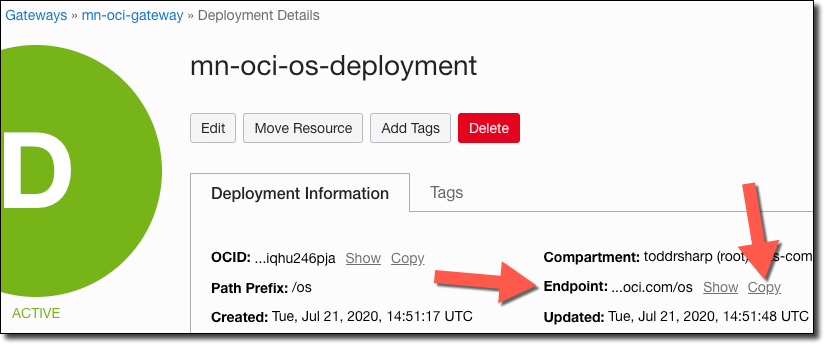
Your new deployment will be listed in 'Creating' state.
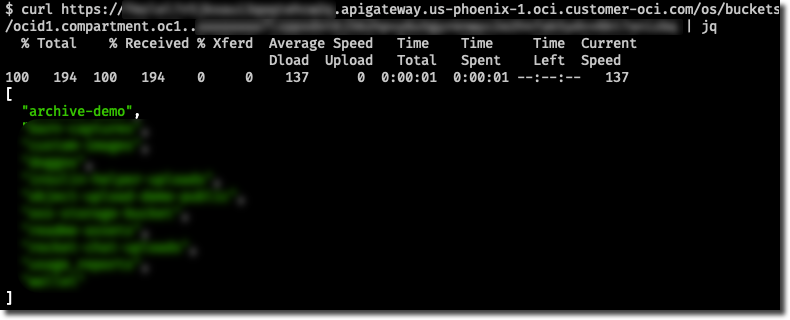
When your new deployment becomes 'Active', click on the deployment to view the deployment details. Copy the 'Endpoint' - this is the base URL that you’ll use for your function invocations.
Test your functions by appending the proper controller path and one of your controller endpoints.