Session-based authentication
Learn how to secure a Pyronaut application using session-based authentication.
1. Getting Started
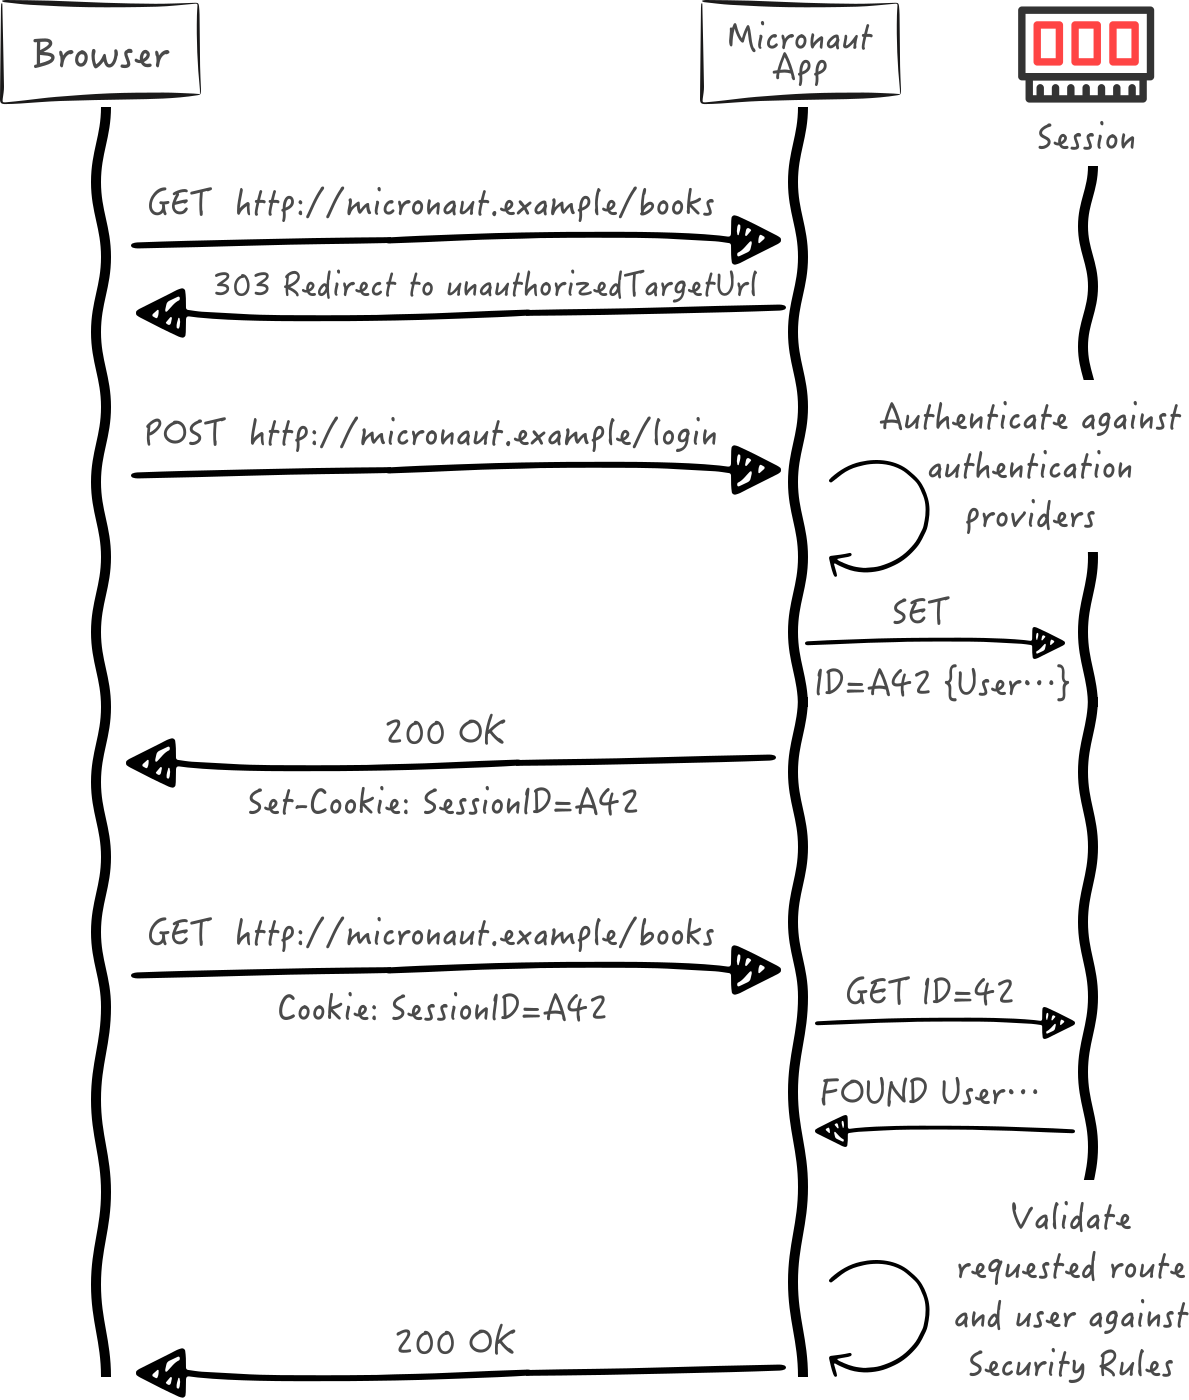
In this guide, we will create a Pyronaut application written in Python with session-based authentication.
The following sequence illustrates the authentication flow:
2. What you will need
To complete this guide, you will need the following:
-
Some time on your hands
-
GraalPy installed and the Pyronaut CLI available locally
3. Solution
We recommend that you follow the instructions in the next sections and create the application step by step. However, you can go right to the completed example.
-
Download and unzip the source
4. Writing the Application
Create an application using the Pyronaut CLI (Command Line Interface) or Pyronaut Launch
pyronaut create example.micronaut.micronautguide --features=security-session,views-velocity4.1. Configuration
Add this configuration to application.toml:
config/application.toml
[micronaut.security]
(1)
authentication = "session"

[micronaut.security.redirect]
(2)
login-success = "/"
(3)
login-failure = "/login/authFailed"
logout = "/"| 1 | Set micronaut.security.authentication to session. It sets the necessary beans for login and logout using session-based authentication. |
| 2 | After the user logs in, redirect them to the Home page. |
| 3 | If the login fails, redirect them to /login/authFailed |
4.2. Authentication Provider
To keep this guide simple, create a naive AuthenticationProvider to simulate user authentication.
src/example/micronaut/authentication_provider_user_password.py
from jakarta.inject import Singleton
from micronaut.security.authentication import (
    AuthenticationFailureReason,
    AuthenticationResponse,
)
from micronaut.security.authentication.provider import HttpRequestAuthenticationProvider

@Singleton  (1)
class AuthenticationProviderUserPassword(HttpRequestAuthenticationProvider):  (2)
    def authenticate(self, http_request, authentication_request) -> AuthenticationResponse:
        identity = authentication_request.getIdentity()
        secret = authentication_request.getSecret()
        if identity == "sherlock" and secret == "password":
            return AuthenticationResponse.success(identity)
return AuthenticationResponse.failure(AuthenticationFailureReason.CREDENTIALS_DO_NOT_MATCH)| 1 | Use jakarta.inject.Singleton to designate a class as a singleton. |
| 2 | A Micronaut Authentication Provider implements the interface io.micronaut.security.authentication.provider.HttpRequestAuthenticationProvider. |
4.3. Apache Velocity
By default, Micronaut controllers produce JSON. Usually, you consume those endpoints with a mobile phone application, or a JavaScript front end (Angular, React, Vue.js, etc.). However, to keep this guide simple, we will produce HTML in our controllers.
In order to do that, we use Apache Velocity and the Micronaut Server Side View Rendering Module.
Velocity is a Java-based template engine. It permits anyone to use a simple yet powerful template language to reference objects defined in Java code.
Create two Velocity templates in src/main/resources/views:
config/views/home.vm
<!DOCTYPE html>
<html>
    <head>
        <title>Home</title>
    </head>
    <body>
        #if( $loggedIn )
            <h1>username: <span>$username</span></h1>
        #else
            <h1>You are not logged in</h1>
        #end
        #if( $loggedIn )
            <form action="logout" method="POST">
                <input type="submit" value="Logout"/>
            </form>
        #else
            <p><a href="/login/auth">Login</a></p>
        #end
    </body>
</html>
config/views/auth.vm
<!DOCTYPE html>
<html>
    <head>
        #if( $errors )
            <title>Login Failed</title>
        #else
            <title>Login</title>
        #end
    </head>
<body>
    <form action="/login" method="POST">
        <ol>
            <li>
                <label for="username">Username</label>
                <input type="text" name="username" id="username"/>
            </li>
            <li>
                <label for="password">Password</label>
                <input type="password" name="password" id="password"/>
            </li>
            <li>
                <input type="submit" value="Login"/>
            </li>
            #if( $errors )
                <li id="errors">
                    <span style="color: red;">Login Failed</span>
                </li>
            #end
        </ol>
    </form>
</body>
</html>
4.4. Controllers
Create HomeController which resolves the base URL /:
src/example/micronaut/home_controller.py
from java.security import Principal
from micronaut.http.annotation import Controller, Get
from micronaut.security.annotation import Secured
from micronaut.security.rules import SecurityRule
from micronaut.views import View

@Secured(SecurityRule.IS_ANONYMOUS)  (1)
@Controller  (2)
class HomeController:

    @Get("/")  (3)
    @View("home")  (4)
    def index(self, principal: Principal | None = None) -> dict:  (5)
        model = {"loggedIn": principal is not None}
        if principal is not None:
            model["username"] = principal.getName()
return model| 1 | Annotate with io.micronaut.security.Secured to configure security access. Use isAnonymous() expression to allow access to authenticated and unauthenticated users. |
| 2 | The root route responds to /. |
| 3 | Use View annotation to specify which template to use to render the response. |
| 4 | If you are authenticated, the Micronaut framework binds the user object to a java.security.Principal | None argument. |
5. Login Form
Next, create LoginAuthController which renders the login form.
src/example/micronaut/login_auth_controller.py
from micronaut.http.annotation import Controller, Get
from micronaut.security.annotation import Secured
from micronaut.security.rules import SecurityRule
from micronaut.views import View

@Secured(SecurityRule.IS_ANONYMOUS)  (1)
@Controller("/login")  (2)
class LoginAuthController:

    @Get("/auth")  (3)
    @View("auth")  (4)
    def auth(self) -> dict:
        return {}

    @Get("/authFailed")  (5)
    @View("auth")  (4)
    def auth_failed(self) -> dict:
return {"errors": True}| 1 | Annotate with io.micronaut.security.Secured to configure security access. Use isAnonymous() expression for anonymous access. |
| 2 | Annotate with io.micronaut.http.annotation.Controller to designate the class as a Micronaut controller. |
| 3 | Responds to GET requests at /login/auth |
| 4 | Use View annotation to specify which template to use to render the response. |
| 5 | Responds to GET requests at /login/authFailed |
6. Tests
Create a test to verify the user authentication flow.
tests/example/micronaut/test_session_authentication.py
import pytest
import requests

from pyronaut.test import MicronautTest, micronaut_test_fixture


@pytest.fixture
def my_context(request):
    fixture = micronaut_test_fixture(
        request,
        MicronautTest(
            transactional=False,
            properties={"micronaut.http.client.follow-redirects": "false"},
        ),
    )  (1)
    yield fixture
    fixture.stop()


@pytest.fixture
def client(my_context):
    return requests.with_context(my_context)  (2)


def test_home_page_renders_anonymous_user(client):
    response = client.get("/")  (3)

    assert response.status_code == 200
    assert "You are not logged in" in response.text
    assert "/login/auth" in response.text


def test_login_form_renders(client):
    response = client.get("/login/auth")

    assert response.status_code == 200
    assert "Username" in response.text
    assert "Password" in response.text


def test_failed_login_redirects_to_auth_failed(client):
    response = client.post(
        "/login",
        data={"username": "sherlock", "password": "wrong"},
        allow_redirects=False,
    )  (4)

    assert response.status_code == 303
    assert response.headers["Location"] == "/login/authFailed"

    response = client.get("/login/authFailed")
    assert response.status_code == 200
    assert "Login Failed" in response.text


def test_successful_login_and_logout(client):
    response = client.post(
        "/login",
        data={"username": "sherlock", "password": "password"},
        allow_redirects=False,
    )  (5)

    assert response.status_code == 303
    assert response.headers["Location"] == "/"

    response = client.get("/")  (6)
    assert response.status_code == 200
    assert "username: <span>sherlock</span>" in response.text

    response = client.post("/logout", data={}, allow_redirects=False)  (7)
    assert response.status_code == 303
    assert response.headers["Location"] == "/"

    response = client.get("/")
    assert response.status_code == 200
assert "You are not logged in" in response.text| 1 | Annotate the class with @MicronautTest so the Micronaut framework will initialize the application context and the embedded server. More info. |
| 2 | Use requests.with_context to send HTTP requests to the running test server. |
| 3 | Anonymous users can render the Home page. |
| 4 | Invalid credentials redirect back to the failed login page. |
| 5 | Valid credentials redirect back to the Home page. |
| 6 | The same client keeps the session cookie and renders the authenticated Home page. |
| 7 | The logout endpoint clears the session and redirects back to the Home page. |
7. Testing the Application
To run the tests:
pyronaut install
pyronaut validate-config
pyronaut test
8. Running the Application
To run the application, use the pyronaut dev command, which starts the application on port 8080.
9. Next Steps
Explore more features with Micronaut Guides.
10. License
| All guides are released with an Apache License 2.0 for the code and a Creative Commons Attribution 4.0 license for the writing and media (images). |