mn create-app example.micronaut.micronautguide --build=gradle --lang=javaTable of Contents
Secure a Micronaut app with Google
Learn how to create Micronaut app and secure it with Google and provide authentication with OpenID Connect
Authors: Sergio del Amo
Micronaut Version: 2.5.0
1. Getting Started
In this guide we are going to create a Micronaut app written in Java.
2. What you will need
To complete this guide, you will need the following:
-
Some time on your hands
-
A decent text editor or IDE
-
JDK 1.8 or greater installed with
JAVA_HOMEconfigured appropriately
3. Solution
We recommend that you follow the instructions in the next sections and create the app step by step. However, you can go right to the completed example.
-
Download and unzip the source
4. Writing the App
Create an app using the Micronaut Command Line Interface or with Micronaut Launch.
If you don’t specify the --build argument, Gradle is used as a build tool. If you don’t specify the --lang argument, Java is used as a language.
|
The previous command creates a Micronaut app with the default package example.micronaut in a folder named micronautguide.
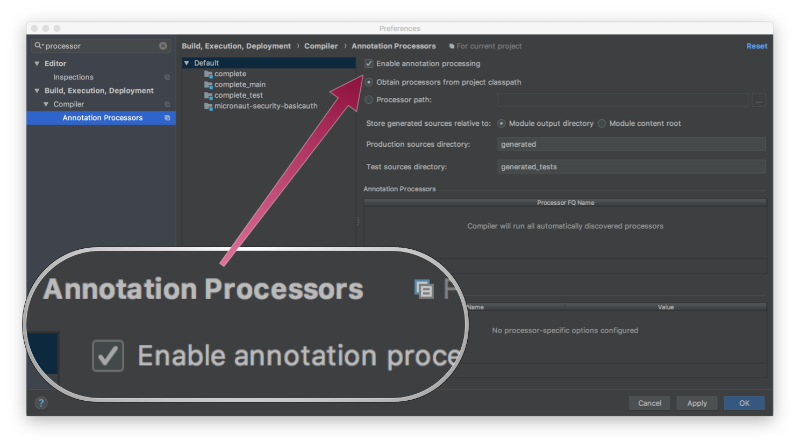
If you are using Java or Kotlin and IntelliJ IDEA, make sure you have enabled annotation processing.
4.1. Views
Although Micronaut is primarily designed around message encoding / decoding, there are occasions where it is convenient to render a view on the server side.
To use Thymeleaf Java template engine to render views within a Micronaut application add the following dependency on your classpath.
build.gradle
implementation("io.micronaut.views:micronaut-views-thymeleaf")4.2. OAuth 2.0
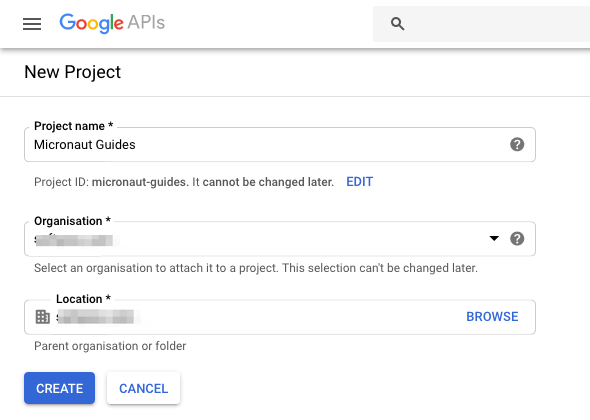
Visit https://console.developers.google.com and create a new project:
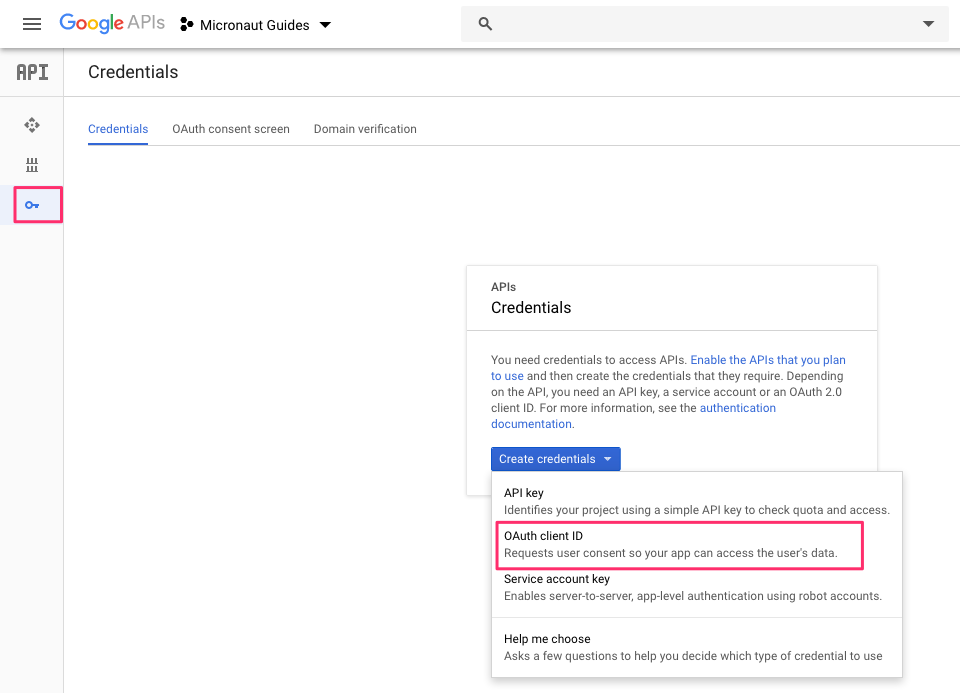
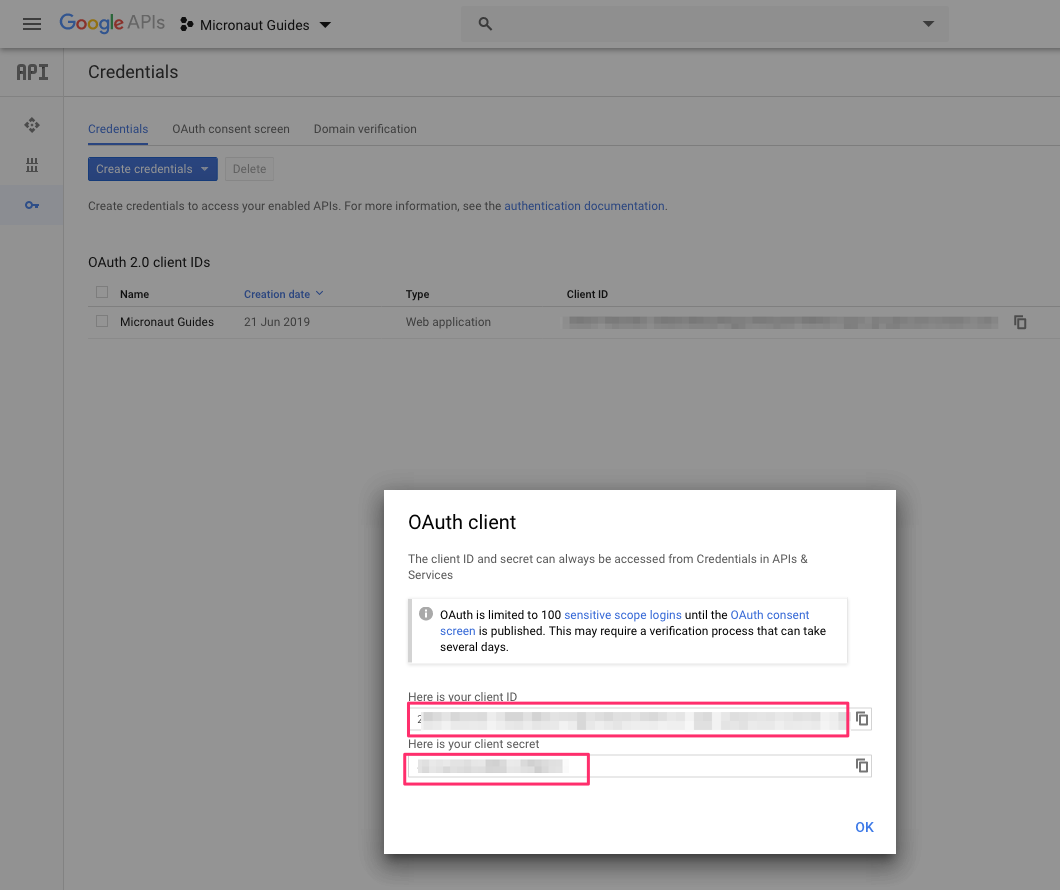
You will also need to create OAuth 2.0 credentials for the project since Google does not do that automatically. From the sidebar, click the Credentials tab, the click Create credentials and choose OAuth client ID from the dropdown.
The Google Console will prompt for some information about your application such as the product name, a home page and a logo. On the next page, select Web Application type, and enter the redirect URL where the Micronaut app we will build next will wait for the callback.
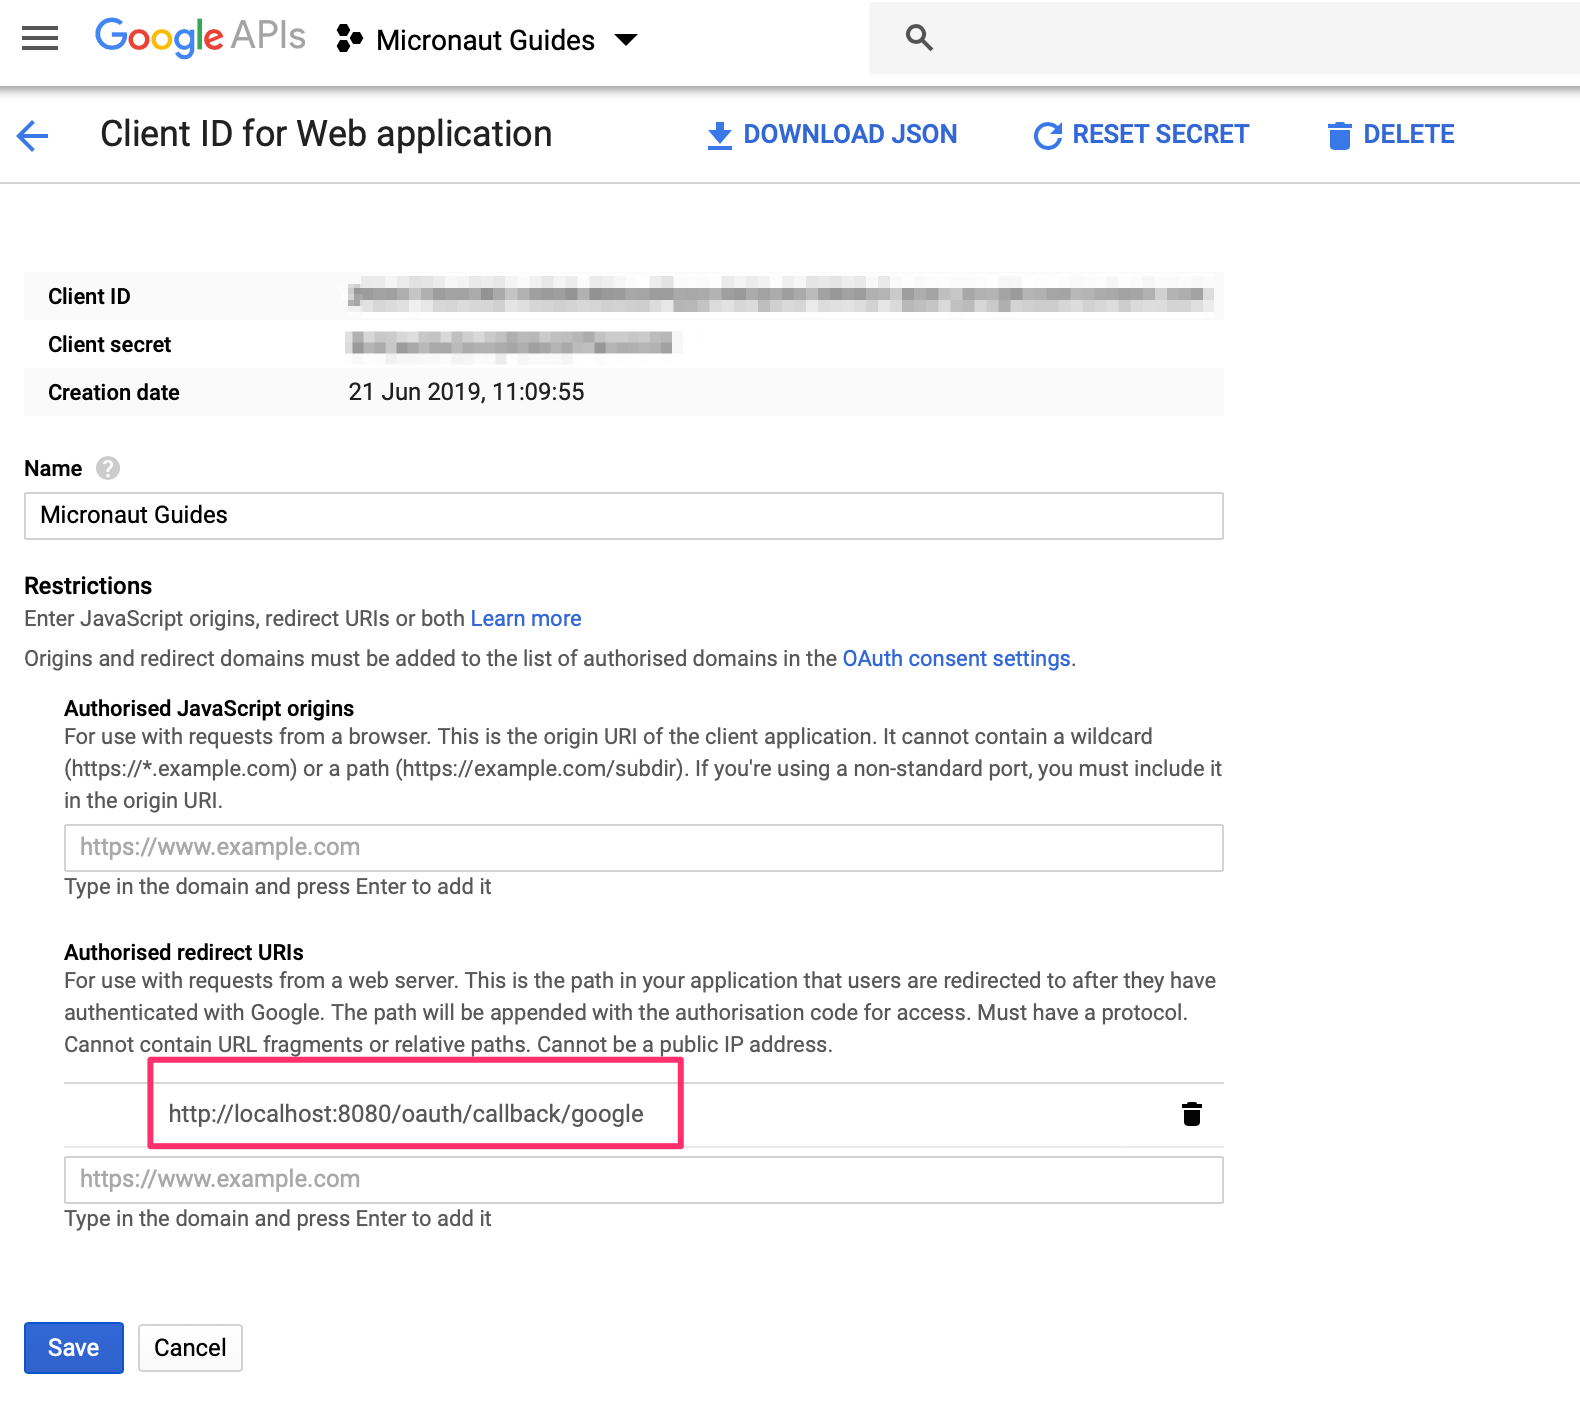
You will then receive a client ID and secret.
To use OAuth 2.0 integration in your Micronaut App, add the next dependency:
build.gradle
implementation("io.micronaut.security:micronaut-security-oauth2")Add also JWT Micronaut’s JWT support dependencies:
build.gradle
implementation("io.micronaut.security:micronaut-security-jwt")Add the following Oauth2 Configuration:
src/main/resources/application.yml
---
micronaut:
  security:
    authentication: idtoken (1)
    oauth2:
      clients:
        google: (2)
          client-id: '${OAUTH_CLIENT_ID:xxx}'  (3)
          client-secret: '${OAUTH_CLIENT_SECRET:yyy}' (4)
          openid:
            issuer: 'https://accounts.google.com' (5)
    endpoints:
      logout:
get-allowed: true (6)| 1 | Set micronaut.security.authentication as idtoken. The idtoken provided by Google when the OAuth 2.0 Authorization code flow ends will be saved in a cookie. The id token is a signed JWT. For every request, Micronaut extracts the JWT from the Cookie and validates the JWT signature with the remote Json Web Key Set exposed by Google. JWKS is exposed by Google via the jws-uri entry of https://accounts.google.com/.well-known/openid-configuration |
| 2 | You can choose any name. The name you select, will be used in your routes. E.g. If you set google the login route for this OAuth 2.0 client is /oauth/login/google |
| 3 | Client Secret. See previous screenshot. |
| 4 | Client ID. See previous screenshot. |
| 5 | issuer url. It allows micronaut to discover the configuration of the OpenID Connect server. |
| 6 | Accept GET request to the /logout endpoint. |
The previous configuration uses several placeholders. You will need to setup OAUTH_CLIENT_ID, OAUTH_CLIENT_SECRET environment variables.
export OAUTH_CLIENT_ID=XXXXXXXXXX
export OAUTH_CLIENT_SECRET=YYYYYYYYYY
Check Google .well-known/openid-configuration documentation.
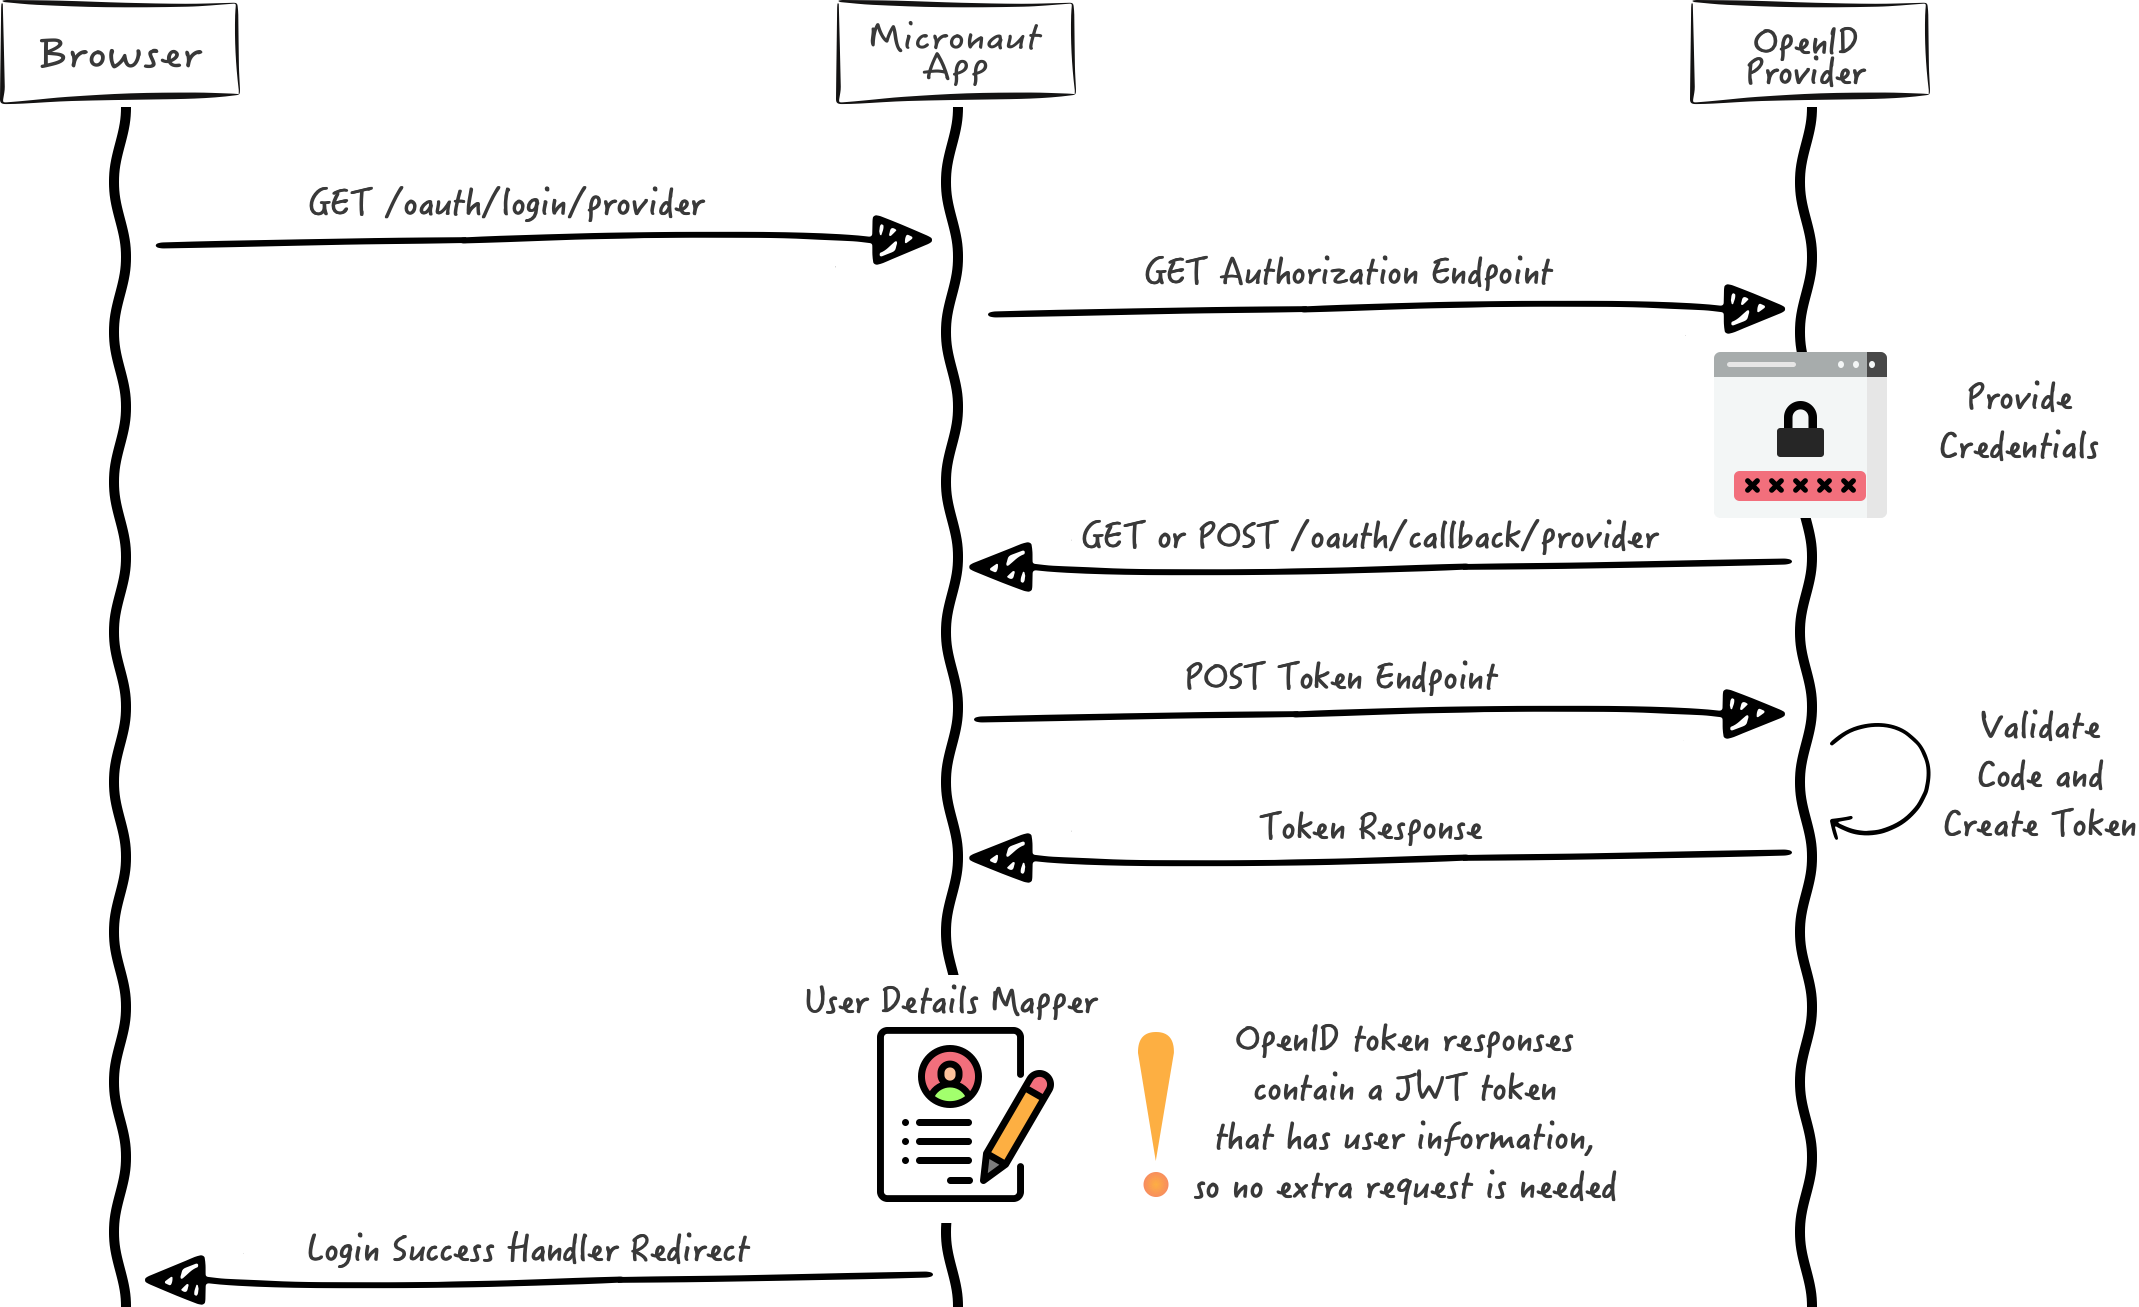
We want to use an Authorization Code grant type flow which it is described in the following diagram:
4.3. Home
Create a controller to handle the requests to /. You are going to display the email of the authenticated person if any. Annotate the controller endpoint with @View since we are going to use a Thymeleaf template.
src/main/java/example/micronaut/HomeController.java
package example.micronaut;

import io.micronaut.http.annotation.Controller;
import io.micronaut.http.annotation.Get;
import io.micronaut.security.annotation.Secured;
import io.micronaut.security.rules.SecurityRule;
import io.micronaut.views.View;

import java.util.HashMap;
import java.util.Map;

@Controller (1)
public class HomeController {

    @Secured(SecurityRule.IS_ANONYMOUS) (2)
    @View("home") (3)
    @Get (4)
    public Map<String, Object> index() {
        return new HashMap<>();
    }
}| 1 | The class is defined as a controller with the @Controller annotation mapped to the path /. |
| 2 | Annotate with io.micronaut.security.Secured to configure secured access. The SecurityRule.IS_ANONYMOUS expression will allow access without authentication. |
| 3 | Use View annotation to specify which template would you like to render the response against. |
| 4 | The @Get annotation is used to map the index method to GET / requests. |
Create a thymeleaf template:
src/main/resources/views/home.html
<!DOCTYPE html>
<html xmlns:th="http://www.thymeleaf.org">
<head>
<title>Home</title>
</head>
<body>
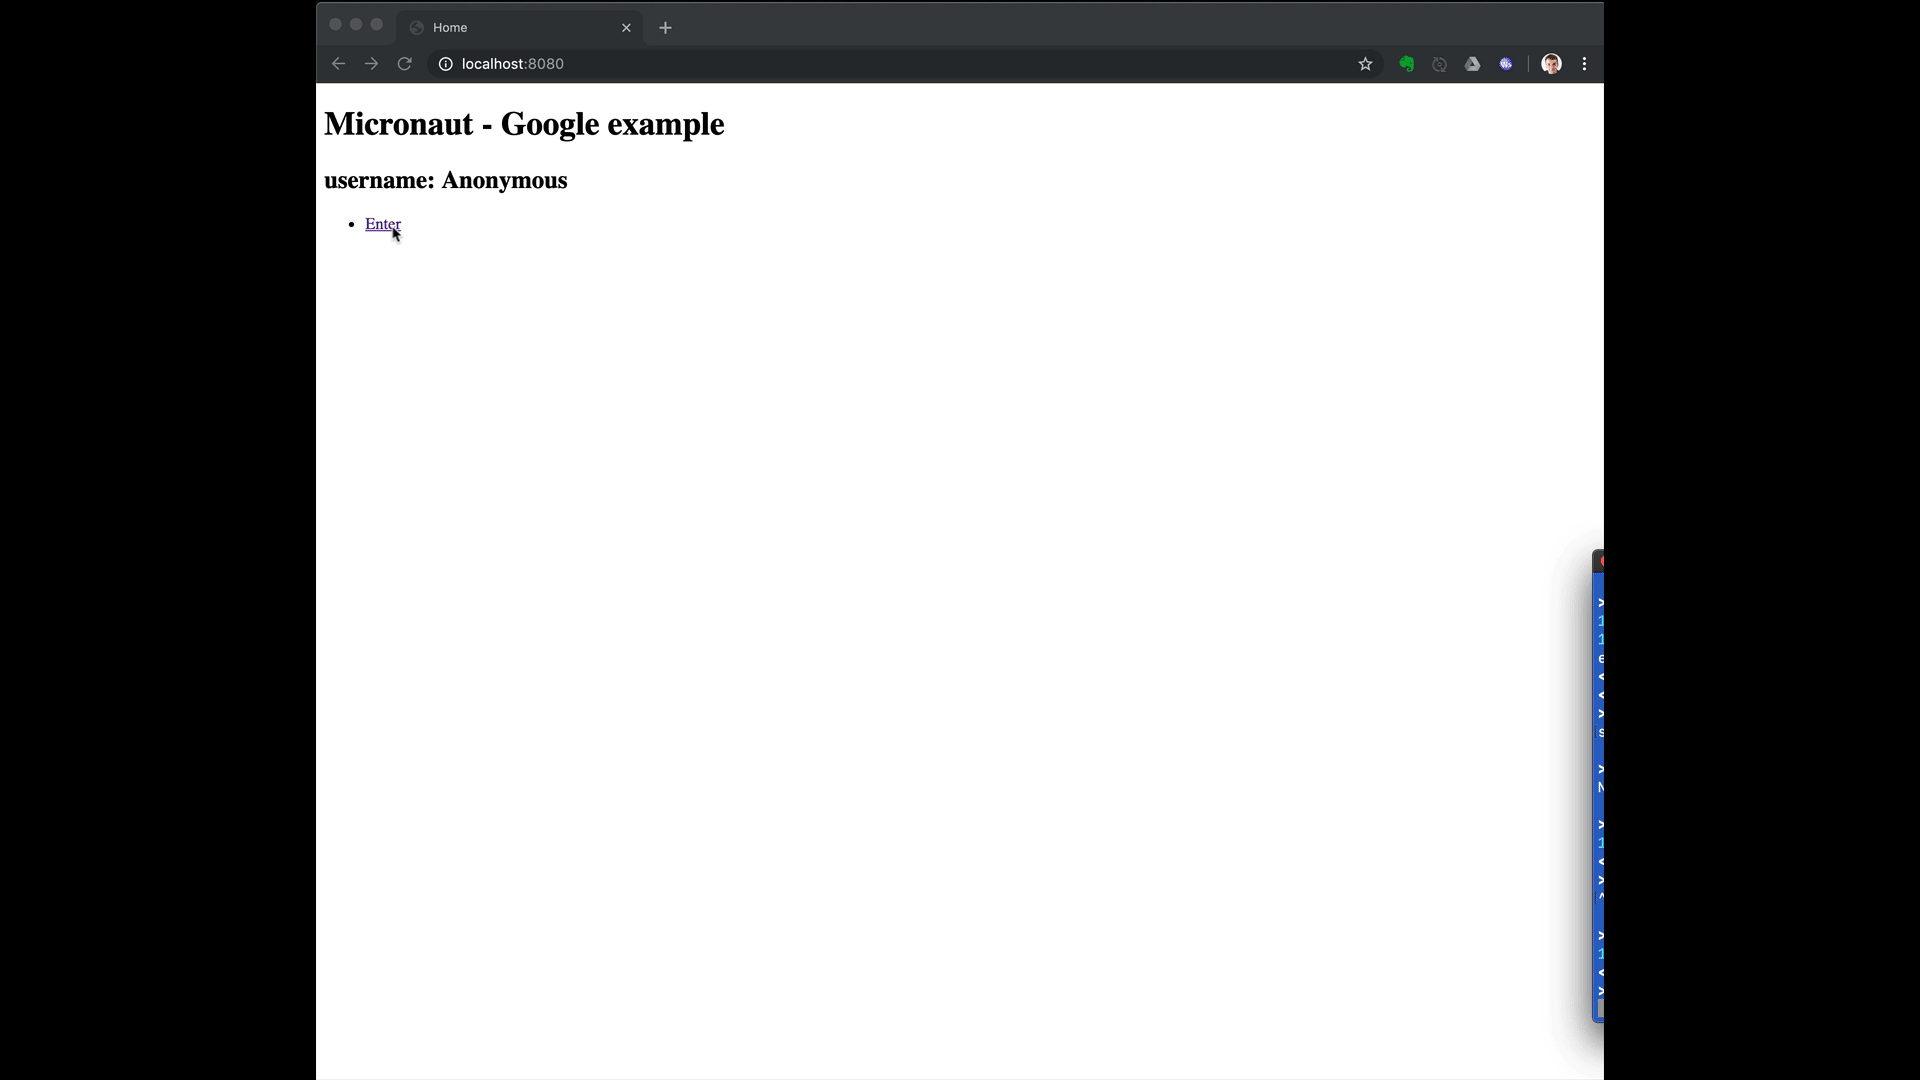
<h1>Micronaut - Google example</h1>
<h2 th:if="${security}">username: <span th:text="${security.attributes.get('email')}"></span></h2>
<h2 th:unless="${security}">username: Anonymous</h2>
<nav>
<ul>
<li th:unless="${security}"><a href="/oauth/login/google">Enter</a></li>
<li th:if="${security}"><a href="/logout">Logout</a></li>
</ul>
</nav>
</body>
</html>Also, note that we return an empty model in the controller. However, we are accessing security in the thymeleaf template.
-
The SecurityViewModelProcessor injects into the model a
securitymap with the authenticated user. See User in a view documentation.
5. Running the Application
To run the application use the ./gradlew run command which will start the application on port 8080.
5.1. Custom ID token claims validation
Imagine you want to allow sign-in with Google but only to users' in your organization.
Google OAuth consent screen settings allows you to do that:

However, we could also achieve this programmatically. Google id token contains a claim named hd which stands for hosted domain.
We can create a configuration object:
src/main/java/example/micronaut/ApplicationConfiguration.java
package example.micronaut;

import io.micronaut.core.annotation.NonNull;

public interface ApplicationConfiguration {

    @NonNull
    String getHostedDomain();
}
Backed by a @ConfigurationProperties annotated class:
src/main/java/example/micronaut/ApplicationConfigurationProperties.java
package example.micronaut;

import io.micronaut.context.annotation.ConfigurationProperties;
import io.micronaut.context.annotation.Requires;
import io.micronaut.core.annotation.NonNull;

@Requires(property = "app.hosted-domain")
@ConfigurationProperties("app")
public class ApplicationConfigurationProperties implements ApplicationConfiguration {

    @NonNull
    private String hostedDomain;

    public void setHostedDomain(@NonNull String hostedDomain) {
        this.hostedDomain = hostedDomain;
    }

    @Override
    @NonNull
    public String getHostedDomain() {
        return hostedDomain;
    }
}
and then implement a OpenIdClaimsValidator bean. Micronaut validates the id token against every bean of type OpenIdClaimsValidator. If the id token hd claim does not match the value configured, it is considered invalid.
src/main/java/example/micronaut/HostedDomainClaimValidator.java
package example.micronaut;

import io.micronaut.context.annotation.Requires;
import io.micronaut.security.oauth2.client.OpenIdProviderMetadata;
import io.micronaut.security.oauth2.configuration.OauthClientConfiguration;
import io.micronaut.security.oauth2.endpoint.token.response.OpenIdClaims;
import io.micronaut.security.oauth2.endpoint.token.response.validation.OpenIdClaimsValidator;

import javax.inject.Singleton;

@Requires(beans = ApplicationConfiguration.class)
@Singleton
public class HostedDomainClaimValidator implements OpenIdClaimsValidator {

    public static final String HOSTED_DOMAIN_CLAIM = "hd";

    private final String hostedDomain;

    public HostedDomainClaimValidator(ApplicationConfiguration applicationConfiguration) {
        this.hostedDomain = applicationConfiguration.getHostedDomain();
    }

    @Override
    public boolean validate(OpenIdClaims claims,
                            OauthClientConfiguration clientConfiguration,
                            OpenIdProviderMetadata providerMetadata) {
        Object hd = claims.get(HOSTED_DOMAIN_CLAIM);
        return hd instanceof String && ((String) hd).equalsIgnoreCase(hostedDomain);
    }
}
Add to src/main/resources/application.yaml
app:
  hosted-domain: 'objectcomputing.com'
if you start the app, you will only be able to sign in with a Google Account within OCI organization.
6. Generate a Micronaut app’s Native Image with GraalVM
We are going to use GraalVM, the polyglot embeddable virtual machine, to generate a Native image of our Micronaut application.
Native images compiled with GraalVM ahead-of-time improve the startup time and reduce the memory footprint of JVM-based applications.
Use of GraalVM’s native-image tool is only supported in Java or Kotlin projects. Groovy relies heavily on
reflection which is only partially supported by GraalVM.
|
6.1. Native Image generation
The easiest way to install GraalVM is to use SDKMan.io.
# For Java 8
$ sdk install java 21.1.0.r8-grl

# For Java 11
$ sdk install java 21.1.0.r11-grl
You need to install the native-image component which is not installed by default.
$ gu install native-imageTo generate a native image using Gradle run:
$ ./gradlew nativeImageThe native image will be created in build/native-image/application and can be run with ./build/native-image/application
It is also possible to customize the name of the native image or pass additional parameters to GraalVM:
build.gradle
nativeImage {
    args('--verbose')
    imageName('mn-graalvm-application') (1)
}| 1 | The native image name will now be mn-graalvm-application |
After you execute the native image, navigate to localhost:8080 and authenticate with Google.
7. Next steps
Read Micronaut OAuth 2.0 documentation to learn more.
8. Help with Micronaut
Object Computing, Inc. (OCI) sponsored the creation of this Guide. A variety of consulting and support services are available.