mn create-app example.micronaut.micronautguide --build=maven --lang=javaSecure a Micronaut app with Github
Learn how to create Micronaut app and secure it with an Authorization Server provided by Github. Learn how to write your own UserDetails Mapper.
Authors: Sergio del Amo
Micronaut Version: 2.5.0
1. Getting Started
In this guide we are going to create a Micronaut app written in Java.
2. What you will need
To complete this guide, you will need the following:
-
Some time on your hands
-
A decent text editor or IDE
-
JDK 1.8 or greater installed with
JAVA_HOMEconfigured appropriately
3. Solution
We recommend that you follow the instructions in the next sections and create the app step by step. However, you can go right to the completed example.
-
Download and unzip the source
4. Writing the App
Create an app using the Micronaut Command Line Interface or with Micronaut Launch.
If you don’t specify the --build argument, Gradle is used as a build tool. If you don’t specify the --lang argument, Java is used as a language.
|
The previous command creates a Micronaut app with the default package example.micronaut in a folder named micronautguide.
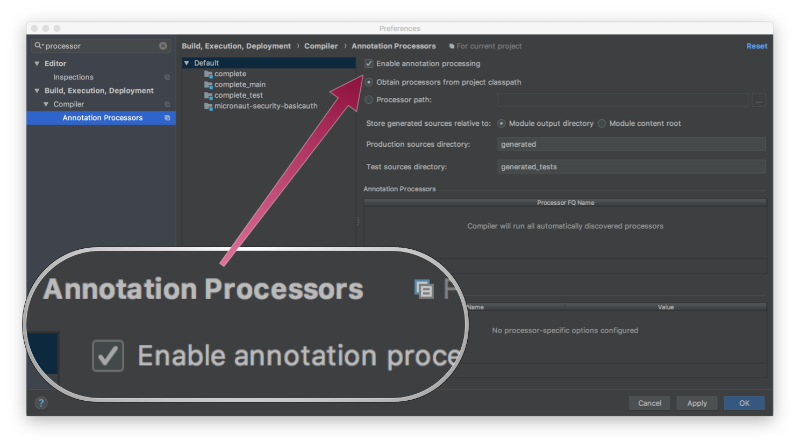
If you are using Java or Kotlin and IntelliJ IDEA, make sure you have enabled annotation processing.
4.1. Views
Although Micronaut is primarily designed around message encoding / decoding, there are occasions where it is convenient to render a view on the server side.
To use Thymeleaf Java template engine within a Micronaut Application add the following dependency on your classpath.
pom.xml
<dependency>
    <groupId>io.micronaut.views</groupId>
    <artifactId>micronaut-views-thymeleaf</artifactId>
    <scope>compile</scope>
</dependency>
4.2. Home
Create a controller to handle the requests to /. You are going to display the email of the authenticated person if any. Annotate the controller endpoint with @View since we are going to use a Thymeleaf template.
src/main/java/example/micronaut/HomeController.java
package example.micronaut;

import io.micronaut.http.annotation.Controller;
import io.micronaut.http.annotation.Get;
import io.micronaut.security.annotation.Secured;
import io.micronaut.security.rules.SecurityRule;
import io.micronaut.views.View;

import java.util.HashMap;
import java.util.Map;

@Controller (1)
public class HomeController {

    @Secured(SecurityRule.IS_ANONYMOUS) (2)
    @View("home") (3)
    @Get (4)
    public Map<String, Object> index() {
        return new HashMap<>();
    }
}| 1 | The class is defined as a controller with the @Controller annotation mapped to the path /. |
| 2 | Annotate with io.micronaut.security.Secured to configure secured access. The SecurityRule.IS_ANONYMOUS expression will allow access without authentication. |
| 3 | Use View annotation to specify which template would you like to render the response against. |
| 4 | The @Get annotation is used to map the index method to GET / requests. |
Create a thymeleaf template:
src/main/resources/views/home.html
<!DOCTYPE html>
<html xmlns:th="http://www.thymeleaf.org">
<head>
    <title>Home</title>
</head>
<body>
<h1>Micronaut - Github example</h1>

<h2 th:if="${security}">username: <span th:text="${security.name}"> </h2>
<h2 th:unless="${security}">username: Anonymous</h2>

<nav>
    <ul>
        <li th:unless="${security}"><a href="/oauth/login/github">Enter</a></li>
        <li th:if="${security}"><a href="/repos">View Repos</a></li>
        <li th:if="${security}"><a href="/logout">Logout</a></li>
    </ul>
</nav>
</body>
</html>
Also, note that we return an empty model in the controller. However, we are accessing security in the thymeleaf template.
-
The SecurityViewModelProcessor injects into the model a
securitymap with the authenticated user. See User in a view documentation.

4.4. OAuth 2.0 Configuration
To use OAuth 2.0 integration, add the next dependency:
pom.xml
<dependency>
    <groupId>io.micronaut.security</groupId>
    <artifactId>micronaut-security-oauth2</artifactId>
    <scope>compile</scope>
</dependency>
Add the following Oauth2 Configuration: Add also JWT Micronaut’s JWT support dependencies:
pom.xml
<dependency>
    <groupId>io.micronaut.security</groupId>
    <artifactId>micronaut-security-jwt</artifactId>
    <scope>compile</scope>
</dependency>
Add the following Oauth2 Configuration:
src/main/resources/application.yml
micronaut:
  security:
    authentication: cookie (1)
    token:
      jwt:
        signatures:
          secret:
            generator: (2)
              secret: '"${JWT_GENERATOR_SIGNATURE_SECRET:pleaseChangeThisSecretForANewOne}"' (3)
    oauth2:
      clients:
        github: (4)
          client-id:  '${OAUTH_CLIENT_ID:xxx}' (5)
          client-secret: '${OAUTH_CLIENT_SECRET:yyy}' (6)
          scopes: (7)
            - user:email
            - read:user
            - public_repo
          authorization:
            url: 'https://github.com/login/oauth/authorize' (8)
          token:
            url: 'https://github.com/login/oauth/access_token' (9)
            auth-method: client-secret-post
    endpoints:
      logout:
get-allowed: true (10)| 1 | Once validated, we are going to save the ID Token in a Cookie. To read in subsequent requests, set micronaut.security.authentication to cookie. |
| 2 | You can create a SecretSignatureConfiguration named generator via configuration as illustrated above. The generator signature is used to sign the issued JWT claims. |
| 3 | Change this by your own secret and keep it safe (do not store this in your VCS). |
| 4 | The provider identifier should match the last part of the url you entered as a redirect url /oauth/callback/github |
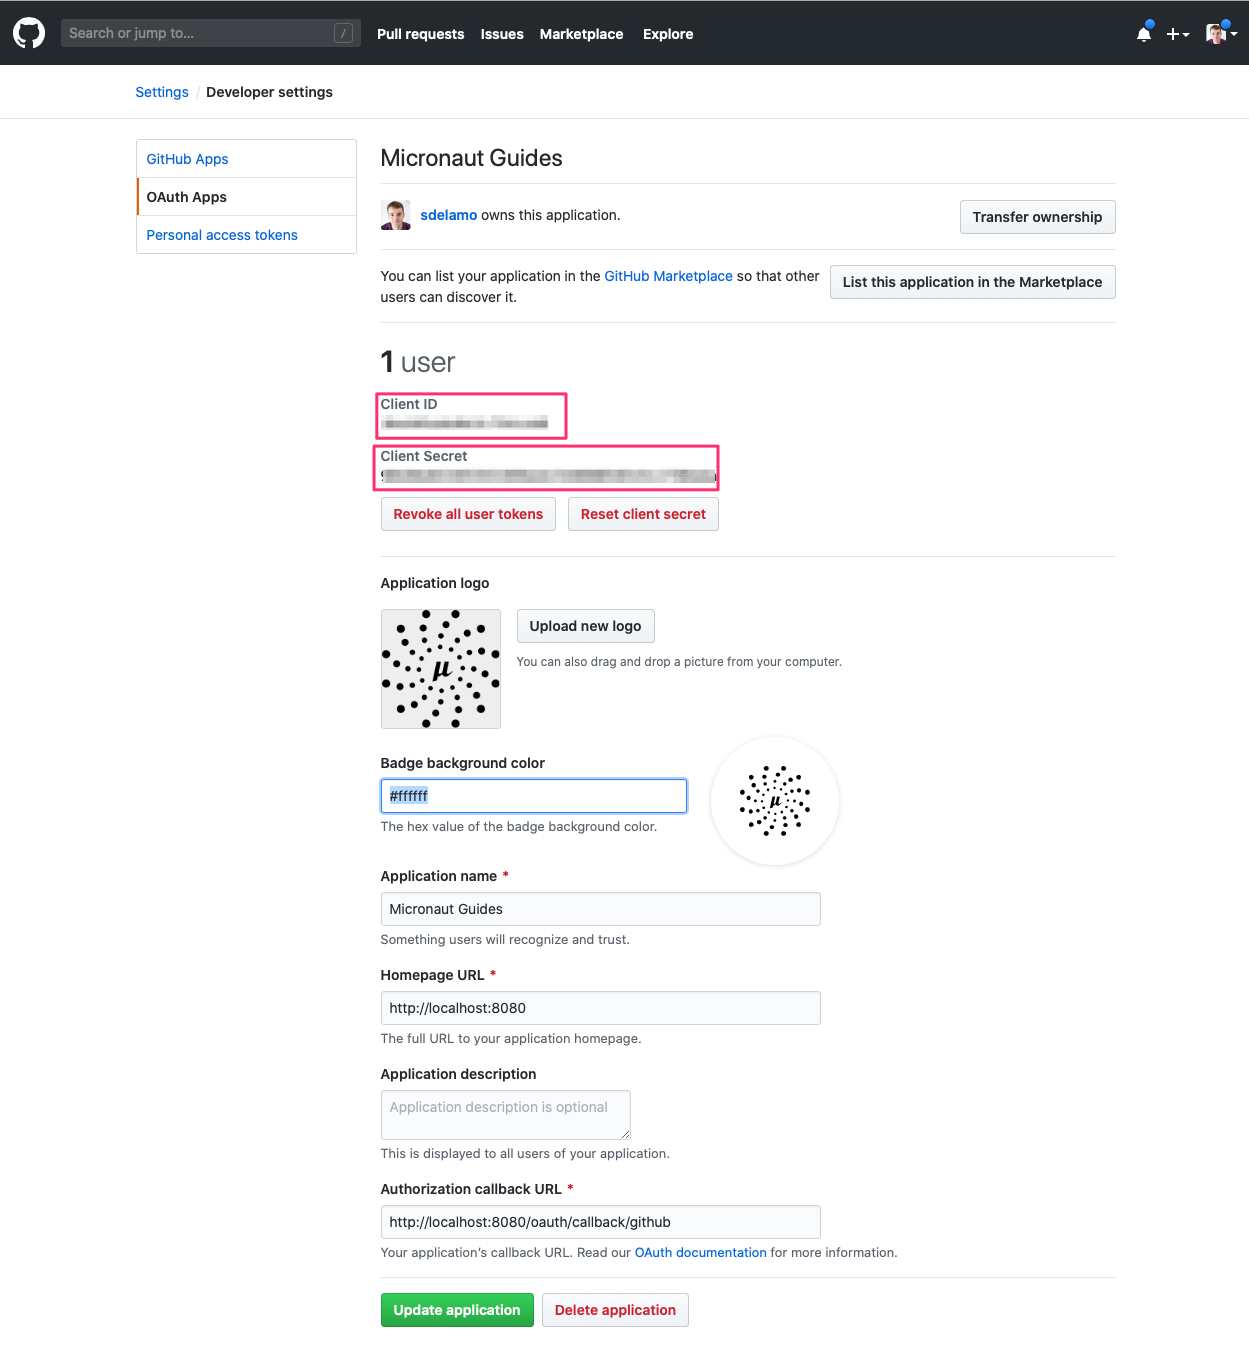
| 5 | Client Secret. See previous screenshot. |
| 6 | Client ID. See previous screenshot. |
| 7 | Specify the scopes you want to request. Github Scopes let you sepcify exactly what type of access you need. |
| 8 | Map manually the Github’s Authorization endpoint. |
| 9 | Map manually the Github’s Token endpoint. |
| 10 | Accept GET request to the /logout endpoint. |
The previous configuration uses several placeholders. You will need to setup OAUTH_CLIENT_ID, OAUTH_CLIENT_SECRET environment variables.
export OAUTH_CLIENT_ID=XXXXXXXXXX
export OAUTH_CLIENT_SECRET=YYYYYYYYYY
4.5. User Details Mapper
Here is a high level diagram of how the authorization code grant flow works with an OAuth 2.0 provider such as Github.

We need an HTTP Client to retrieve the user info. Create a POJO to represent a Github user:
src/main/java/example/micronaut/GithubUser.java
package example.micronaut;

import com.fasterxml.jackson.databind.PropertyNamingStrategy;
import com.fasterxml.jackson.databind.annotation.JsonNaming;
import io.micronaut.core.annotation.Introspected;

@Introspected
public class GithubUser {

    private String login;
    private String name;
    private String email;

    public GithubUser() {

    }

    public String getLogin() {
        return login;
    }

    public void setLogin(String login) {
        this.login = login;
    }

    public String getName() {
        return name;
    }

    public void setName(String name) {
        this.name = name;
    }

    public String getEmail() {
        return email;
    }

    public void setEmail(String email) {
        this.email = email;
    }
}
Then, create a Micronaut Declarative HTTP Client to consume Github REST API v3
src/main/java/example/micronaut/GithubApiClient.java
package example.micronaut;

import io.micronaut.core.annotation.Nullable;
import io.micronaut.http.HttpHeaders;
import io.micronaut.http.annotation.Get;
import io.micronaut.http.annotation.Header;
import io.micronaut.http.annotation.QueryValue;
import io.micronaut.http.client.annotation.Client;
import io.reactivex.Flowable;

import javax.validation.constraints.Pattern;
import java.util.List;

@Header(name = "User-Agent", value = "https://micronautguides.com")
@Header(name = "Accept", value = "application/vnd.github.v3+json, application/json") (1)
@Client(id = "githubv3") (2)
public interface GithubApiClient {

    @Get("/user") (3)
    Flowable<GithubUser> getUser( (4)
@Header(HttpHeaders.AUTHORIZATION) String authorization); (5)| 1 | Github encourages to explicitly request the version 3 via the Accept header. With @Header, you add the Accept: application/vnd.github.v3+json HTTP header to every request. |
| 2 | Add the id githubv3 to the @Client annotation. Later, you will provide url for this client id. |
| 3 | Define a HTTP GET request to /user endpoint. |
| 4 | You can return reactive types in a Micronaut declarative HTTP client. |
| 5 | You can specify that a parameter binds to a HTTP Header such as the Authorization header. |
Specify the url for the githubv3 service.
src/main/resources/application.yml
micronaut:
  http:
    services:
      githubv3:
        url: "https://api.github.com"
For Github we need to provide a UserDetails Mapper. The easiest way is to create a bean which implements OauthUserDetailsMapper.
src/main/java/example/micronaut/GithubUserDetailsMapper.java
package example.micronaut;
import io.micronaut.security.authentication.UserDetails;
import io.micronaut.security.oauth2.endpoint.token.response.OauthUserDetailsMapper;
import io.micronaut.security.oauth2.endpoint.token.response.TokenResponse;
import org.reactivestreams.Publisher;

import javax.inject.Named;
import javax.inject.Singleton;
import java.util.Collections;
import java.util.HashMap;
import java.util.List;
import java.util.Map;

@Named("github") (1)
@Singleton
public class GithubUserDetailsMapper implements OauthUserDetailsMapper {

    public static final String TOKEN_PREFIX = "token ";
    public static final String ROLE_GITHUB = "ROLE_GITHUB";
    private final GithubApiClient apiClient;

    public GithubUserDetailsMapper(GithubApiClient apiClient) {
        this.apiClient = apiClient;
    }

    @Override
    public Publisher<UserDetails> createUserDetails(TokenResponse tokenResponse) {
        return apiClient.getUser(TOKEN_PREFIX + tokenResponse.getAccessToken()) (2)
                .map(user -> new UserDetails(user.getLogin(),
                        Collections.singletonList(ROLE_GITHUB),
                        Collections.singletonMap(OauthUserDetailsMapper.ACCESS_TOKEN_KEY, tokenResponse.getAccessToken()))); (3)
    }
}| 1 | Usa a name qualifier for the bean which matches the name you used in the OAuth 2.0 configuration in application.yml |
| 2 | Consume the /user endpoint with the Micronaut HTTP Client. |
| 3 | Save the original Github access token in a claim. We will use to to contact Github’s api later. |
4.6. Retrieve User Github repositories
With the access token, we retrieved during the login we are going to contact the Github API to fetch the user’s repositories.
First, create a POJO to represent a Github repository:
src/main/java/example/micronaut/GithubRepo.java
package example.micronaut;

import io.micronaut.core.annotation.Introspected;

@Introspected
public class GithubRepo {

    private String name;

    public GithubRepo() {

    }

    public String getName() {
        return name;
    }

    public void setName(String name) {
        this.name = name;
    }
}
Add a method to GithubApiClient
src/main/java/example/micronaut/GithubApiClient.java
    @Get("/user/repos{?sort,direction}") (1)
    List<GithubRepo> repos(
            @Pattern(regexp = "created|updated|pushed|full_name") @Nullable @QueryValue String sort, (2)
            @Pattern(regexp = "asc|desc") @Nullable @QueryValue String direction, (2)
@Header(HttpHeaders.AUTHORIZATION) String authorization);| 1 | Specify two query values sort and direction. |
| 2 | Annotate sort and direction as @Nullable since they are optional. You can restrict the allowed values with use of constraints. |
Create a controller to expose /repos endpoint:
src/main/java/example/micronaut/ReposController.java
package example.micronaut;

import io.micronaut.http.HttpHeaderValues;
import io.micronaut.http.annotation.Controller;
import io.micronaut.http.annotation.Get;
import io.micronaut.security.annotation.Secured;
import io.micronaut.security.authentication.Authentication;
import io.micronaut.security.oauth2.endpoint.token.response.OauthUserDetailsMapper;
import io.micronaut.security.rules.SecurityRule;
import io.micronaut.views.View;
import java.util.HashMap;
import java.util.List;
import java.util.Map;

@Controller("/repos") (1)
public class ReposController {

    public static final String CREATED = "created";
    public static final String DESC = "desc";
    public static final String REPOS = "repos";
    private final GithubApiClient githubApiClient;

    public ReposController(GithubApiClient githubApiClient) {
        this.githubApiClient = githubApiClient;
    }

    @Secured(SecurityRule.IS_AUTHENTICATED) (2)
    @View("repos") (3)
    @Get (4)
    Map<String, Object> index(Authentication authentication) {
        List<GithubRepo> repos = githubApiClient.repos(CREATED, DESC, authorizationValue(authentication));  (5)
        Map<String, Object> model = new HashMap<>();
        model.put(REPOS, repos);
        return model;
    }

    private String authorizationValue(Authentication authentication) {
        String authorization = null;
        Object claim = authentication.getAttributes().get(OauthUserDetailsMapper.ACCESS_TOKEN_KEY);  (6)
        if (claim instanceof String) {
            authorization = HttpHeaderValues.AUTHORIZATION_PREFIX_BEARER + ' ' + claim;
        }
        return authorization;
    }
}| 1 | Qualify the @Controller annotation with /repos to designate the endpoint url. |
| 2 | We want this endpoint to be only accessible to authenticated users. |
| 3 | We specify the view name repos which is used to render the model. |
| 4 | Declare a GET endpoint. |
| 5 | Consume the Github API. |
| 6 | Use the previously obtained access token to get access against the Github API. |
Create a thymeleaf template:
src/main/resources/views/repos.html
<!DOCTYPE html>
<html xmlns:th="http://www.thymeleaf.org">
<head>
<title>Home</title>
</head>
<body>
<h1><a href="/">Home</a> → Repositories</h1>
<nav>
<ul th:each="repo: ${repos}">
<li th:text="${repo.name}"/>
</ul>
</nav>
</body>
</html>5. Running the Application
To run the application use the ./mvnw mn:run command which will start the application on port 8080.
6. Generate a Micronaut app’s Native Image with GraalVM
We are going to use GraalVM, the polyglot embeddable virtual machine, to generate a Native image of our Micronaut application.
Native images compiled with GraalVM ahead-of-time improve the startup time and reduce the memory footprint of JVM-based applications.
Use of GraalVM’s native-image tool is only supported in Java or Kotlin projects. Groovy relies heavily on
reflection which is only partially supported by GraalVM.
|
6.1. Native Image generation
The easiest way to install GraalVM is to use SDKMan.io.
# For Java 8
$ sdk install java 21.1.0.r8-grl

# For Java 11
$ sdk install java 21.1.0.r11-grl
You need to install the native-image component which is not installed by default.
$ gu install native-imageTo generate a native image using Maven run:
$ ./mvnw package -Dpackaging=native-imageThe native image will be created in target/application and can be run with ./target/application.
Visit localhost:8080 and authenticate with Github
7. Next steps
Read Micronaut OAuth 2.0 documentation to learn more.
8. Help with Micronaut
Object Computing, Inc. (OCI) sponsored the creation of this Guide. A variety of consulting and support services are available.