Access an Oracle Autonomous Database
Learn how to access an Oracle Autonomous Database using the Micronaut framework.
Authors: Burt Beckwith
Micronaut Version: 3.9.2
1. Getting Started
In this guide, we will create a Micronaut application written in Groovy.
2. What you will need
To complete this guide, you will need the following:
-
Some time on your hands
-
A decent text editor or IDE
-
JDK 11 or greater installed with
JAVA_HOMEconfigured appropriately -
An Oracle Cloud account (create a free trial account at signup.oraclecloud.com)
-
Oracle Cloud CLI installed with local access to Oracle Cloud configured by running
oci setup config -
Docker installed (optional, only needed if using Testcontainers for the persistence tests)
3. Solution
We recommend that you follow the instructions in the next sections and create the application step by step. However, you can go right to the completed example.
-
Download and unzip the source
4. Provision Oracle Autonomous Database
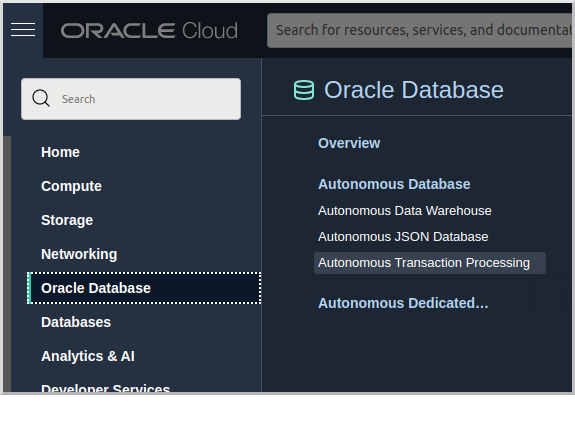
Login to your Oracle Cloud tenancy, and from the Oracle Cloud Menu select "Oracle Database" and then "Autonomous Transaction Processing":
Enter "MicronautDemo" as the display name and database name:

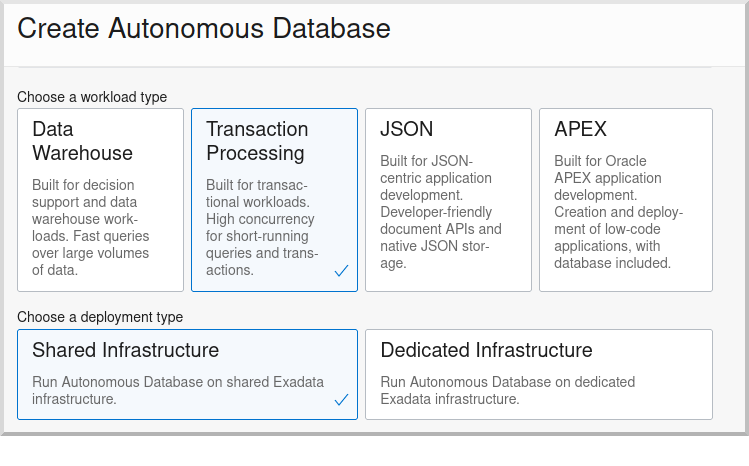
Select "Transaction Processing" and "Shared Infrastructure", and if you’re using a trial account be sure to select "Always Free":
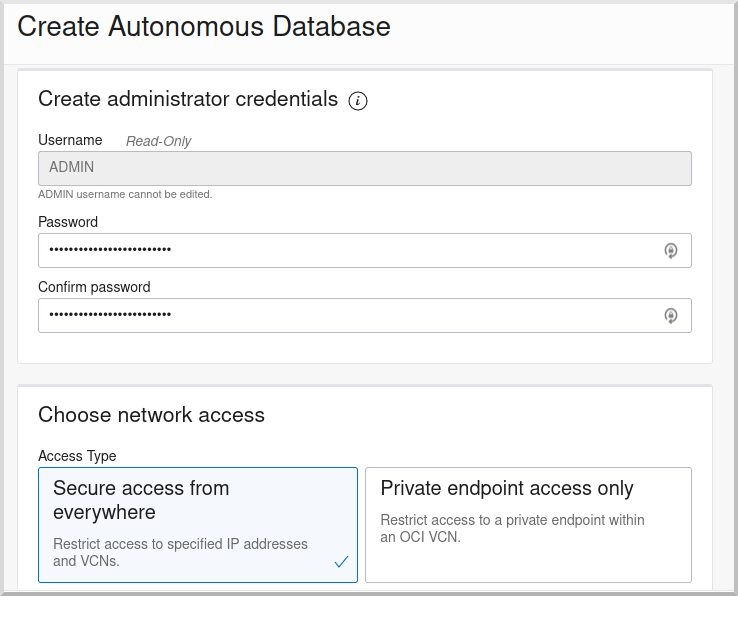
Create an Admin password (must be at least 12 characters and contain a number and an uppercase letter) and select "Secure access from everywhere":
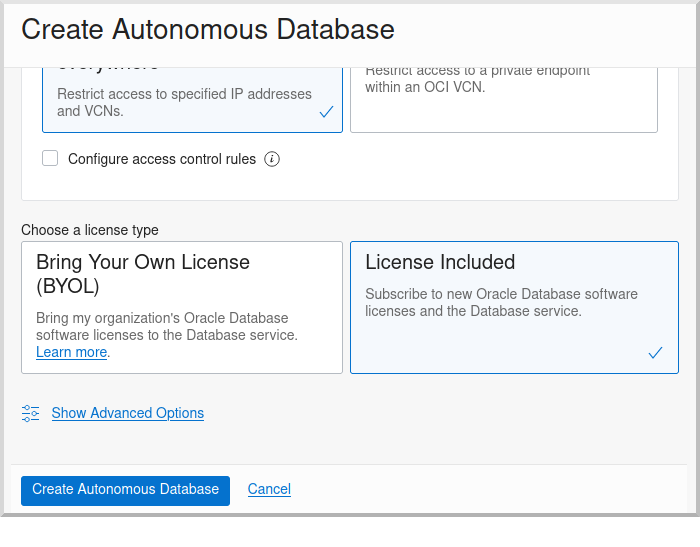
Select "License Included" and click "Create Autonomous Database" to create your instance:
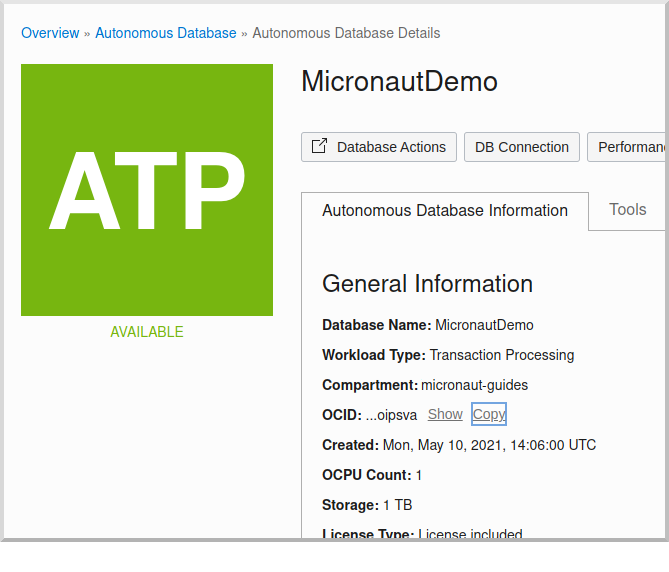
On the "Autonomous Database Details" page click the "Copy" link in the OCID row; this is the unique identifier for your database instance and you’ll need it later in your application’s application.yml.
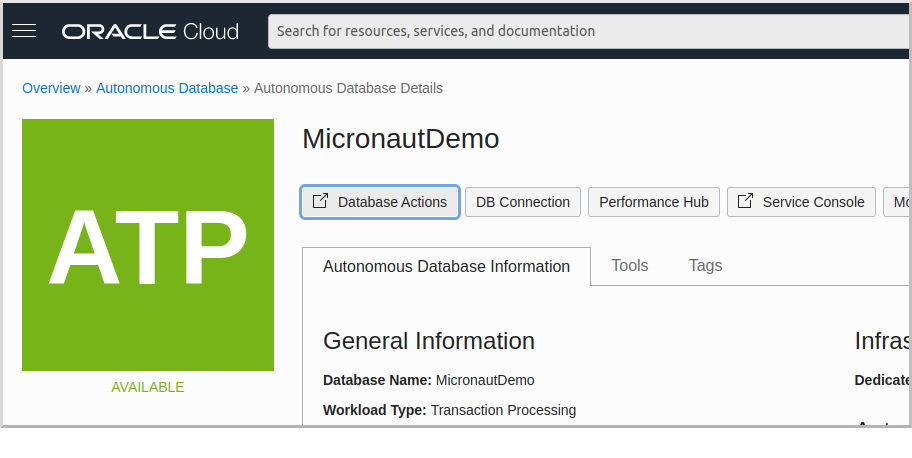
Next, create a schema user. On the "Autonomous Database Details" page click the "Database Actions" button:
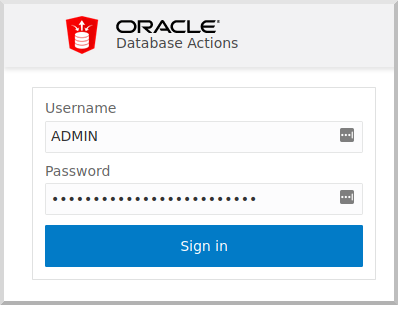
Login with username "ADMIN" and the admin password you defined earlier:
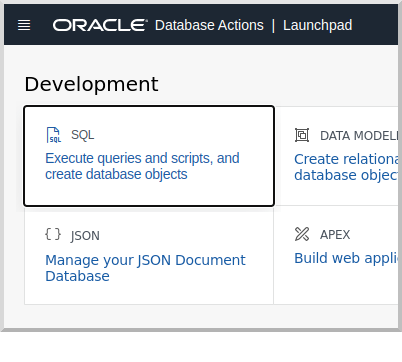
Under "Development" click the "SQL" button to open the SQL console:
Copy and paste the following SQL which will create a schema user into the worksheet:
CREATE USER micronautdemo IDENTIFIED BY "XXXXXXXXX";
GRANT CONNECT, RESOURCE TO micronautdemo;
GRANT UNLIMITED TABLESPACE TO micronautdemo;
Create a schema user password (must be at least 12 characters and contain a number and an uppercase letter) and replace the text "XXXXXXXXX" with that password.
Click the  ("Run Script") button to execute the SQL:

5. Writing the App
Create an application using the Micronaut Command Line Interface or with Micronaut Launch.
mn create-app example.micronaut.micronautguide \
    --build=maven --lang=groovy --jdk=11 \
    --features=data-jdbc,flyway,oracle-cloud-atp,testcontainers
If you don’t specify the --build argument, Gradle is used as the build tool. If you don’t specify the --lang argument, Java is used as the language.
|
The previous command creates a Micronaut application with the default package example.micronaut in a directory named micronautguide.
| If you have an existing Micronaut application and want to add the functionality described here, you can view the dependency and configuration changes from the specified features and apply those changes to your application. |
5.1. Entity class
Create a Thing entity class to represent database data:
src/main/groovy/example/micronaut/domain/Thing.groovy
package example.micronaut.domain

import groovy.transform.CompileStatic
import io.micronaut.core.annotation.Creator
import io.micronaut.data.annotation.GeneratedValue
import io.micronaut.data.annotation.Id
import io.micronaut.data.annotation.MappedEntity

@MappedEntity
@CompileStatic
class Thing {

    @Id
    @GeneratedValue
    Long id

    final String name

    @Creator
    Thing(String name) {
        this.name = name
    }
}
5.2. Repository class
Create a ThingRepository interface to read and write Thing database data:
src/main/groovy/example/micronaut/repository/ThingRepository.groovy
package example.micronaut.repository

import example.micronaut.domain.Thing
import io.micronaut.core.annotation.NonNull
import io.micronaut.data.jdbc.annotation.JdbcRepository
import io.micronaut.data.model.query.builder.sql.Dialect
import io.micronaut.data.repository.CrudRepository

@JdbcRepository(dialect = Dialect.ORACLE)
interface ThingRepository extends CrudRepository<Thing, Long> {

    @Override
    @NonNull
    List<Thing> findAll()

    Optional<Thing> findByName(String name)
}
5.3. Data populator class
Create a DataPopulator class to create some example database entries when the application starts:
src/main/groovy/example/micronaut/DataPopulator.groovy
package example.micronaut

import example.micronaut.domain.Thing
import example.micronaut.repository.ThingRepository
import groovy.transform.CompileStatic
import io.micronaut.context.annotation.Requires
import io.micronaut.context.event.StartupEvent
import io.micronaut.runtime.event.annotation.EventListener
import jakarta.inject.Singleton

import javax.transaction.Transactional

@Singleton
@Requires(notEnv = 'test')
@CompileStatic
class DataPopulator {

    private final ThingRepository thingRepository

    DataPopulator(ThingRepository thingRepository) {
        this.thingRepository = thingRepository
    }

    @EventListener
    @Transactional
    void init(StartupEvent event) {
        // clear out any existing data
        thingRepository.deleteAll()

        // create data
        Thing fred = new Thing('Fred')
        Thing barney = new Thing('Barney')
        thingRepository.saveAll([fred, barney])
    }
}
5.4. Controller class
Create a ThingController class to view persisted data:
src/main/groovy/example/micronaut/controller/ThingController.groovy
package example.micronaut.controller

import example.micronaut.domain.Thing
import example.micronaut.repository.ThingRepository
import groovy.transform.CompileStatic
import io.micronaut.http.annotation.Controller
import io.micronaut.http.annotation.Get
import io.micronaut.scheduling.TaskExecutors
import io.micronaut.scheduling.annotation.ExecuteOn

import javax.validation.constraints.NotBlank

@Controller('/things')
@ExecuteOn(TaskExecutors.IO)
@CompileStatic
class ThingController {

    private final ThingRepository thingRepository

    ThingController(ThingRepository thingRepository) {
        this.thingRepository = thingRepository
    }

    @Get
    List<Thing> all() {
        thingRepository.findAll()
    }

    @Get('/{name}')
    Optional<Thing> byName(@NotBlank String name) {
        thingRepository.findByName(name)
    }
}
5.5. Configuration
Create a new Flyway migration SQL script in src/main/resources/db/migration/V1__create-schema.sql and add the following:
src/main/resources/db/migration/V1__create-schema.sql
CREATE TABLE "THING" ("ID" NUMBER(19) PRIMARY KEY NOT NULL,"NAME" VARCHAR(255) NOT NULL);
CREATE SEQUENCE "THING_SEQ" MINVALUE 1 START WITH 1 NOCACHE NOCYCLE;
Edit src/main/resources/logback.xml and add the following (anywhere in the <configuration> element) to monitor the SQL queries that Micronaut Data performs:
<logger name='io.micronaut.data.query' level='debug' />Replace the generated application.yml with this:
src/main/resources/application.yml
micronaut:
  application:
    name: micronautguide
  executors:
    io:
      type: fixed
      nThreads: 75 (1)
flyway:
  datasources:
    default:
enabled: true| 1 | This is optional, but it’s a good idea to configure the IO pool size when using @ExecuteOn(TaskExecutors.IO) in controllers |
Oracle Cloud Autonomous Database connection information and credentials are stored in the Oracle Wallet. See the Micronaut Oracle Cloud integration documentation for more details and options for working with Oracle Cloud in Micronaut applications.
Create an application-oraclecloud.yml file in src/main/resources with this content:
src/main/resources/application-oraclecloud.yml
datasources:
  default:
    ocid: (1)
    walletPassword: (2)
    username: micronautdemo
    password: (3)
oci:
  config:
profile: DEFAULT (4)| 1 | Set the value of the ocid property with the database OCID unique identifier you saved when creating the database |
| 2 | Set the walletPassword property with a password to encrypt the wallet keys (must be at least 8 characters and include at least 1 letter and either 1 numeric or special character) |
| 3 | Set the password property with the micronautdemo schema user password you created |
| 4 | Change the profile name if you’re not using the default, and optionally add a value for the path to the config file if necessary as described in the Authentication section of the Micronaut Oracle Cloud docs |
5.6. Writing Tests
Create a test to verify that database access works:
src/test/groovy/example/micronaut/repository/ThingRepositorySpec.groovy
package example.micronaut.repository

import example.micronaut.domain.Thing
import example.micronaut.repository.ThingRepository
import io.micronaut.test.extensions.spock.annotation.MicronautTest
import spock.lang.Specification

import jakarta.inject.Inject
import java.util.stream.Collectors

@MicronautTest
class ThingRepositorySpec extends Specification {

    @Inject
    ThingRepository thingRepository

    void 'test findAll'() {

        when:
        // clear out existing data; safe because each
        // test runs in a transaction that's rolled back
        thingRepository.deleteAll()

        then:
        !thingRepository.count()

        when:
        thingRepository.saveAll(Arrays.asList(
                new Thing('t1'),
                new Thing('t2'),
                new Thing('t3')))

        List<Thing> things = thingRepository.findAll()

        then:
        things.size() == 3
        ['t1', 't2', 't3'] == things.stream()
                .map(Thing::getName)
                .sorted()
                .collect(Collectors.toList())
    }

    void 'test findByName'() {
        given:
        String name = UUID.randomUUID()

        when:
        Thing thing = thingRepository.findByName(name).orElse(null)

        then:
        !thing

        when:
        thingRepository.save(new Thing(name))
        thing = thingRepository.findByName(name).orElse(null)

        then:
        thing
        name == thing.name
    }
}
6. Testing the Application
There are two options for running the tests; one is to run against the live database, and the other is to run tests locally with an Oracle database in a Docker container using Testcontainers.
Replace the following dependency:
pom.xml
<dependency>
    <groupId>org.testcontainers</groupId>
    <artifactId>junit-jupiter</artifactId>
    <scope>test</scope>
</dependency>
with:
pom.xml
<dependency>
    <groupId>org.testcontainers</groupId>
    <artifactId>oracle-xe</artifactId>
    <scope>test</scope>
</dependency>
and create application-test.yml file in src/test/resources with this content:
src/test/resources/application-test.yml
datasources:
  default:
    url: jdbc:tc:oracle:thin:@/xe
    driverClassName: org.testcontainers.jdbc.ContainerDatabaseDriver
    username: system
    password: oracle

flyway:
  datasources:
    default:
      locations: classpath:db/migration
      baseline-version: 0
      baseline-on-migrate: true
To test using the live database, replace the generated application-test.yml with this:
src/test/resources/application-test.yml
flyway:
  datasources:
    default:
      locations: classpath:db/migration
      baseline-version: 0
      baseline-on-migrate: true
Then replace the @MicronautTest annotation on ThingRepositoryTest with @MicronautTest(environments = Environment.ORACLE_CLOUD) (and add an import for io.micronaut.context.env.Environment) to use the datasource configured in application-oraclecloud.yml.
To run the tests:
./mvnw test7. Using Oracle Cloud Vault
In the previous sections, we included the admin and user passwords in cleartext inside application-oraclecloud.yml, which is not a best practice. However, it’s possible to externalize those (and other properties that shouldn’t be in cleartext and/or in source control) with Oracle Cloud Vault.
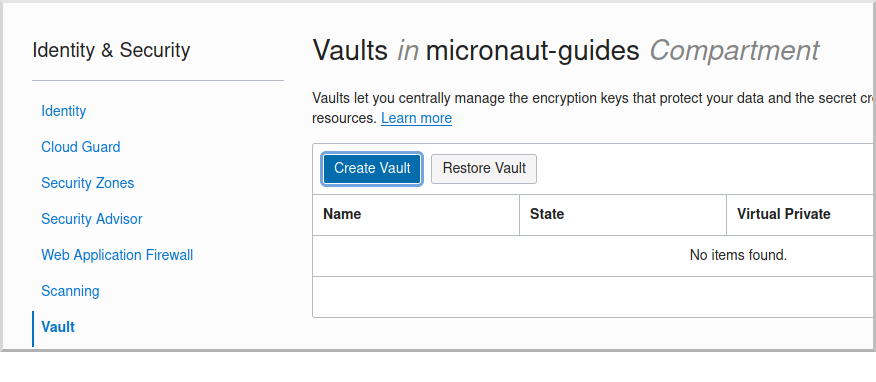
7.1. Creating the vault
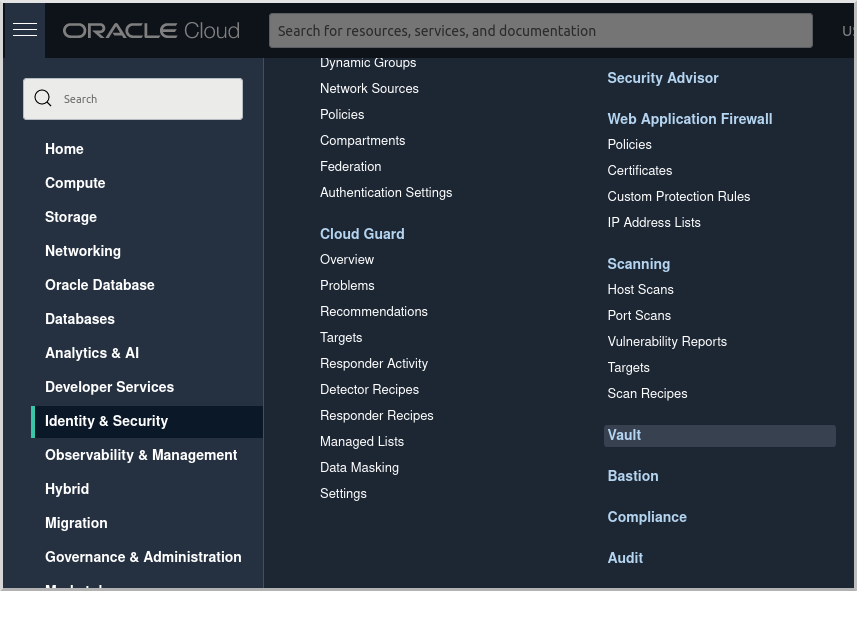
From the Oracle Cloud Menu select "Identity & Security" and then "Vault":
Click "Create Vault":
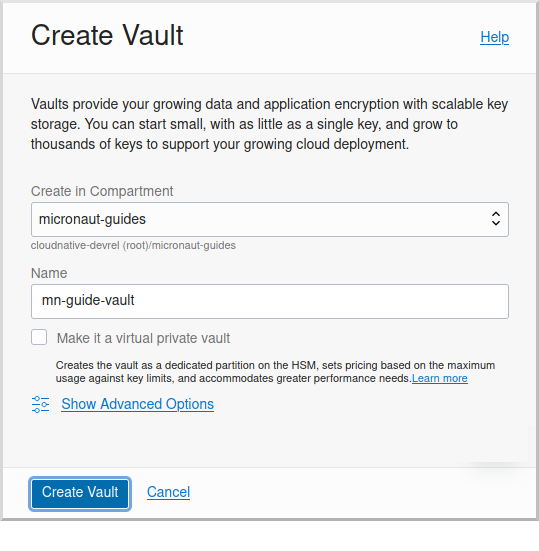
Then enter a name for the vault, e.g. "mn-guide-vault" and click "Create Vault":
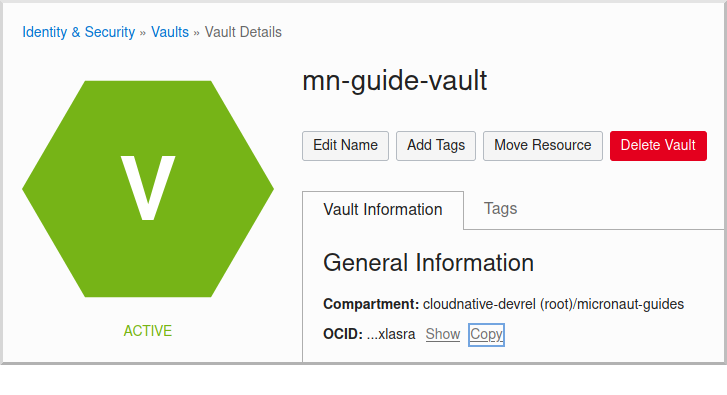
Click the "Copy" link in the OCID row; this is the unique identifier for your vault and you’ll need it later.
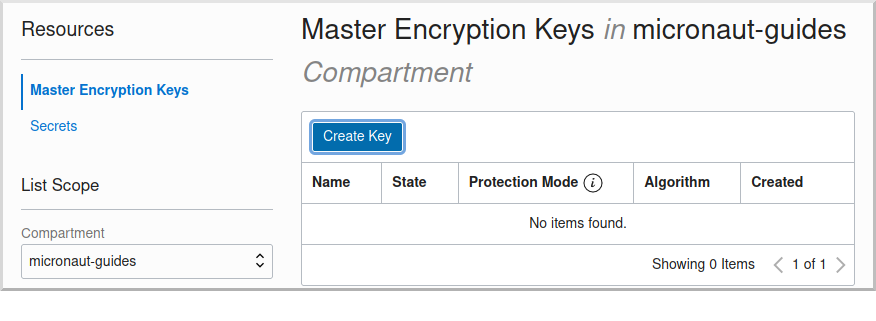
Click "Master Encryption Keys" under "Resources", then click "Create Key":
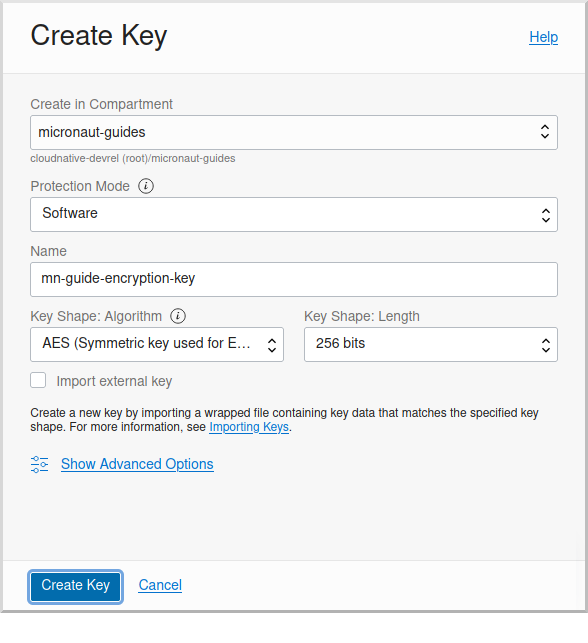
Choose a name for the key, e.g. "mn-guide-encryption-key", and change "Protection Mode" to "Software", then click "Create Key":
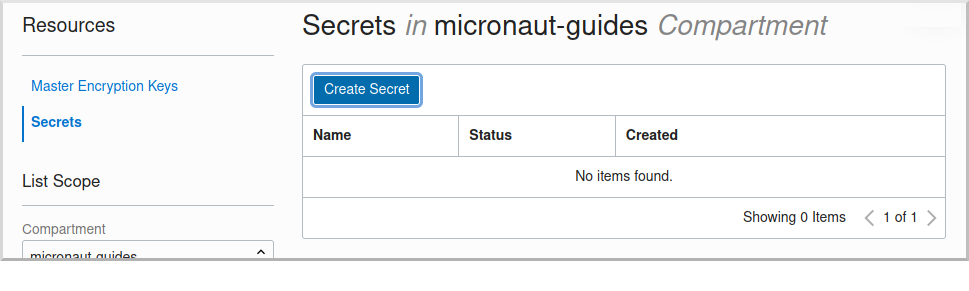
Once the key has finished provisioning, click "Secrets" under "Resources", then click "Create Secret":
This first secret will be for the wallet password, so choose a name like "ATP_WALLET_PASSWORD". Select the encryption key you created, and put the wallet password value in the "Secret Contents" field, then click "Create Secret":
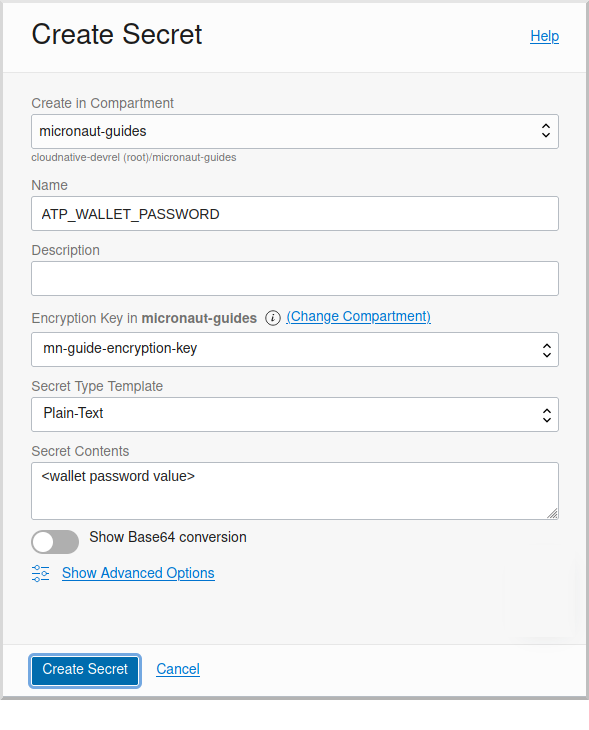
Create another secret for the user password, using a name like "ATP_USER_PASSWORD" and for "Secret Contents" use created database password.
7.2. Dependency
Add a dependency for the micronaut-oraclecloud-vault library to add support for using Vault as a distributed configuration source:
pom.xml
<dependency>
    <groupId>io.micronaut.oraclecloud</groupId>
    <artifactId>micronaut-oraclecloud-vault</artifactId>
    <scope>compile</scope>
</dependency>
7.3. Configuration changes
Create src/main/resources/bootstrap.yml with just the micronaut.application.name property:
src/main/resources/bootstrap.yml
micronaut:
  application:
    name: micronautguide
and delete the micronaut.application.name property from application.yml so it’s only declared once:
src/main/resources/application.yml
micronaut:
  executors:
    io:
      type: fixed
      nThreads: 75
flyway:
  datasources:
    default:
      enabled: true
Then create src/main/resources/bootstrap-oraclecloud.yml with the following content:
src/main/resources/bootstrap-oraclecloud.yml
micronaut:
  config-client:
    enabled: true
oci:
  config:
    profile: DEFAULT (1)
  vault:
    config:
      enabled: true
    vaults:
      - ocid: (2)
compartment-ocid: (3)| 1 | Use the same profile name as above in application-oraclecloud.yml |
| 2 | Set the value of the ocid property with the vault OCID unique identifier you saved when creating the vault. |
| 3 | Set the value of the compartment-ocid property with the OCID unique identifier of the compartment where you created the secrets |
Delete the oci.config.profile property from application-oraclecloud.yml, and replace the cleartext passwords with placeholders using the secret names you created:
src/main/resources/application-oraclecloud.yml
datasources:
  default:
    ocid: ocid1.autonomousdatabase.oc1.iad.anuwcl...
    walletPassword: ${ATP_WALLET_PASSWORD}
    username: micronautdemo
    password: ${ATP_USER_PASSWORD}
8. Running the Application
To run the application use
MICRONAUT_ENVIRONMENTS=oraclecloud ./mvnw mn:runor if you use Windows:
cmd /C "set MICRONAUT_ENVIRONMENTS=oraclecloud && mvnw mn:run"which will start the application on port 8080.
You should see output similar to the following, indicating that the database connectivity and wallet configuration is all handled automatically, and the Flyway migration runs since the database is determined to be out of date. Also, if you added the Logback logger above, you’ll see the results of the work done by DataPopulator:
INFO  com.oracle.bmc.Region - Loaded service 'DATABASE' endpoint mappings: {US_ASHBURN_1=https://database.us-ashburn-1.oraclecloud.com}
INFO  c.oracle.bmc.database.DatabaseClient - Setting endpoint to https://database.us-ashburn-1.oraclecloud.com
INFO  i.m.o.a.j.OracleWalletArchiveProvider - Using default serviceAlias: MicronautDemo_high
INFO  i.m.flyway.AbstractFlywayMigration - Running migrations for database with qualifier [default]
INFO  o.f.c.i.database.base.DatabaseType - Database: jdbc:oracle:thin:@(description=(retry_count=20)(retry_delay=3)(address=(protocol=tcps)(port=1522)(host=adb.us-ashburn-1.oraclecloud.com))(connect_data=(service_name=rxfmolsmtfaakhf_micronautdemo_high.adb.oraclecloud.com))(security=(ssl_server_cert_dn="CN=adwc.uscom-east-1.oraclecloud.com,OU=Oracle BMCS US,O=Oracle Corporation,L=Redwood City,ST=California,C=US"))) (Oracle 19.0)
INFO  o.f.core.internal.command.DbValidate - Successfully validated 1 migration (execution time 00:00.069s)
INFO  o.f.c.i.s.JdbcTableSchemaHistory - Creating Schema History table "MICRONAUTDEMO"."flyway_schema_history" ...
INFO  o.f.core.internal.command.DbMigrate - Migrating schema "MICRONAUTDEMO" to version "1 - create-schema"
INFO  o.f.core.internal.command.DbMigrate - Successfully applied 1 migration to schema "MICRONAUTDEMO", now at version v1 (execution time 00:01.020s)
DEBUG io.micronaut.data.query - Executing Query: DELETE  FROM "THING"
DEBUG io.micronaut.data.query - Executing SQL Insert: INSERT INTO "THING" ("NAME","ID") VALUES (?,"THING_SEQ".nextval)
DEBUG io.micronaut.data.query - Executing SQL Insert: INSERT INTO "THING" ("NAME","ID") VALUES (?,"THING_SEQ".nextval)
INFO  io.micronaut.runtime.Micronaut - Startup completed in 12776ms. Server Running: http://localhost:8080
You can run some cURL requests to test the application:
curl -i localhost:8080/thingsHTTP/1.1 200 OK
Content-Type: application/json
content-length: 49
connection: keep-alive
[{"id":1,"name":"Fred"},{"id":2,"name":"Barney"}]curl -i localhost:8080/things/FredHTTP/1.1 200 OK
Content-Type: application/json
content-length: 22
connection: keep-alive
{"id":1,"name":"Fred"}curl -i localhost:8080/things/RalphHTTP/1.1 404 Not Found
Content-Type: application/json
content-length: 89
connection: keep-alive
{"message":"Page Not Found","_links":{"self":{"href":"/things/Ralph","templated":false}}}Run the application again, and everything should work with the password placeholders replaced with the resolved secret values at startup.
9. Connect the database with the IntelliJ Database tool
Update your Autonomous Database Instance to Allow both TLS and mTLS Authentication:
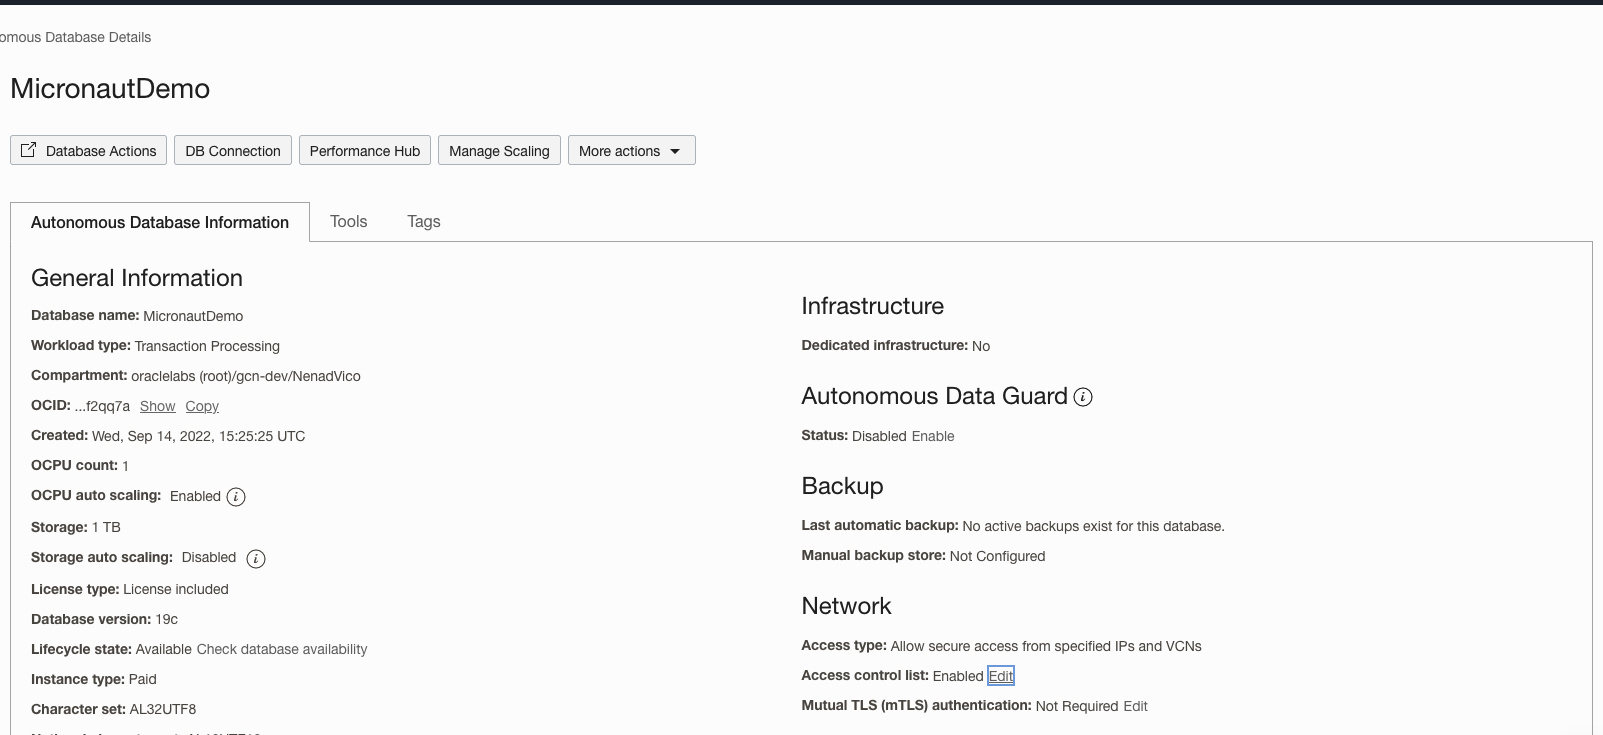
In our Oracle Cloud Autonomous Database Details page under Network section click on "Access control list" "Edit" link.
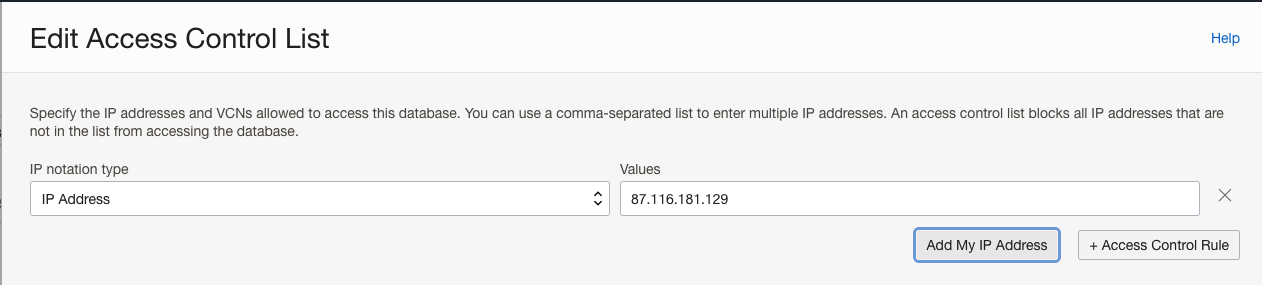
In opened dialog "Edit Access Control List" for "IP notation type" select box choose "IP Address", then click on "Add My IP Address" Button and "Save Changes".
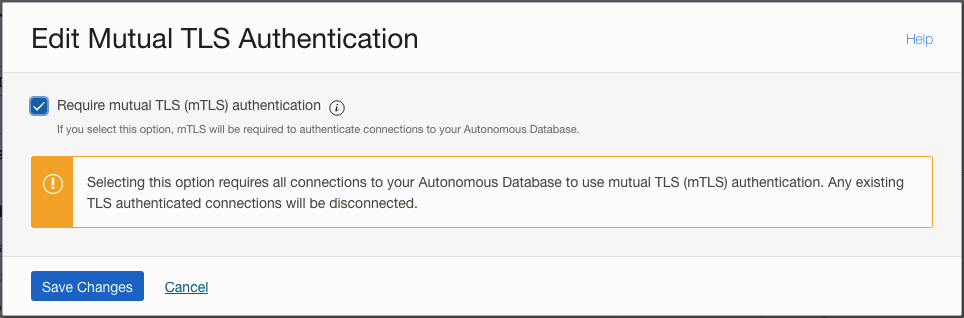
In one field below "Mutual TLS (mTLS) authentication:" click on "Edit" link. Uncheck "Require mutual TLS (mTLS) authentication" check box in opened "Edit Mutual TLS Authentication" dialog and "Save Changes".
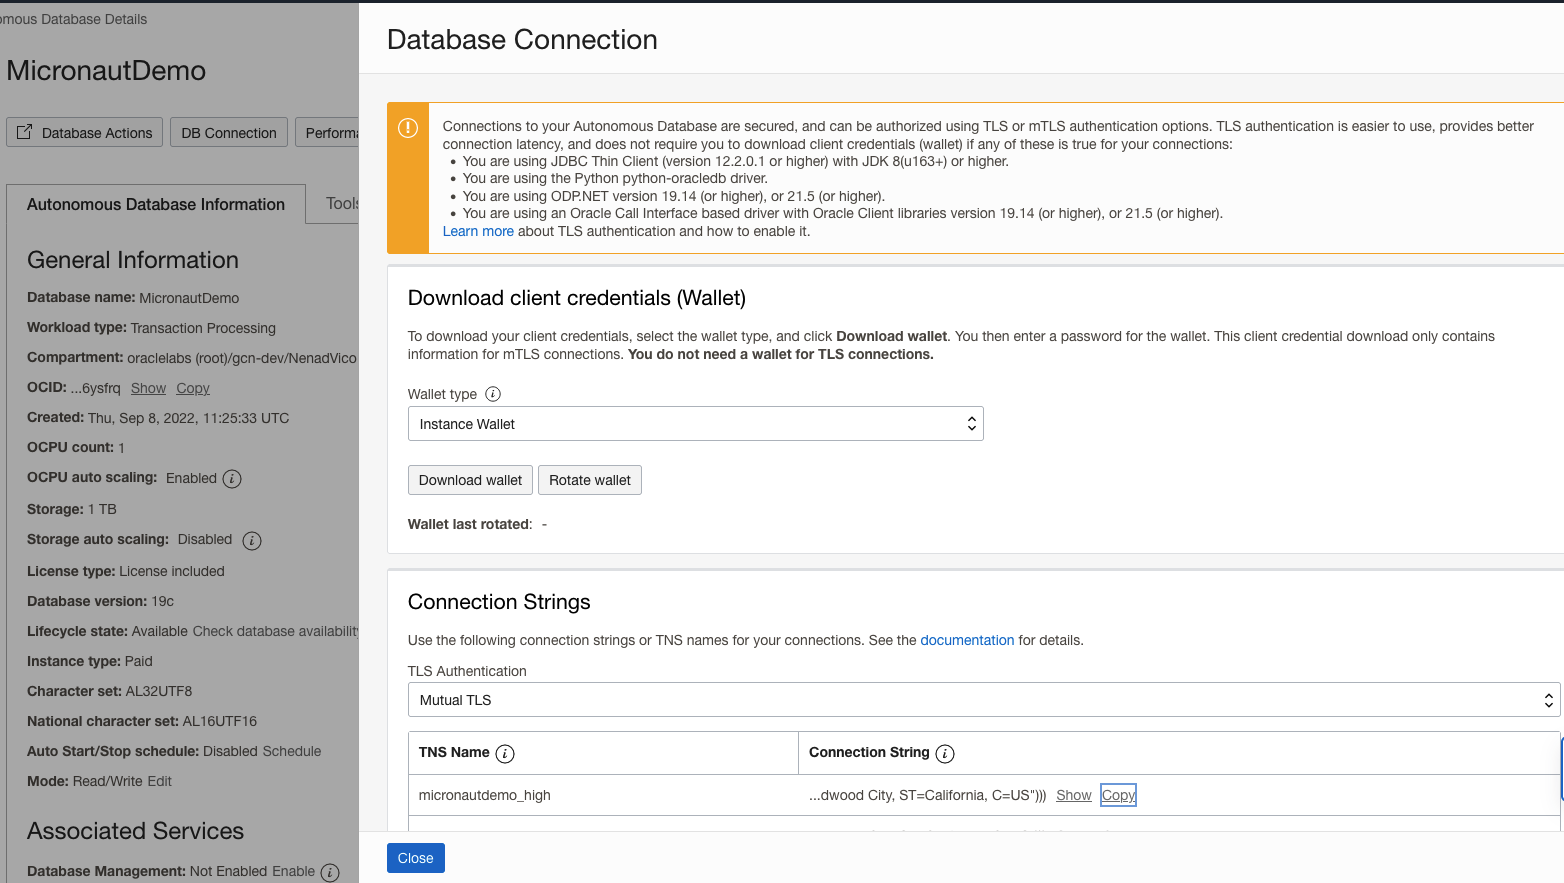
Click on "DB Connection' button then choose one of Connection Strings and click "Copy" link. It will be used for creating connection url.
Setup DB connection in the IntelliJ Database tool:
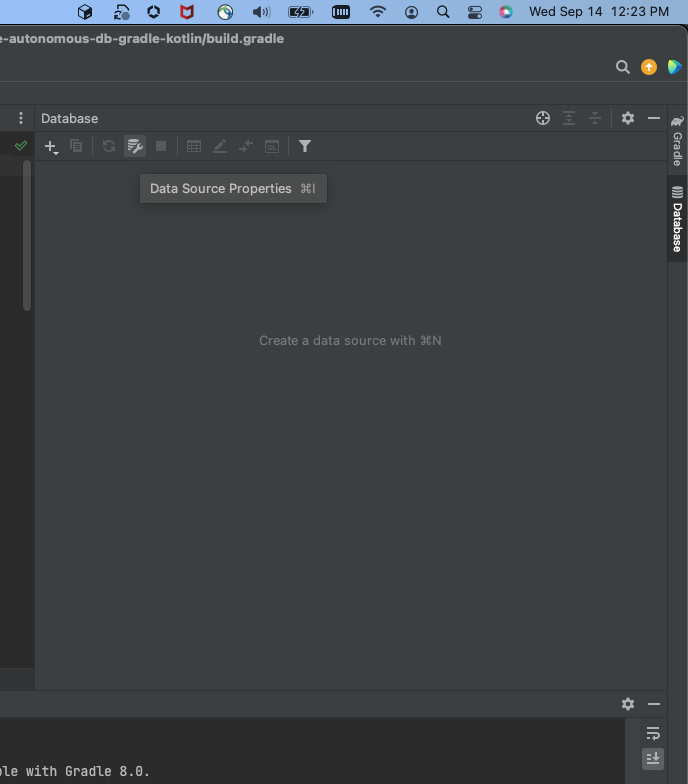
Select Database tool and Data Source Properties in IntelliJ
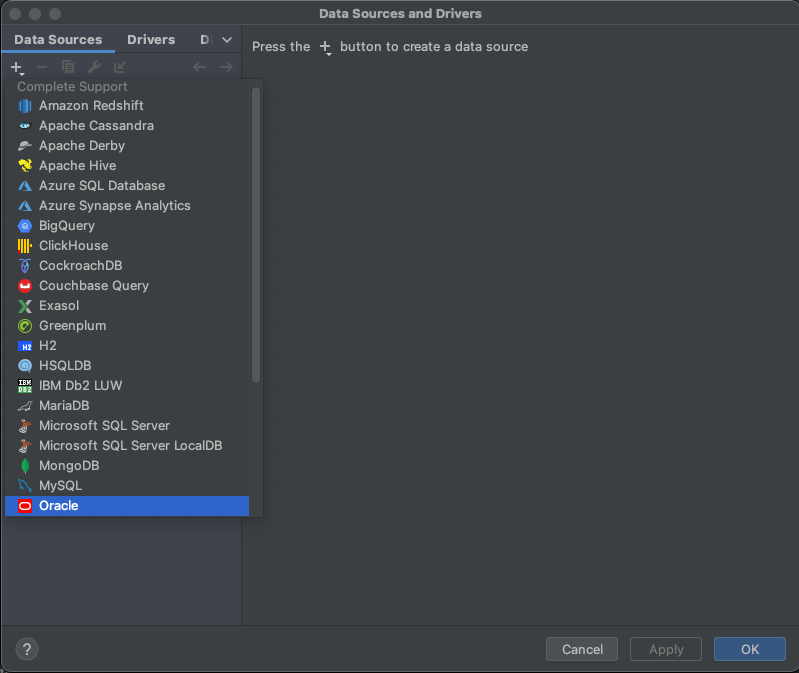
In opened Data Source and Drivers window select adding new DataSource and choose Oracle
In Configuration window add "Name"": MicronautDemo, "User": micronautdemo and "Password" specified before. In "URL" field remove "localhost:1521:XE" and add previously copied Connection String
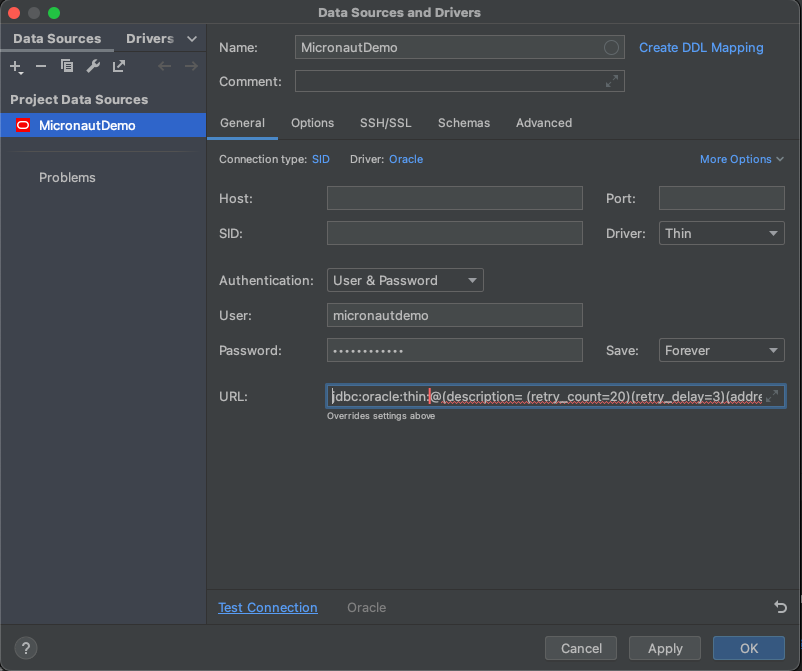
URL field should looks like: jdbc:oracle:thin:@(description= (retry_count=20) …. L=Redwood City, ST=California, C=US")))
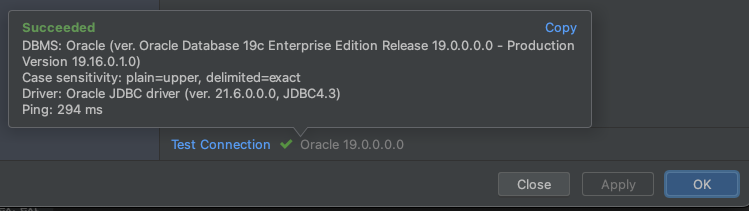
Click on Test Connection and you should get "Secceeded" message, then click "Ok"
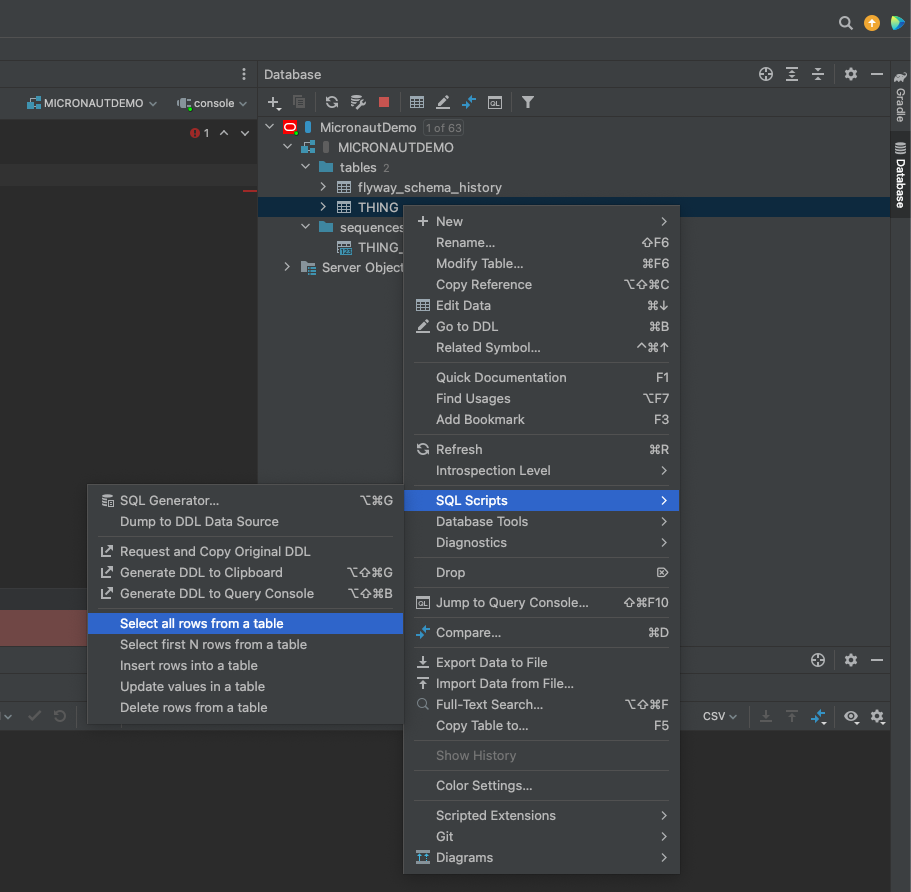
Under MICRONAUTDEMO user make select query of 'THING' table
10. Next steps
Explore more features with Micronaut Guides.
Read more about the Micronaut Oracle Cloud integration.
Optionally, you can use the approach described in Deploy a Micronaut application to Oracle Cloud to deploy this application to Oracle Cloud.