@Override
public boolean canHandle(HandlerInput handlerInput) {
return handlerInput.matches(Predicates.intentName("HelloWorldIntent"));
}

== Micronaut Function Name

Property `micronaut.function.name` takes precedence over the function name present in the Lambda Context.Table of Contents
Micronaut AWS
Provides integration between Micronaut and Amazon Web Services (AWS)
Version:
1 Introduction
This project provides various extensions to Micronaut for Amazon Web Services (AWS).
A base AWSClientConfiguration is provided which can be used as a base configuration class for any configuration that needs to configure an AWS SDK client.
2 Release History
For this project, you can find a list of releases (with release notes) here:
3 Micronaut AWS 3.0
3.1 Breaking Changes in Micronaut AWS 3.0
Module micronaut-aws-route53 removal
Module micronaut-aws-route53 which used AWS SDK V1 has been removed. Instead, you can use micronaut-aws-service-discovery module which provides the same functionality but it uses AWS SDK V2.
@IntentHandler removal
The @IntentHandler annotation and the associated AnnotatedRequestHandler have been removed. @IntentHandler helped to implement automatically the method canHandle of an Alexa’s handler.
If you had code, such as @IntentHandler("HelloWorldIntent"), you need to implement canHandle method. For example:
4 Micronaut AWS 2.0
4.1 What's new in Micronaut AWS 2.0 ?
Micronaut AWS 2.0.0 contains improvements to ease the creation of Alexa Skills with Micronaut:
-
Support for AWS SDK v2.
-
Improvements to GraalVM support on Lambda.
-
Creation of Alexa Skills as http services.
-
Creation of Flash Briefing skills.
-
Easier creation of SSML.
Check the Alexa section to learn more.
See the section Breaking Changes to ease into the migration to Micronaut AWS 2.x
4.2 Breaking Changes in Micronaut AWS 2.0
Class changes
AlexaFunction has been refactored to ease extension.
| Old Class Name | New Class |
|---|---|
|
| Class Name | Old Package | New Package |
|---|---|---|
|
|
|
|
|
|
|
|
Artifact changes
Now all artifacts are published under the io.micronaut.aws group id.
| Old artifact | New artifact |
|---|---|
|
|
Content negotiation
When using AWS API Proxy, the new support for server side content negotiation may require changes to tests. For example a test that makes a call such as:
String result = client.toBlocking().retrieve(
    HttpRequest.GET("/test")
        .accept("text/plain"), String)
If the server implementation does not declare the route as @Produces("text/plain") the request won’t match.
5 Amazon Corretto
Amazon Corretto is an OpenJDK distribution that provides free, long-term support with no pay-gated features or restrictions on how it’s used in production. Corretto is used by thousands of Amazon workloads; for example, it’s the JDK used by the AWS Lambda java11 runtime, which provides insights Amazon uses to push improvements upstream.
6 AWS SDK v1
To use the AWS SDK v1, add the following dependency:
implementation("io.micronaut.aws:micronaut-aws-sdk-v1")<dependency>
<groupId>io.micronaut.aws</groupId>
<artifactId>micronaut-aws-sdk-v1</artifactId>
</dependency>6.1 AWS Credentials Provider
When working with AWS SDK, you may need to provide a com.amazonaws.auth.AWSCredentialsProvider. To ease that this module provides a utility class: EnvironmentAWSCredentialsProvider
For example the following snippet show how you may configure a S3 Client if you set two environment variables:
export AWS_ACCESS_KEY_ID=XXXX
export AWS_SECRET_KEY=YYYY
AmazonS3ClientBuilder amazonS3ClientBuilder = AmazonS3ClientBuilder.standard();
amazonS3ClientBuilder.setCredentials(new EnvironmentAWSCredentialsProvider(applicationContext.getEnvironment()));
AmazonS3 s3 = amazonS3ClientBuilder.build();Read about externalized Configuration with property sources in Micronaut.
7 AWS SDK v2
To use the AWS SDK v2, add the following dependency:
implementation("io.micronaut.aws:micronaut-aws-sdk-v2")<dependency>
<groupId>io.micronaut.aws</groupId>
<artifactId>micronaut-aws-sdk-v2</artifactId>
</dependency>7.1 SDK HTTP Client
By default, the AWS SDK v2 will pull transitively both the Netty (async) and Apache HTTP (sync) clients. If you wish
to use a client based on the JVM’s lightweight URLConnection, you should configure it as explained below.
7.1.1 URLConnection client
To use the URLConnection-based client, you should exclude the other clients from the classpath:
Maven
<dependency>
    <groupId>software.amazon.awssdk</groupId>
    <artifactId>s3</artifactId>
    <exclusions>
        <exclusion>
            <groupId>software.amazon.awssdk</groupId>
            <artifactId>apache-client</artifactId>
        </exclusion>
        <exclusion>
            <groupId>software.amazon.awssdk</groupId>
            <artifactId>netty-nio-client</artifactId>
        </exclusion>
    </exclusions>
</dependency>
<dependency>
    <groupId>software.amazon.awssdk</groupId>
    <artifactId>url-connection-client</artifactId>
</dependency>
Gradle
implementation "software.amazon.awssdk:s3", {
    exclude group: "software.amazon.awssdk", module: "apache-client"
    exclude group: "software.amazon.awssdk", module: "netty-nio-client"
}
implementation "software.amazon.awssdk:url-connection-client"
Then, you can configure it with the following configuration properties:
| Property | Type | Description |
|---|---|---|
|
java.time.Duration |
|
|
java.time.Duration |
|
|
software.amazon.awssdk.http.urlconnection.ProxyConfiguration |
If you don’t exclude the other clients from the classpath, you still can configure which one is used by setting the following JVM system properties:
-
software.amazon.awssdk.http.service.impl. Possible values:-
software.amazon.awssdk.http.urlconnection.UrlConnectionSdkHttpServicefor theURLConnectionbased client. -
software.amazon.awssdk.http.apache.ApacheSdkHttpServicefor the Apache HTTP client (if in the classpath).
-
-
software.amazon.awssdk.http.async.service.impl. Possible values:-
software.amazon.awssdk.http.nio.netty.NettySdkAsyncHttpServicefor the Netty client (if in the classpath).
-
7.1.2 Apache HTTP client
The Apache HTTP client can be configured with the following options:
| Property | Type | Description |
|---|---|---|
|
java.time.Duration |
|
|
java.time.Duration |
|
|
java.time.Duration |
|
|
java.lang.Integer |
|
|
java.net.InetAddress |
|
|
java.lang.Boolean |
|
|
java.time.Duration |
|
|
java.time.Duration |
|
|
java.lang.Boolean |
|
|
org.apache.http.conn.DnsResolver |
|
|
org.apache.http.conn.socket.ConnectionSocketFactory |
|
|
java.lang.Boolean |
|
|
java.net.URI |
|
|
java.lang.String |
|
|
java.lang.String |
|
|
java.lang.String |
|
|
java.lang.String |
|
|
java.util.Set |
|
|
java.lang.String |
|
|
java.lang.Boolean |
|
|
java.lang.Boolean |
7.1.3 Netty client
The Netty client can be configured with the following options:
| Property | Type | Description |
|---|---|---|
|
java.lang.Integer |
|
|
java.lang.Integer |
|
|
java.time.Duration |
|
|
java.time.Duration |
|
|
java.time.Duration |
|
|
java.time.Duration |
|
|
java.time.Duration |
|
|
java.time.Duration |
|
|
java.time.Duration |
|
|
java.lang.Boolean |
|
|
software.amazon.awssdk.http.Protocol |
|
|
java.lang.Boolean |
|
|
java.lang.Integer |
|
|
java.lang.String |
|
|
int |
|
|
java.lang.String |
|
|
java.util.Set |
|
|
java.lang.String |
|
|
java.lang.String |
|
|
java.lang.Boolean |
7.2 Supplying AWS credentials
By default, AWS SDK v2 will attempt to find AWS credentials from the following places:
-
Java system properties:
aws.accessKeyIdandaws.secretAccessKey. -
Environment variables:
AWS_ACCESS_KEY_IDandAWS_SECRET_ACCESS_KEY. -
The default credential profiles file:
~/.aws/credentials. -
Amazon ECS container credentials, loaded from Amazon ECS if the environment variable
AWS_CONTAINER_CREDENTIALS_RELATIVE_URIis set. -
Instance profile credentials, used on Amazon EC2 instances, and delivered through the Amazon EC2 metadata service.
For more information, check the AWS documentation.
If you still want to specify the credentials via configuration, you can do so in application.yml:
aws:
  accessKeyId: your_access_key_id_here
  secretKey: your_secret_key_id_here
  sessionToken: your_session_token_here
7.3 AWS region selection
By default, AWS SDK v2 will attempt to determine the AWS region in the following ways:
-
Environment variable:
AWS_REGION. -
The default shared configuration file:
~/.aws/config. -
Amazon EC2 instance metadata service.
For more information, check the AWS documentation.
If you still want to specify the region via configuration, you can do so in application.yml:
aws:
  region: eu-west-1
7.4 API Gateway Management API Client
To use an API Gateway Management Api client, add the following dependency:
implementation("software.amazon.awssdk:apigatewaymanagementapi")<dependency>
<groupId>software.amazon.awssdk</groupId>
<artifactId>apigatewaymanagementapi</artifactId>
</dependency>Then, the following beans will be created:
-
software.amazon.awssdk.services.apigatewaymanagementapi.ApiGatewayManagementApiClientBuilder -
software.amazon.awssdk.services.apigatewaymanagementapi.ApiGatewayManagementApiClient.
And:
-
software.amazon.awssdk.services.apigatewaymanagementapi.ApiGatewayManagementApiAsyncClientBuilder -
software.amazon.awssdk.services.apigatewaymanagementapi.ApiGatewayManagementApiAsyncClient.
The HTTP client, credentials and region will be configured as per described in the SDK v2 documentation.
7.5 S3
Micronaut provides a high-level, uniform object storage API that works across the major cloud providers: Micronaut Object Storage.
To get started, select the object-storage-aws feature in Micronaut Launch, or add the following dependency:
implementation("io.micronaut.objectstorage:micronaut-object-storage-aws")<dependency>
<groupId>io.micronaut.objectstorage</groupId>
<artifactId>micronaut-object-storage-aws</artifactId>
</dependency>For more information, check the Micronaut Object Storage AWS support documentation.
If you still need the low-level AWS S3 client, add the following dependency:
implementation("software.amazon.awssdk:s3")<dependency>
<groupId>software.amazon.awssdk</groupId>
<artifactId>s3</artifactId>
</dependency>Then, the following beans will be created:
-
software.amazon.awssdk.services.s3.S3ClientBuilder -
software.amazon.awssdk.services.s3.S3Client.
And:
-
software.amazon.awssdk.services.s3.S3AsyncClientBuilder -
software.amazon.awssdk.services.s3.S3AsyncClient.
The HTTP client, credentials and region will be configured as per described in the SDK v2 documentation.
Additionally, this service accepts the following configuration properties:
| Property | Type | Description |
|---|---|---|
|
java.lang.Boolean |
|
|
java.lang.Boolean |
|
|
java.lang.Boolean |
|
|
java.lang.Boolean |
|
|
java.lang.Boolean |
|
|
java.lang.Boolean |
|
|
java.lang.String |
|
|
java.net.URI |
Provide a URI to override the endpoint with which the AWS SDK should communicate. Optional. Defaults to |
7.6 Dynamo DB
To use a DynamoDb client, add the following dependency:
implementation("software.amazon.awssdk:dynamodb")<dependency>
<groupId>software.amazon.awssdk</groupId>
<artifactId>dynamodb</artifactId>
</dependency>Then, the following beans will be created:
-
software.amazon.awssdk.services.dynamodb.DynamoDbClientBuilder -
software.amazon.awssdk.services.dynamodb.DynamoDbClient.
And:
-
software.amazon.awssdk.services.dynamodb.DynamoDbAsyncClientBuilder -
software.amazon.awssdk.services.dynamodb.DynamoDbAsyncClient.
The HTTP client, credentials and region will be configured as per described in the SDK v2 documentation.
7.7 SES
To use a SES client, add the following dependency:
implementation("software.amazon.awssdk:ses")<dependency>
<groupId>software.amazon.awssdk</groupId>
<artifactId>ses</artifactId>
</dependency>Then, the following beans will be created:
-
software.amazon.awssdk.services.ses.SesClientBuilder -
software.amazon.awssdk.services.ses.SesClient.
And:
-
software.amazon.awssdk.services.ses.SesAsyncClientBuilder -
software.amazon.awssdk.services.ses.SesAsyncClient.
The HTTP client, credentials and region will be configured as per described in the SDK v2 documentation.
7.8 SNS
To use a SNS client, add the following dependency:
implementation("software.amazon.awssdk:sns")<dependency>
<groupId>software.amazon.awssdk</groupId>
<artifactId>sns</artifactId>
</dependency>Then, the following beans will be created:
-
software.amazon.awssdk.services.sns.SnsClientBuilder -
software.amazon.awssdk.services.sns.SnsClient.
And:
-
software.amazon.awssdk.services.sns.SnsAsyncClientBuilder -
software.amazon.awssdk.services.sns.SnsAsyncClient.
The HTTP client, credentials and region will be configured as per described in the SDK v2 documentation.
7.9 SQS
To use a SQS client, add the following dependency:
implementation("software.amazon.awssdk:sqs")<dependency>
<groupId>software.amazon.awssdk</groupId>
<artifactId>sqs</artifactId>
</dependency>Then, the following beans will be created:
-
software.amazon.awssdk.services.sqs.SqsClientBuilder -
software.amazon.awssdk.services.sqs.SqsClient.
And:
-
software.amazon.awssdk.services.sqs.SqsAsyncClientBuilder -
software.amazon.awssdk.services.sqs.SqsAsyncClient.
The HTTP client, credentials and region will be configured as per described in the SDK v2 documentation.
7.10 SSM
To use an SSM client, add the following dependency:
implementation("software.amazon.awssdk:ssm")<dependency>
<groupId>software.amazon.awssdk</groupId>
<artifactId>ssm</artifactId>
</dependency>Then, the following beans will be created:
-
software.amazon.awssdk.services.ssm.SsmClientBuilder -
software.amazon.awssdk.services.ssm.SsmClient.
And:
-
software.amazon.awssdk.services.ssm.SsmAsyncClientBuilder -
software.amazon.awssdk.services.ssm.SsmAsyncClient.
The HTTP client, credentials and region will be configured as per described in the SDK v2 documentation.
7.11 Secrets Manager
To use a AWS Secrets Manager client, add the following dependency:
implementation("software.amazon.awssdk:secretsmanager")<dependency>
<groupId>software.amazon.awssdk</groupId>
<artifactId>secretsmanager</artifactId>
</dependency>Then, the following beans will be created:
-
software.amazon.awssdk.services.secretsmanager.SecretsManagerClientBuilder -
software.amazon.awssdk.services.secretsmanager.SecretsManagerClient.
And:
-
software.amazon.awssdk.services.secretsmanager.SecretsManagerAsyncClientBuilder -
software.amazon.awssdk.services.secretsmanager.SecretsManagerAsyncClient.
The HTTP client, credentials and region will be configured as per described in the SDK v2 documentation.
7.12 Service discovery
To use Service discovery, the AWS Java SDK for Amazon Route 53 Auto Naming module, add the following dependency:
implementation("software.amazon.awssdk:servicediscovery")<dependency>
<groupId>software.amazon.awssdk</groupId>
<artifactId>servicediscovery</artifactId>
</dependency>Then, the following beans will be created:
-
software.amazon.awssdk.services.servicediscovery.ServiceDiscoveryClientBuilder -
software.amazon.awssdk.services.servicediscovery.ServiceDiscoveryClient
And:
-
software.amazon.awssdk.services.servicediscovery.ServiceDiscoveryAsyncClient -
software.amazon.awssdk.services.servicediscovery.ServiceDiscoveryAsyncClientBuilder.
The HTTP client, credentials and region will be configured as per described in the SDK v2 documentation.
7.13 CloudWatch logging
| This does not apply to AWS Lambda. AWS Lambda publishes automatically to CloudWatch logs produced to standard out. |
To use the Cloudwatch Logs, add the following dependency to your project:
implementation("io.micronaut.aws:micronaut-aws-cloudwatch-logging")<dependency>
<groupId>io.micronaut.aws</groupId>
<artifactId>micronaut-aws-cloudwatch-logging</artifactId>
</dependency>Then, the following beans will be created:
-
software.amazon.awssdk.services.cloudwatchlogs.CloudWatchLogsClient -
software.amazon.awssdk.services.cloudwatchlogs.CloudWatchLogsClientBuilder
And:
-
software.amazon.awssdk.services.cloudwatchlogs.CloudWatchLogsAsyncClient -
software.amazon.awssdk.services.cloudwatchlogs.CloudWatchLogsAsyncClientBuilder
The HTTP client, credentials and region will be configured as per described in the SDK v2 documentation.
7.13.1 Set CloudWatch Logging
By default, Micronaut application will try to create the group and stream for you using AWS client. To disable this behavior you have to set the createGroupAndStream flag to false inside your appender.
Default value for group name is your application name and for stream name is your hostname. If you want you can change them by setting value groupName for group name and streamName for stream name.
| Property | Type | Default value | Description |
|---|---|---|---|
|
|
Application name |
Cloudwatch Log group name |
|
|
Host name |
Cloudwatch Log stream name |
|
|
100 |
Time in ms between two batch publishing of logs |
|
|
128 |
Time maximum number of log lines that will be sent in one batch request |
|
|
128 |
The size of publishing log queue |
|
|
true |
If flag is set to true the Micronaut application will try to create group and stream on the AWS |
|
|
empty |
List of logger names that won’t be published |
7.13.2 Logback configuration
Edit a src/main/resources/logback.xml file and make it look like this:
src/main/resources/logback.xml
<configuration>

    <appender name="CLOUDWATCH" class="io.micronaut.aws.cloudwatch.logging.CloudWatchLoggingAppender">
        <!-- <blackListLoggerName>example.app.Application</blackListLoggerName> -->
        <encoder class="ch.qos.logback.core.encoder.LayoutWrappingEncoder">
            <layout class="ch.qos.logback.contrib.json.classic.JsonLayout">
                <jsonFormatter class="io.micronaut.aws.cloudwatch.logging.CloudWatchJsonFormatter" />
            </layout>
        </encoder>
        <!-- <groupName>customGroupName</groupName> -->
        <!-- <streamName>customStreamName</streamName> -->
        <!-- <createGroupAndStream>true</createGroupAndStream> -->
    </appender>

    <root level="INFO">
        <appender-ref ref="CLOUDWATCH" />
    </root>
</configuration>
You can customize your JsonLayout with additional parameters the are available on official docs of Logback’s JsonLayout.
The CloudWatchLoggingAppender supports blacklisting the loggers by specifying the logger name. That might come handy if you want to use level=DEBUG or level=TRACE for the root logger level.
7.13.3 OpenTelemetry and logging
If you are using the OpenTelemetry for tracing you can include traceId and spanId fields into your logs. First you have to add next dependency into your project:
runtimeOnly("io.opentelemetry.instrumentation:opentelemetry-logback-mdc-1.0:1.16.0-alpha")<dependency>
<groupId>io.opentelemetry.instrumentation</groupId>
<artifactId>opentelemetry-logback-mdc-1.0</artifactId>
<version>1.16.0-alpha</version>
<scope>runtime</scope>
</dependency>Inside your src/main/resources/logback.xml you should add a new appender io.opentelemetry.instrumentation.logback.v1_0.OpenTelemetryAppender.
src/main/resources/logback.xml
<configuration>

    <appender name="CLOUDWATCH" class="io.micronaut.aws.cloudwatch.logging.CloudWatchLoggingAppender">
        <!-- <blackListLoggerName>example.app.Application</blackListLoggerName> -->
        <encoder class="ch.qos.logback.core.encoder.LayoutWrappingEncoder">
            <layout class="ch.qos.logback.contrib.json.classic.JsonLayout">
                <jsonFormatter class="io.micronaut.aws.cloudwatch.logging.CloudWatchJsonFormatter" />
            </layout>
        </encoder>
        <!-- <groupName>customGroupName</groupName> -->
        <!-- <streamName>customStreamName</streamName> -->
        <!-- <createGroupAndStream>true</createGroupAndStream> -->
    </appender>

    <appender name="OTEL" class="io.opentelemetry.instrumentation.logback.v1_0.OpenTelemetryAppender">
        <appender-ref ref="CLOUDWATCH" />
    </appender>

    <root level="INFO">
        <appender-ref ref="OTEL" />
    </root>
</configuration>
7.13.4 Emergency Appender
Since this appender is queuing up log messages and then writing them remotely, there are a number of situations which might result in log messages not getting remoted correctly. To address such scenarios you can configure the emergency appender to preserve those messages.
Inside your src/main/resources/logback.xml you should add a new appender, in the example it is STDOUT. Inside the CloudWatchLoggingAppender add appender-ref that points to the new crated appender.
src/main/resources/logback.xml
<configuration>
    <appender name="STDOUT" class="ch.qos.logback.core.ConsoleAppender">
        <withJansi>true</withJansi>
        <!-- encoders are assigned the type
             ch.qos.logback.classic.encoder.PatternLayoutEncoder by default -->
        <encoder>
            <pattern>%cyan(%d{HH:mm:ss.SSS}) %gray([%thread]) %highlight(%-5level) %magenta(%logger{36}) - %msg%n</pattern>
        </encoder>
    </appender>

    <appender name="CLOUDWATCH" class="io.micronaut.aws.cloudwatch.logging.CloudWatchLoggingAppender">
        <appender-ref ref="STDOUT"/>
        <!-- <blackListLoggerName>example.app.Application</blackListLoggerName> -->
        <encoder class="ch.qos.logback.core.encoder.LayoutWrappingEncoder">
            <layout class="ch.qos.logback.contrib.json.classic.JsonLayout">
                <jsonFormatter class="io.micronaut.aws.cloudwatch.logging.CloudWatchJsonFormatter" />
            </layout>
        </encoder>
        <!-- <groupName>customGroupName</groupName> -->
        <!-- <streamName>customStreamName</streamName> -->
        <!-- <createGroupAndStream>true</createGroupAndStream> -->
    </appender>

    <root level="INFO">
        <appender-ref ref="CLOUDWATCH" />
    </root>
</configuration>
7.13.5 Browsing the Logs
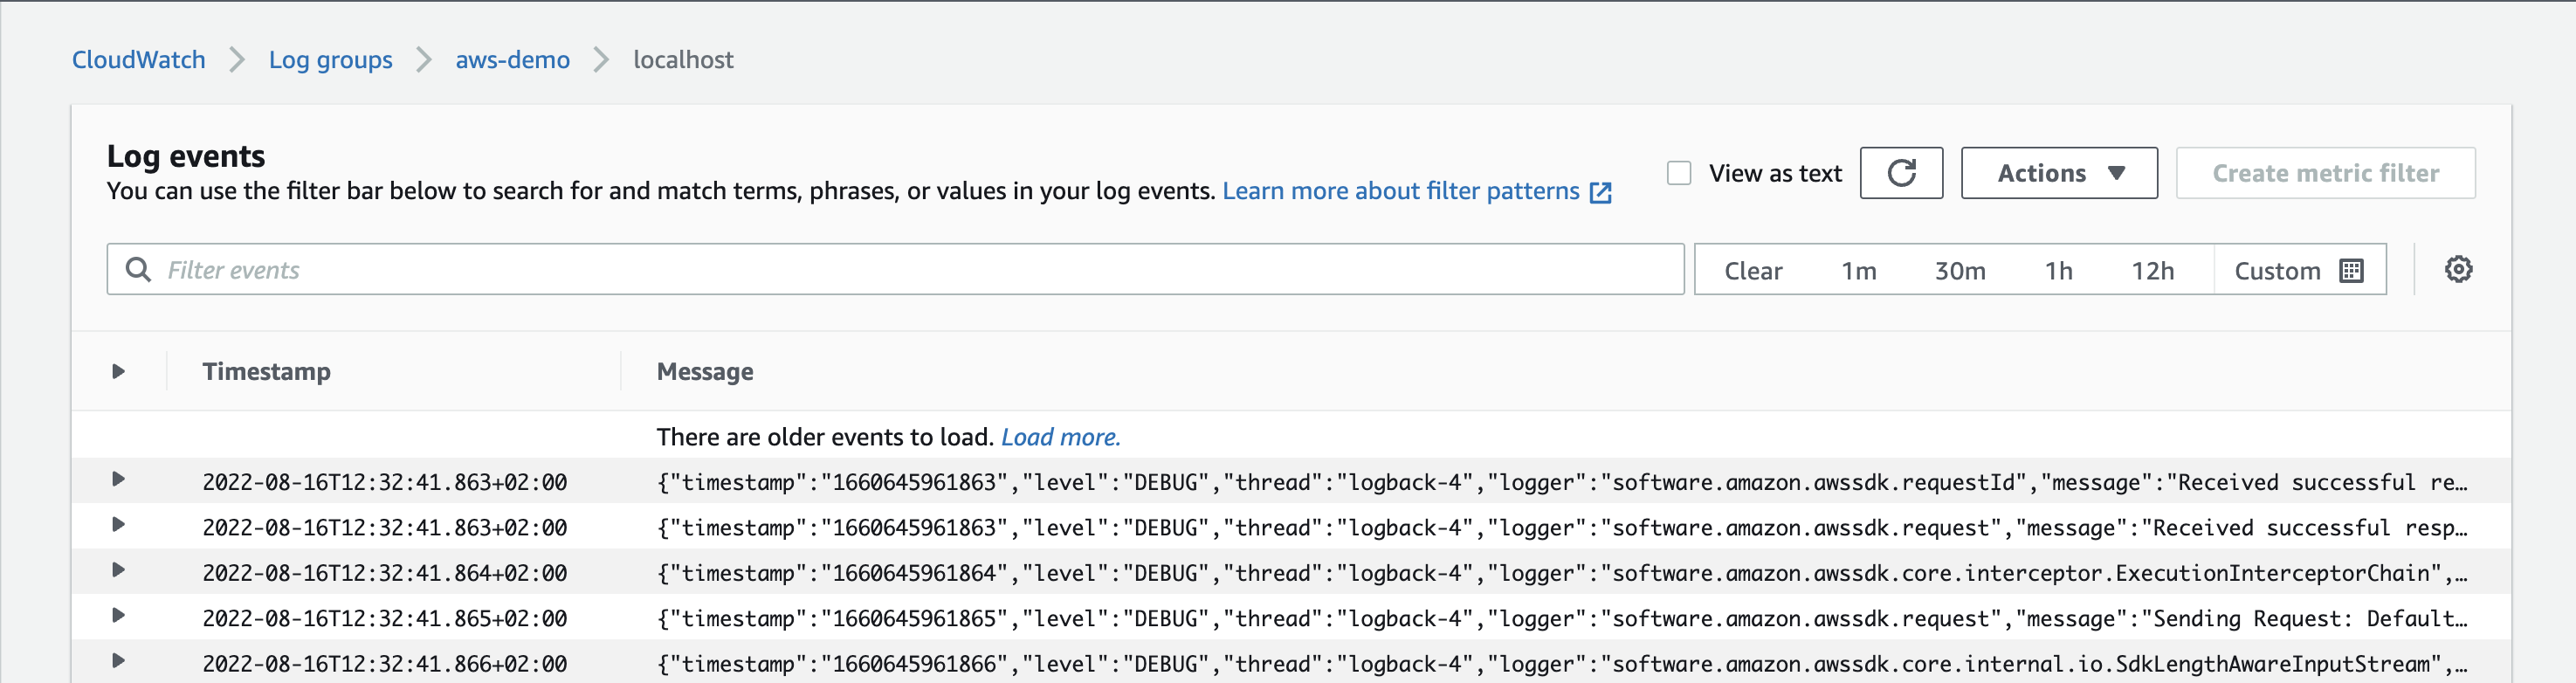
When you have completed a setup, you can browse your logs on the Cloudwatch home. In the Log groups menu and choose the group name and stream name of your application. In the "Log events" section you should be able to see your service logs.
7.14 Advanced configuration
For advanced configuration options that are not suitable to provide via application.yml, you can declare a
BeanCreatedEventListener bean that listens for builder bean creations, and apply any further customisation there:
@Singleton
public class S3ClientBuilderListener implements BeanCreatedEventListener<S3ClientBuilder> {

    @Override
    public S3ClientBuilder onCreated(BeanCreatedEvent<S3ClientBuilder> event) {
        S3ClientBuilder builder = event.getBean();
        builder.overrideConfiguration(ClientOverrideConfiguration.builder().retryPolicy(RetryMode.LEGACY).build());

        return builder;
    }
}
7.15 Other services
Since the list of services offered by AWS is huge, you can write your own client support and leverage the foundation classes that support the services supported by Micronaut.
To do so, you would create a @Factory class that would get injected some other beans to do its job.
For example, to create a client for AWS Rekognition:
@Factory
public class RekognitionClientFactory extends AwsClientFactory<RekognitionClientBuilder, RekognitionAsyncClientBuilder, RekognitionClient, RekognitionAsyncClient> {

    protected RekognitionClientFactory(AwsCredentialsProviderChain credentialsProvider, AwsRegionProviderChain regionProvider) {
        super(credentialsProvider, regionProvider);
    }

    // Sync client
    @Override
    protected RekognitionClientBuilder createSyncBuilder() { // (1)
        return RekognitionClient.builder();
    }

    @Override
    @Singleton
    public RekognitionClientBuilder syncBuilder(SdkHttpClient httpClient) { // (2)
        return super.syncBuilder(httpClient);
    }

    @Override
    @Bean(preDestroy = "close")
    public RekognitionClient syncClient(RekognitionClientBuilder builder) { // (3)
        return super.syncClient(builder);
    }

    // Async client
    @Override
    protected RekognitionAsyncClientBuilder createAsyncBuilder() { // (1)
        return RekognitionAsyncClient.builder();
    }

    @Override
    @Singleton
    @Requires(beans = SdkAsyncHttpClient.class)
    public RekognitionAsyncClientBuilder asyncBuilder(SdkAsyncHttpClient httpClient) { // (2)
        return super.asyncBuilder(httpClient);
    }

    @Override
    @Bean(preDestroy = "close")
    @Requires(beans = SdkAsyncHttpClient.class)
    public RekognitionAsyncClient asyncClient(RekognitionAsyncClientBuilder builder) { // (3)
        return super.asyncClient(builder);
    }
}| 1 | This method needs to be implemented so that the parent factory class knows how to create the builder. You may apply additional customisations to the builder here. |
| 2 | This method gives a chance to register a BeanCreaterEventListener over the builder, so that any builder can be
customised. Needs to be overriden to apply the @Singleton annotation. |
| 3 | This method builds the client. Needs to be overriden to apply the @Bean annotation. |
8 AWS Lambda Support
There are several ways to create Micronaut AWS Lambda functions.
8.1 Micronaut Application Types for AWS Lambda
In Micronaut Launch, you can select the feature aws-lambda for applications of type Application or Serverless Function. Those application types have their CLI equivalents commands.
| Application Type | CLI Command |
|---|---|
|
|
|
|
8.2 AWS Lambda Considerations
To deploy a AWS Lambda function you have to:
-
Select a runtime
-
Choose how your Lambda is triggered
-
Specify your Handler
-
Upload your code
The above decisions influence the type of Micronaut application you choose.
8.3 AWS Lambda Runtimes
To deploy a Micronaut function to AWS Lambda you have to choose a AWS Lambda Runtime. For Micronaut functions, you select a Java (8 or 11) or custom runtime. To deploy your Micronaut function as a GraalVM Native Image you need to select a custom runtime.

8.4 Application Types, Lambda Runtimes, Dependencies
Depending on your application type and runtime, you need different dependencies:
| Application Type | AWS Lambda Runtime | ArtifactId |
|---|---|---|
Application |
Java 8/11 |
|
Application |
GraalVM Native Image in a AWS Lambda Custom Runtime |
micronaut-function-aws-api-proxy, micronaut-function-aws-custom-runtime |
Serverless Function |
Java 8/ 11 |
|
Serverless Function |
GraalVM Native Image in a AWS Lambda Custom Runtime |
micronaut-function-aws, micronaut-function-aws-custom-runtime |
micronaut-function-aws-api-proxy has a transitive dependency to micronaut-function-aws.
micronaut-function-aws-api-proxy supports only Payload format version 1.0.
|
The previous set of artifacts have a group id of io.micronaut.aws.
Micronaut CLI or Launch will include the necessary dependencies when you select the aws-lambda feature or both aws-lambda and graalvm features.
8.5 Lambda Triggers
AWS Lambda integrates with other AWS services to invoke functions. The Micronaut application type you select depends on the triggers you want to support. To respond to incoming HTTP requests (e.g. AWS Lambda Proxy integrations in API Gateway) you can choose either Application or Serverless Function. For other triggers, such as consuming events from a queue, or run on a schedule you will choose Serverless Function.
| Application Type | Trigger type |
|---|---|
|
HTTP requests to a single endpoint |
|
HTTP requests to multiple endpoints |
|
S3 events, events for a queue, schedule triggers etc. |
On the one hand, if you need to support a single endpoint a Serverless Function gives you a function with less code (which translates to a faster cold startup).
On the other hand, functions written as an application of type Application allows you to code with a more familiar paradigm - Classes annotated with @Controller. That it is possible because, through the micronaut-function-aws-api-proxy dependency, Micronaut integrates with the AWS Serverless Java Container project.
micronaut-function-aws-api-proxy supports only Payload format version 1.0.
|
8.6 Lambda Context
Lambda Context is registered as a singleton each time the handler gets invoked. You can inject it by using:
-
@Any BeanProvider<com.amazonaws.services.lambda.runtime.Context> context
If present in the Lambda Context, the following singletons are registered, and you can inject them:
-
@Any BeanProvider<CognitoIdentity> context -
@Any BeanProvider<ClientContext> context -
@Any BeanProvider<LambdaLogger> context
8.7 Lambda Handlers
Your Lambda function’s handler is the method in your function code that processes events. When your function is invoked, Lambda runs the handler method. When the handler exits or returns a response, it becomes available to handle another event.
The aws-lambda-java-core library defines two interfaces for handler methods. When coding your functions with Micronaut you don’t implement those interfaces directly. Instead you extend or use its Micronaut equivalents:
| Application Type | AWS Handler Interface | Micronaut Handler Class |
|---|---|---|
Serverless Function |
||
Serverless Function |
||
Application |
|
For functions of type Application, use the handler MicronautLambdaHandler.
To resolve that class you need to add the micronaut-function-aws-api-proxy dependency to your build.
implementation("io.micronaut:micronaut-function-aws-api-proxy")<dependency>
<groupId>io.micronaut</groupId>
<artifactId>micronaut-function-aws-api-proxy</artifactId>
</dependency>
micronaut-function-aws-api-proxy supports only Payload format version 1.0.
|
For Serverless Functions the decision to use one MicronautRequestHandler or MicronautRequestStreamHandler depends on how you want to handle the input and output types.
To resolve those classes you need to add the micronaut-function-aws dependency to your build.
implementation("io.micronaut:micronaut-function-aws")<dependency>
<groupId>io.micronaut</groupId>
<artifactId>micronaut-function-aws</artifactId>
</dependency>With MicronautRequestHandler, it is expected that you supply generic types with the input and the output types. If you wish to work with raw streams then subclass MicronautRequestStreamHandler instead.
| Input / Output Types | Handler |
|---|---|
Supply Generic types with the input and Output |
Class which extends MicronautRequestHandler |
Raw streams |
8.8 AfterExecutionEvent
AWS Lambda runtime will reuse the instances of your handler classes but the Java Virtual Machine will be suspended between the invocation. Every call on a single instance of your handler will reuse the same application context. If you need to perform actions before the JVM gets suspended then you can create synchronous handler for AfterExecutionEvent event which is published right before the execution of the method handleRequest in MicronautRequestHandler and MicronautRequestStreamHandler is finished.
To subscribe to AfterExecutionEvent create a @Singleton class which implements ApplicationEventListener<AfterExecutionEvent>. Learn more about Context Events.
8.9 Cold Startups
Instances of Lambda functions are automatically added as request concurrency increases. When a new instance handles its first request it has to start the JVM and load your code, this one time process is called a cold start. The request is then processed, and the instance stays alive to be reused for subsequent requests. Lambda instances can be replaced over time and there is no way to determine how long a Lambda instance will live for.
Lambda function executions have different phases (Initialization, Invocation…).
During the initialization phase:
-
AWS Lambda starts a JVM.
-
Java runtime loads and initializes handler class.
The intialization phase has access to more CPU, because of that Micronaut starts the application context and eagerly inits singletons during the intialization of the handler class.
8.10 GraalVM and AWS Custom runtimes
GraalVM is a universal virtual machine which allows to compile Java programs to native executables.
The introduction of AWS Lambda custom runtimes enables cold startup improvements for Java applications running in AWS Lambda.
A runtime is a program that runs a Lambda function’s handler method when the function is invoked. You can include a runtime in your function’s deployment package in the form of an executable file named bootstrap
Micronaut’s dependency micronaut-function-aws-custom-runtime eases the creation of AWS Lambda Custom runtime to execute a Micronaut function.
The main API you will interact with is AbstractMicronautLambdaRuntime. An abstract class which you can extend to create your custom runtime mainClass. That class includes the necessary code to perform the Processing Tasks described in the Custom Runtime documentation.
When you generate a project with Micronaut CLI or Micronaut Launch with aws-lambda and graalvm features, the output includes the necessary files to generate a ZIP file to distribute your functions as a GraalVM Native Image executed from a AWS Lambda custom runtime.
8.11 MDC Logging
micronaut-function-aws adds SLF4J Mapping Diagnostic Context Key/Value pairs for:
| MDC Key | Description |
|---|---|
AWSRequestId |
The AWS request ID associated with the request. |
AWSFunctionName |
The name of the function being executed. |
AWSFunctionVersion |
The version of the function being executed. |
AWSFunctionArn |
The function Arn of the resource being invoked. |
AWSFunctionMemoryLimit |
The memory size configured for the Lambda function |
AWSFunctionRemainingTime |
The time remaining for this execution in milliseconds |
AWS-XRAY-TRACE-ID |
Amazon XRay trace id. |
You can use those MDC Keys in a logging pattern:
<configuration>
    <appender name="STDOUT" class="ch.qos.logback.core.ConsoleAppender">
        <withJansi>false</withJansi>
        <encoder>
            <pattern>%d{yyyy-MM-dd HH:mm:ss} %X{AWSRequestId} %X{AWSFunctionVersion}  %X{AWS-XRAY-TRACE-ID} %-5p %c{1} - %m%n</pattern>
        </encoder>
    </appender>
    <root level="info">
        <appender-ref ref="STDOUT" />
    </root>
    <logger name="groovycalamari.bots.l337" level="TRACE"/>
</configuration>
Override MicronautRequestHandler populateMappingDiagnosticContextValues or populateMappingDiagnosticContextWithXrayTraceId methods to adjust the functionality to your needs.
8.12 Micronaut AWS Lambda Tutorials
Check the step-by-step tutorials to get you started:
| Application Type | Runtime | Tutorial |
|---|---|---|
Application |
Java 11 |
Deploy a Micronaut application to AWS Lambda Java 11 Runtime |
Serverless Function |
Java 11 |
Deploy a Serverless Micronaut function to AWS Lambda Java 11 Runtime |
Application |
GraalVM Native Image in Custom Runtime |
Deploy a Micronaut application as a GraalVM Native Image to AWS Lambda |
Serverless Function |
GraalVM Native Image in Custom Runtime |
Deploy a Micronaut function as a GraalVM Native Image to AWS Lambda |
Serverless Function |
Java 11 |
|
Serverless Function |
Java 11 |
8.13 Testing Lambda Handlers
To test Lambda handlers with JUnit 5, use the MicronautLambdaTest
annotation which will configure a suitable ApplicationContext for use in a Lambda environment. The following
dependency is needed:
testImplementation("io.micronaut.aws:micronaut-function-aws-test")<dependency>
<groupId>io.micronaut.aws</groupId>
<artifactId>micronaut-function-aws-test</artifactId>
<scope>test</scope>
</dependency>Testing subclasses of MicronautRequestHandler or MicronautRequestStreamHandler with this annotation requires
both a no-arg and a one-arg constructor, the latter being used to inject the test application context:
public class SampleRequestHandler extends MicronautRequestHandler<String, String> {
    // Used in AWS
    public SampleRequestHandler() {
    }

    // Used in tests
    public SampleRequestHandler(ApplicationContext applicationContext) {
        super(applicationContext);
    }

    @Override
    public String execute(String input) {
        return null;
    }
}
Example usage:
import io.micronaut.context.ApplicationContext;
import io.micronaut.function.aws.test.annotation.MicronautLambdaTest;
import org.junit.jupiter.api.Test;

import jakarta.inject.Inject;

@MicronautLambdaTest
public class RequestHandlerTest {
    @Inject
    private ApplicationContext context;

    @Test
    void testHandler() {
        SampleRequestHandler sampleRequestHandler = new SampleRequestHandler(context);
        // ...
    }
}
The annotation supports the same options as @MicronautTest. Please note that regardless of whether or not you provide
a custom builder, some Lambda-specific configuration will be set (e.g. eager initialization and active environments).
8.14 Object Mapper Configuration
By default, for efficiency reasons, Micronaut uses the default Jackson ObjectMapper to communicate with the AWS API proxy. However, if you have configured it for your application (for example, setting jackson.propertyNamingStrategy: SNAKE_CASE)
in a way that it would be incompatible with the API proxy, you can set aws.proxy.shared-object-mapper: false, and Micronaut will create a brand new ObjectMapper for the API proxy.
If you wish to further configure this ObjectMapper, you can register a BeanCreatedEventListener<ObjectMapper> and filter based on event.getBeanDefinition() having an annotation like @Named("aws").
8.15 MicronautRequestStreamHandler
Use MicronautRequestStreamHandler in combination of a class annotated with @FunctionBean which implements one of the interfaces from the java.util.function package.
| Interface | Dependency |
|---|---|
Accepts no arguments and returns a single result |
|
Accepts a single argument and returns no result |
|
Accepts two arguments and returns no result |
|
Accepts a single argument and returns a single result |
|
Accepts two arguments and returns a single result |
For example, you can have a @FunctionBean which logs the input event.
import io.micronaut.function.FunctionBean;
import org.slf4j.Logger;
import org.slf4j.LoggerFactory;
import java.util.function.Consumer;

@FunctionBean("eventlogger")
public class EventLogger implements Consumer<String> {
    private static final Logger LOG = LoggerFactory.getLogger(EventLogger.class);
    @Override
    public void accept(String input) {
        LOG.info("Received: {}", input);
    }
}
import groovy.transform.CompileStatic
import io.micronaut.function.FunctionBean
import org.slf4j.Logger
import org.slf4j.LoggerFactory
import java.util.function.Consumer
@CompileStatic
@FunctionBean('eventlogger')
class EventLogger implements Consumer<String> {
private static final Logger LOG = LoggerFactory.getLogger(EventLogger.class)
@Override
void accept(String input) {
LOG.info("Received: {}", input)
}
}import io.micronaut.function.FunctionBean
import org.slf4j.LoggerFactory
import java.util.function.Consumer
@FunctionBean("eventlogger")
class EventLogger : Consumer<String> {
override fun accept(input: String) {
LOG.info("Received: {}", input)
}
companion object {
private val LOG = LoggerFactory.getLogger(EventLogger::class.java)
}
}A single project can define multiple functions, however only a single function should be configured for execution by the application.
By default, it is resolved via the property micronaut.function.name. If not present, the function name present in the Lambda Context, the name of the function on the AWS Console, is used.
Alternatively, you can write a custom Handler which extends MicronautRequestStreamHandler and overrides MicronautRequestStreamHandler::resolveFunctionName(Environment)
import io.micronaut.context.env.Environment;
import io.micronaut.core.annotation.Introspected;
import io.micronaut.function.aws.MicronautRequestStreamHandler;

@Introspected
public class Handler extends MicronautRequestStreamHandler {
    @Override
    protected String resolveFunctionName(Environment env) {
        return "eventlogger";
    }
}
import io.micronaut.context.env.Environment
import io.micronaut.core.annotation.Introspected
import io.micronaut.function.aws.MicronautRequestStreamHandler
@Introspected
class Handler extends MicronautRequestStreamHandler {
@Override
protected String resolveFunctionName(Environment env) {
'eventlogger'
}
}import io.micronaut.context.env.Environment
import io.micronaut.function.aws.MicronautRequestStreamHandler
class Handler : MicronautRequestStreamHandler() {
override fun resolveFunctionName(env: Environment): String {
return "eventlogger"
}
}8.16 Invoke Lambda with @FunctionClient
Micronaut AWS provides support for invoking AWS Lambda functions within a Micronaut application context.
To use the features described in this section, you will need to have the micronaut-function-client-aws dependency on your classpath.
implementation("io.micronaut.aws:micronaut-function-client-aws")<dependency>
<groupId>io.micronaut.aws</groupId>
<artifactId>micronaut-function-client-aws</artifactId>
</dependency>You can define multiple named functions under the aws.lambda.functions configuration.
Each is configured by AWSInvokeRequestDefinition that allows setting any property on the underlying com.amazonaws.services.lambda.model.InvokeRequest.
For example, you invoke a function named AwsLambdaFunctionName, in the AWS Lambda console, with the following configuration:
---
aws:
  lambda:
    functions:
      analytics:
        function-name: 'AwsLambdaFunctionName'
You create an interface annotated with @FunctionClient to invoke the Lambda Function:
import io.micronaut.function.client.FunctionClient;
import jakarta.inject.Named;
@FunctionClient
public interface AnalyticsClient {

    @Named("analytics") // (1)
    String visit(String productId);
}
import io.micronaut.function.client.FunctionClient;
import jakarta.inject.Named;
@FunctionClient
interface AnalyticsClient {
@Named('analytics') // (1)
String visit(String productId);
}import io.micronaut.function.client.FunctionClient
import jakarta.inject.Named
@FunctionClient
internal interface AnalyticsClient {
@Named("analytics")
fun visit(productId: String): String
}| 1 | The value of the @Named annotation matches the bean’s name used in configuration aws.lambda.functions.analytics.function-name. |
Alternatively, you can remove the @Named annotation and match the method name to the function bean name.
import io.micronaut.function.client.FunctionClient;

@FunctionClient
public interface AnalyticsClient {
    String analytics(String productId);
}
import io.micronaut.function.client.FunctionClient;
@FunctionClient
interface AnalyticsClient {
String analytics(String productId);
}import io.micronaut.function.client.FunctionClient
@FunctionClient
internal interface AnalyticsClient {
fun analytics(productId: String): String
}To configure credentials for invoking the function you can either define a ~/.aws/credentials file or use application.yml. Micronaut registers a EnvironmentAWSCredentialsProvider that resolves AWS credentials from the Micronaut Environment.
To invoke a function Micronaut configures a AWSLambdaAsyncClient using AWSLambdaConfiguration that allows configuring any of the properties of the AWSLambdaAsyncClientBuilder class.
|
9 AWS CDK
Micronaut CDK modules simplify the creation of Lambda functions with Amazon Cloud Development Kit (CDK).
9.1 MicronautFunctionFile
MicronautFunctionFile has a fluid API to ease generating the file name of the asset.
MicronautFunctionFile.builder()
        .buildTool(BuildTool.GRADLE)
        .archiveBaseName("app")
        .graalVMNative()
        .version("0.1")
        .build();
9.2 MicronautFunction
MicronautFunction eases the selection of the correct environment and sets the handler automatically.
boolean graalVMNative = false;
Function appFunction = MicronautFunction.create(ApplicationType.DEFAULT, graalVMNative, this, id)
        .architecture(Architecture.X86_64)
        .timeout(Duration.seconds(10))
        .memorySize(512)
        .tracing(Tracing.ACTIVE)
        .code(Code.fromAsset("../app/build/libs/" + MicronautFunctionFile.builder()
                .buildTool(BuildTool.MAVEN)
                .archiveBaseName("app")
                .version("0.1")
                .build()))
        .build();
If you use ApplicationType.FUNCTION you have to provide your handler.
Function.Builder builder = MicronautFunction.create(ApplicationType.FUNCTION, false, this, id)
        .handler("com.example.Handler");
10 Alexa Support
The Micronaut’s aws-alexa module simplifies development of Alexa Skills with Java, Kotlin or Groovy.
implementation("io.micronaut.aws:micronaut-aws-alexa")<dependency>
<groupId>io.micronaut.aws</groupId>
<artifactId>micronaut-aws-alexa</artifactId>
</dependency>10.1 Alexa Skill Configuration
Typically, the next step will be to provide an instance of AlexaSkillConfiguration. The easiest way to do that is to configure the skill id via configuration:
alexa:
  skills:
    myskill:
      skill-id 'xxxx-yaaa-zz123'
10.2 Skill Builder Provider
You have to provide your an implementation of Micronaut’s SkillBuilderProvider.
Micronaut’s alexa module provides by default
StandardSkillBuilderProvider which creates an SDK instance using the Skills.standard builder. However, to use it, you need add the dependency:
implementation("com.amazon.alexa:ask-sdk:{askVersion}")<dependency>
<groupId>com.amazon.alexa</groupId>
<artifactId>ask-sdk</artifactId>
<version>{askVersion}</version>
</dependency>For each AlexaSkillConfiguration bean, Micronaut uses the builder provided by [SkillBuilderProvider to create for you a bean of type AlexaSkill for you and wires up the beans of the following types:
-
com.amazon.ask.dispatcher.request.handler.RequestHandler -
com.amazon.ask.dispatcher.request.interceptor.RequestInterceptor -
com.amazon.ask.dispatcher.request.interceptor.ResponseInterceptor -
com.amazon.ask.dispatcher.exception.ExceptionHandler -
com.amazon.ask.builder.SkillBuilder
10.3 Handlers
To create the sample skill described in Amazon Documentation - Develop your first skill with Micronaut’s Alexa you will write the same LaunchRequestHandler, HelloWorldIntent, HelpIntent, CancelandStopHandler, FallbackIntentHandler, SessionEndedRequestHandler handlers.
You will do just one change, you will annotate those handlers with jakarta.inject.Singleton.
import com.amazon.ask.dispatcher.request.handler.HandlerInput;
import com.amazon.ask.dispatcher.request.handler.RequestHandler;
import com.amazon.ask.model.Response;
import com.amazon.ask.request.Predicates;

import jakarta.inject.Singleton;
import java.util.Optional;

@Singleton (1)
public class HelloWorldIntentHandler implements RequestHandler {

    @Override
    public boolean canHandle(HandlerInput input) {
        return input.matches(Predicates.intentName("HelloWorldIntent"));
    }

    @Override
    public Optional<Response> handle(HandlerInput input) {
        String speechText = "Hello world";
        return input.getResponseBuilder()
                .withSpeech(speechText)
                .withSimpleCard("HelloWorld", speechText)
                .build();
    }

}| 1 | The Singleton scope indicates only one instance of the bean should exist in the Micronaut’s Bean Context |
10.4 Alexa Skill as an AWS Lambda Function
The micronaut-function-aws-alexa module includes support for building deploying an Alexa Skill as a Lambda Function.
implementation("io.micronaut.aws:micronaut-function-aws-alexa")<dependency>
<groupId>io.micronaut.aws</groupId>
<artifactId>micronaut-function-aws-alexa</artifactId>
</dependency>As handler specify io.micronaut.function.aws.alexa.AlexaFunction. You don’t need to create a class which extends SkillStreamHandler, AlexaFunction takes care of adding request handlers interceptors etc.
10.5 Alexa Skill as a Web Service
Micronaut simplifies hosting a Custom Skill as a Web Service.
The micronaut-aws-webservice is a fork of Amazon Servlet module. It allow you to run your Alexa Skill backend logic in Micronaut applications deployed with a netty or servlet runtimes.
Just by including the dependency:
implementation("io.micronaut.aws:micronaut-aws-alexa-httpserver")<dependency>
<groupId>io.micronaut.aws</groupId>
<artifactId>micronaut-aws-alexa-httpserver</artifactId>
</dependency>you get an POST endpoint at /alexa (the route is configurable via alexa.endpoint.path.
You can configure your Skill’s endpoint under Build/Endpoint in the Alexa developer console.
10.6 SSML Builder
Micronaut Alexa ships with a Speech Systhesys Markup Language builder.
new Ssml().speak(new Ssml("Welcome to Ride Hailer. ").audio('soundbank://soundlibrary/transportation/amzn_sfx_car_accelerate_01').build()).build() == '<speak>Welcome to Ride Hailer. <audio src="soundbank://soundlibrary/transportation/amzn_sfx_car_accelerate_01"/></speak>'10.7 Flash Briefings
Micronaut’s eases the creation of Flash Briefing Skills.
You can create a flash briefing skill to provide Alexa customers with news headlines and other short content. Typically a flash briefing becomes a part of a customer’s daily routine.
Your application must expose an endpoint which returns a JSON Array of FlashBriefingItem
package io.micronaut.aws.alexa.flashbriefing;

import io.micronaut.http.annotation.Controller;
import io.micronaut.http.annotation.Get;

import javax.validation.Validator;
import java.util.List;
import java.util.stream.Collectors;

@Controller("/news")
public class FlashBriefingsController {

    private final Validator validator;
    private final FlashBriefingRepository flashBriefingRepository;

    public FlashBriefingsController(Validator validator,
                                    FlashBriefingRepository flashBriefingRepository) {
        this.validator = validator;
        this.flashBriefingRepository = flashBriefingRepository;
    }

    @Get // (1)
    public List<FlashBriefingItem> index() {
        return flashBriefingRepository.find()
                .stream()
                .filter(item -> validator.validate(item).isEmpty()) // (2)
                .sorted() // (3)
                .limit(5) // (4)
                .collect(Collectors.toList());
    }

}| 1 | By default, Micronaut sets the response HTTP Header Content-Type with the value application-json. |
| 2 | Flash Briefing Feed items must be valid according to Flash Briefing Skill API Feed Reference constraints. |
| 3 | Items should be provided in order from newest to oldest, based on the date value for the item. Alexa may ignore older items. |
| 4 | Flash Briefing Skill API Feed Reference instructs to provide between 1 and 5 unique items at a time. |
11 Distributed Configuration
Micronaut AWS supports distributed configuration via services such as AWS Secrets Manager and AWS System Manager Parameter Store.
You can create environment-specific configurations as well by including the environment name after an underscore _. For example if micronaut.application.name is set to helloworld, specifying configuration values under helloworld_test will be applied only to the test environment.
| Precedence | Directory | Description |
|---|---|---|
🔝 |
|
Configuration shared by all applications |
🔝🔝 |
|
Application-specific configuration, example |
🔝🔝🔝 |
|
Configuration shared by all applications for the |
🔝🔝🔝🔝 |
|
Application-specific configuration for an active Environment |
For example, if the configuration name /config/application_test/server.url is configured in AWS Parameter Store, any application connecting to that parameter store can retrieve the value using server.url. If the application has micronaut.application.name configured to be myapp, a value with the name /config/myapp_test/server.url overrides the value just for that application.
| Property | Type | Description |
|---|---|---|
|
boolean |
Search additional paths suffixed with each active environment. e.g. /config/application_ec2 Default value (true). |
|
boolean |
Whether paths for the {@link AwsDistributedConfiguration#getCommonApplicationName()} should be searched or not. Default value (true). |
|
java.lang.String |
Prefix for AWS Distributed Configuration resources names. Default ("/config/") |
|
java.lang.String |
Default Application name. Default value ("application". |
|
java.lang.String |
Delimiter for AWS Distributed Configuration resources names. Default value ("/"). |
11.1 AWS Secrets Manager
To use AWS Secrets Manager as distributed configuration include the following dependency:
implementation("io.micronaut.aws:micronaut-aws-secretsmanager")<dependency>
<groupId>io.micronaut.aws</groupId>
<artifactId>micronaut-aws-secretsmanager</artifactId>
</dependency>To enable distributed configuration, create a src/main/resources/bootstrap.yml file and enable the configuration client:
src/main/resources/bootstrap.yml
micronaut:
config-client:
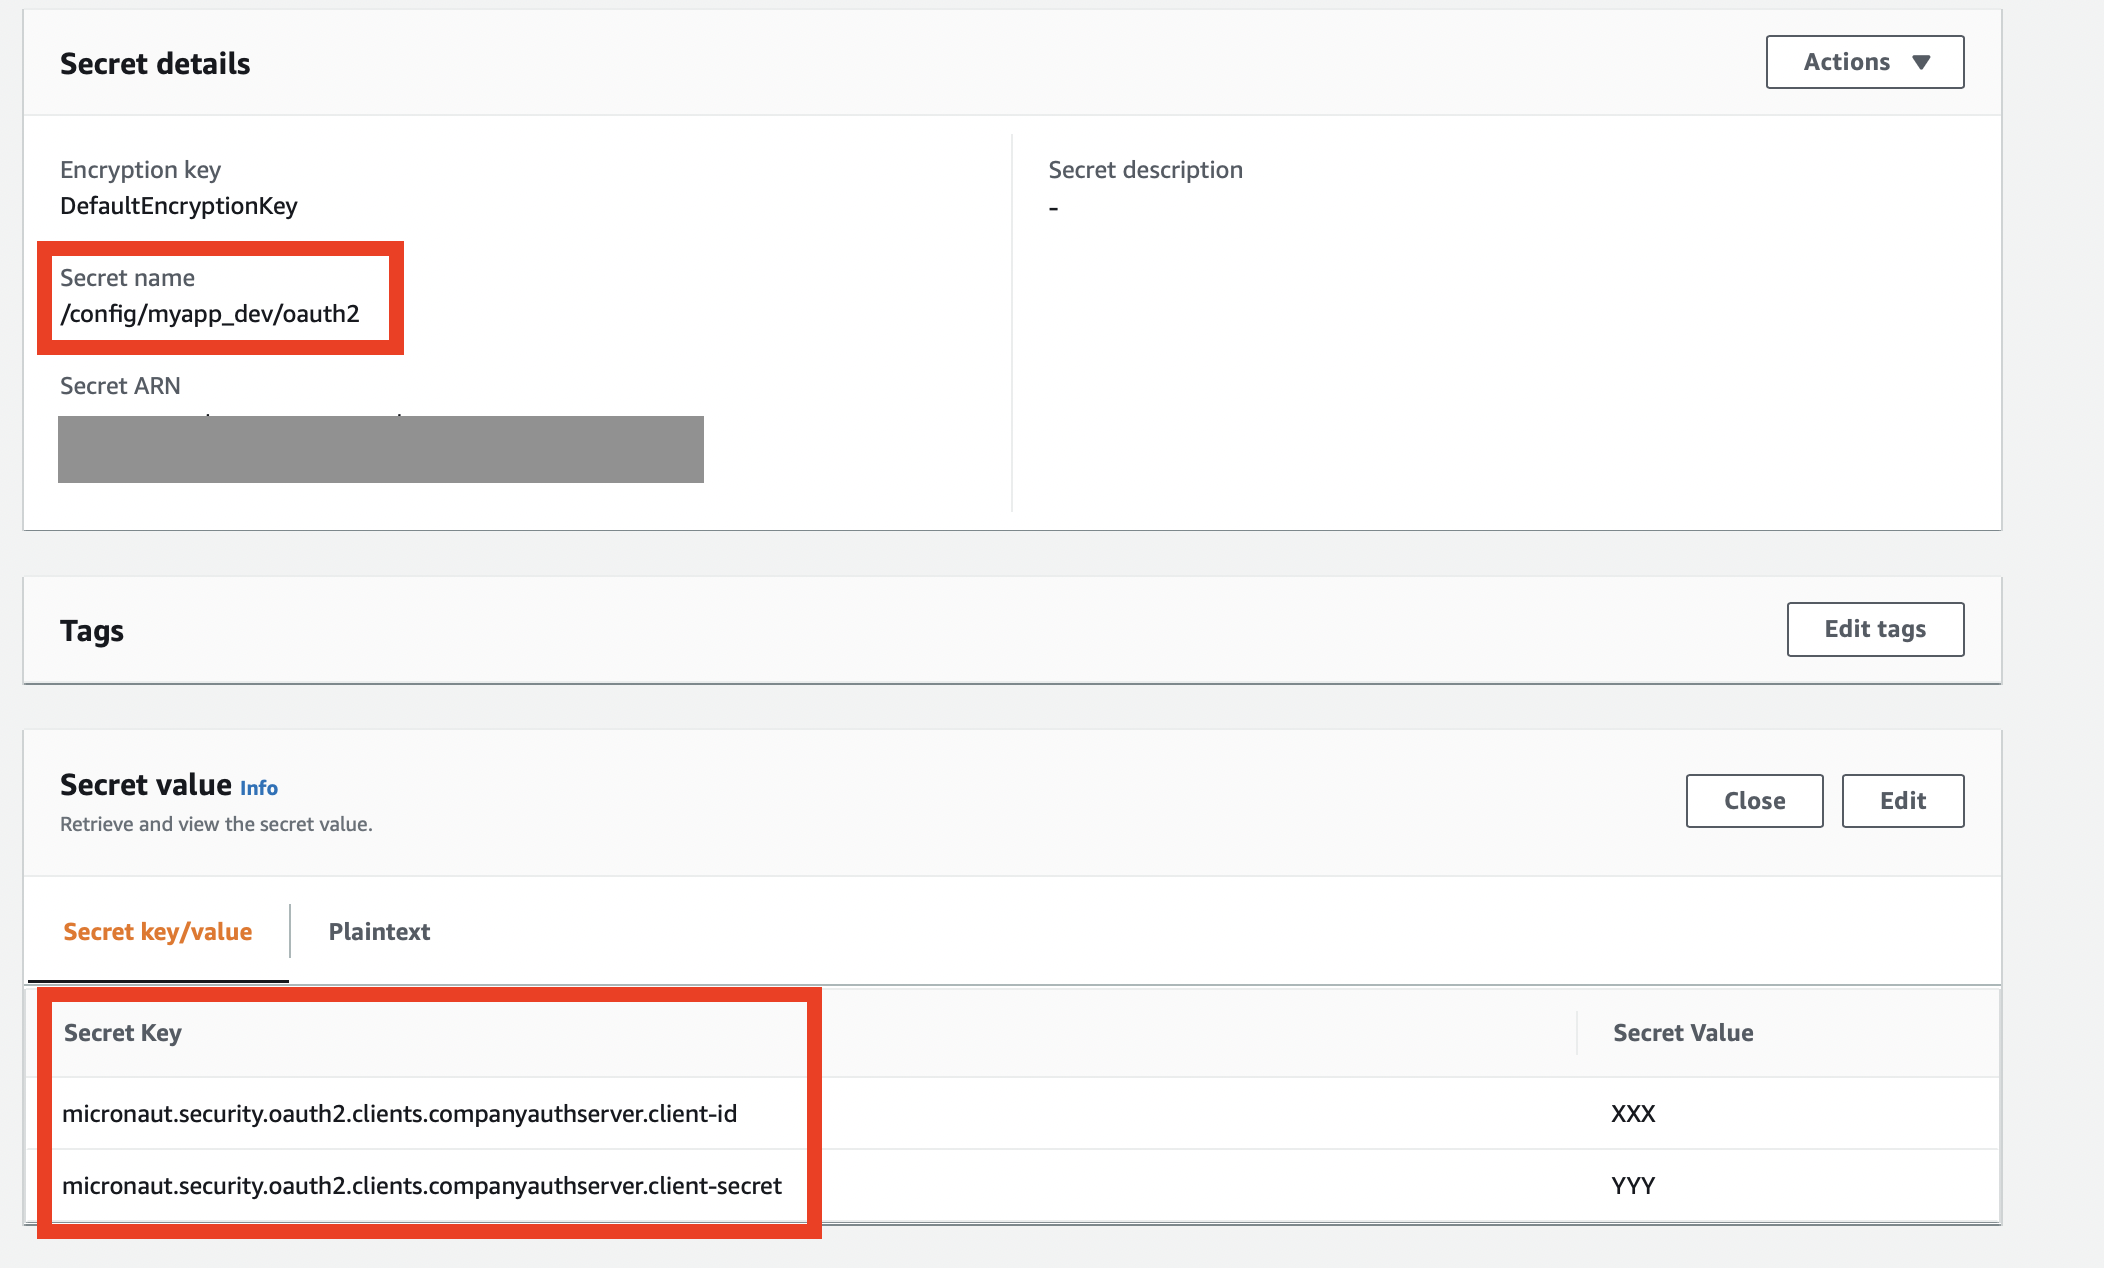
enabled: trueExample:
If you add micronaut.application.name: myapp to bootstrap.yml and you start your app in the dev Micronaut environment the secret shown in the following image is read and two properties micronaut.security.oauth2.clients.companyauthserver.client-id and micronaut.security.oauth2.clients.companyauthserver.client-secret are exposed to your application:
| Property | Type | Description |
|---|---|---|
|
boolean |
Default value (true). |
11.2 AWS System Manager Parameter Store
Micronaut supports configuration sharing via AWS System Manager Parameter Store. You need the following dependencies configured:
implementation("io.micronaut.aws:micronaut-aws-parameter-store")<dependency>
<groupId>io.micronaut.aws</groupId>
<artifactId>micronaut-aws-parameter-store</artifactId>
</dependency>To enable distributed configuration a src/main/resources/bootstrap.yml configuration file must be created and configured to use Parameter Store:
bootstrap.yml
micronaut:
  application:
    name: hello-world
  config-client:
    enabled: true
aws:
  client:
    system-manager:
      parameterstore:
        enabled: true
See the configuration reference for all configuration options.
You can configure shared properties from the AWS Console → System Manager → Parameter Store.
Micronaut uses a hierarchy to read configuration values, and supports String, StringList, and SecureString types.
Each level of the tree can be composed of key=value pairs. For multiple key/value pairs, set the type to StringList.
For special secure information, such as keys or passwords, use the type SecureString. KMS will be automatically invoked when you add and retrieve values, and will decrypt them with the default key store for your account. If you set the configuration to not use secure strings, they will be returned to you encrypted and you must manually decrypt them.
12 Repository
You can find the source code of this project in this repository:
13 Third-party libraries
If you are looking for a higher-level API, check out Agorapulse’s AWS SDK for Micronaut.